My last POTA activation was back in October of 2024 and I really wanted to get back out despite the inclement weather to wrap up a small break from work.
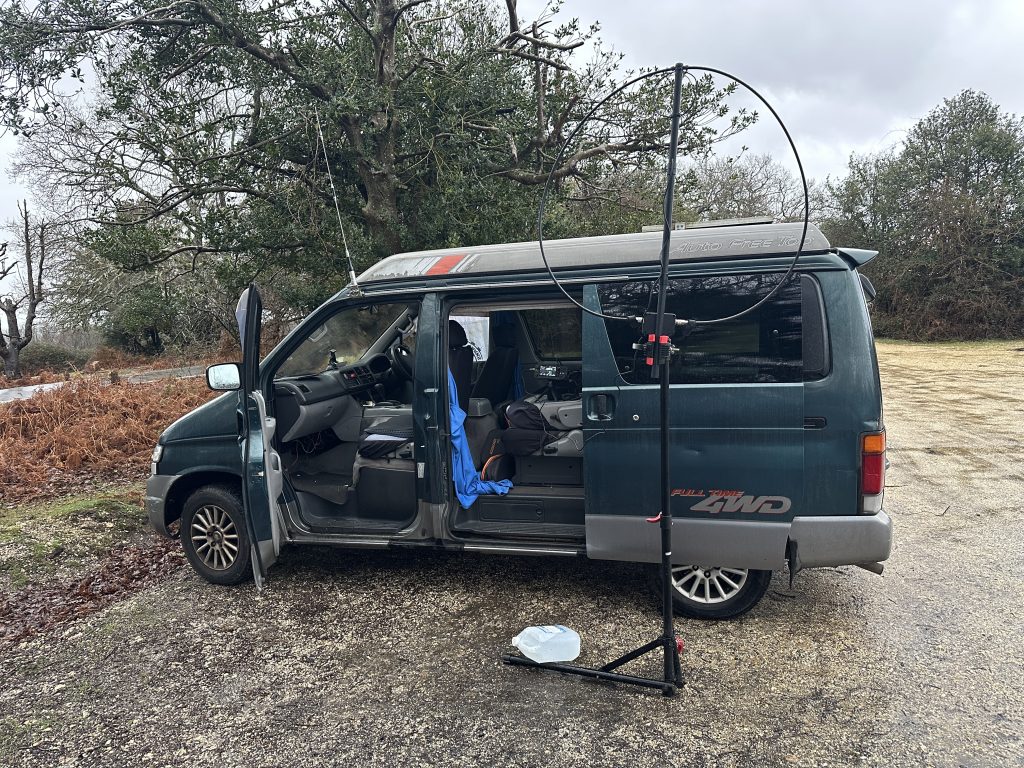
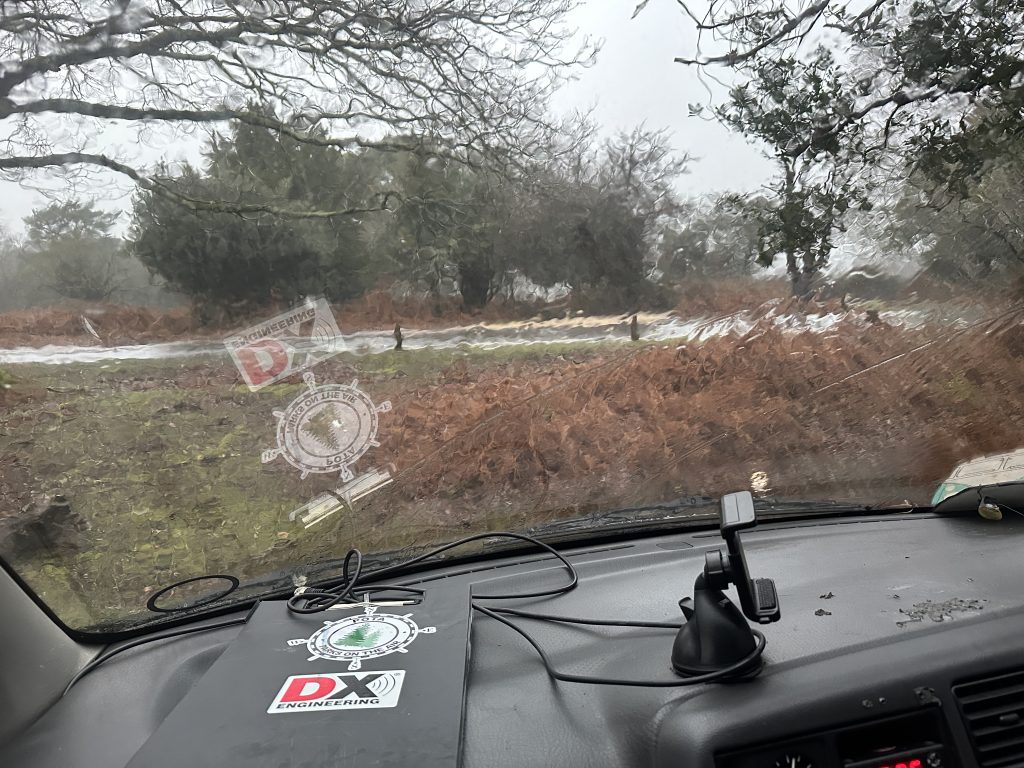
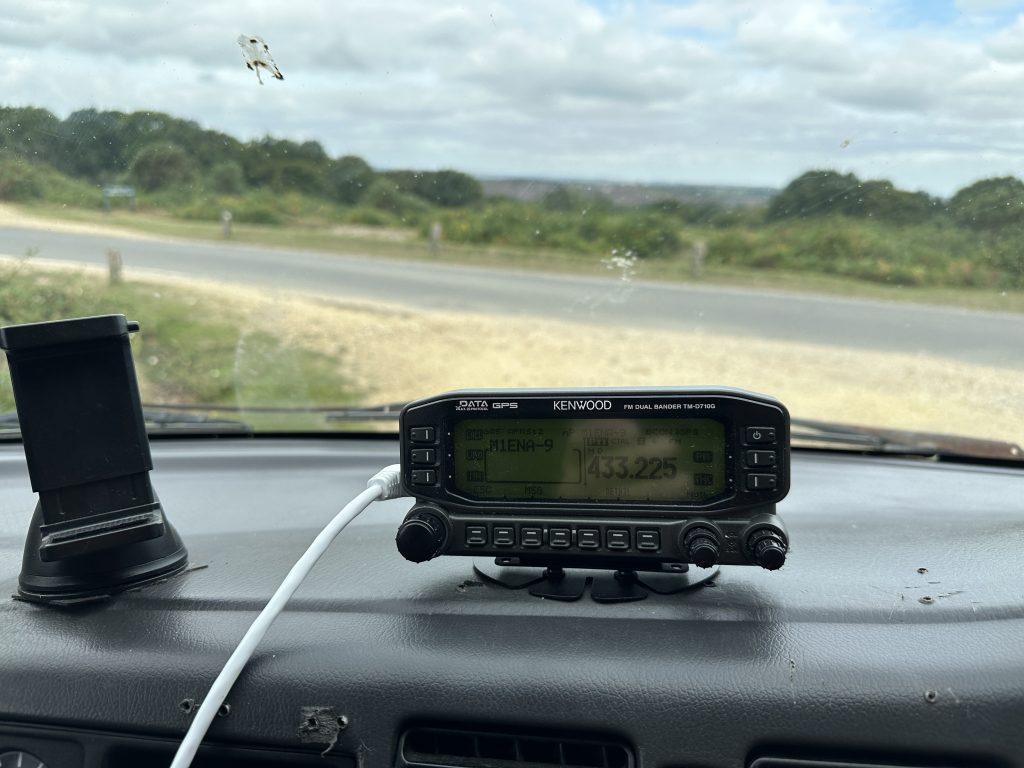
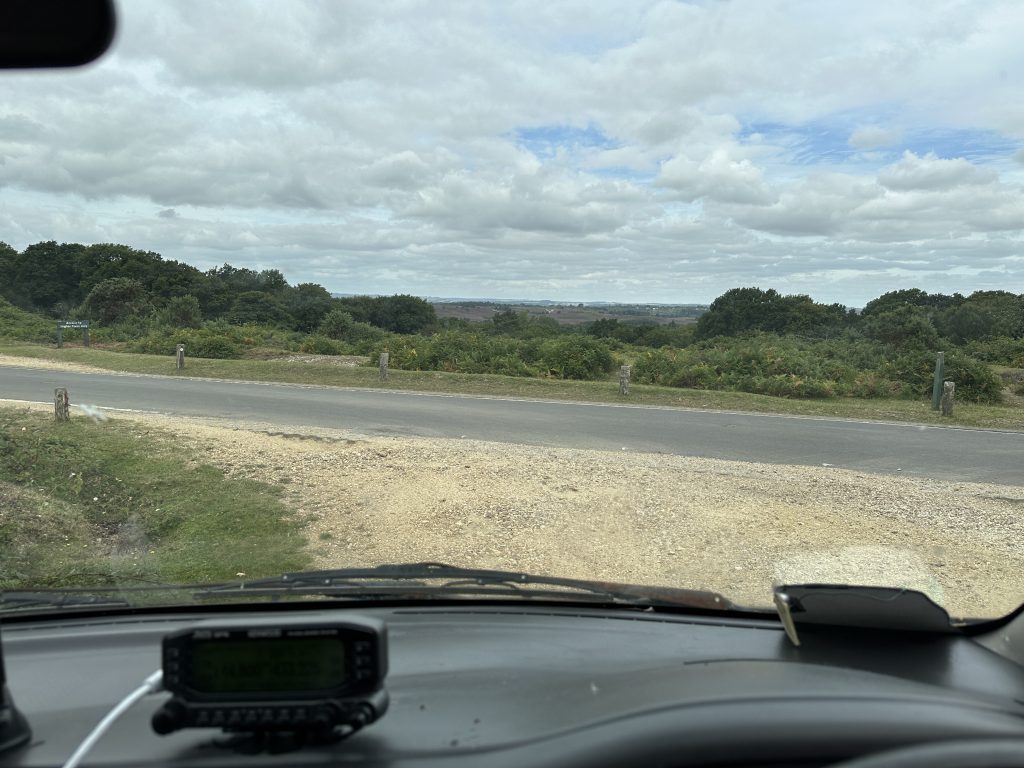
I didn’t really plan ahead of schedule my activation, I just felt like getting the radio, putting in the bag, getting into the bongo and heading back out to the New Forest, which is one of my favourite locations to do POTA from (free and ample parking this time of the year). With my bike stand which seconds as a mag-loop holder put into the trusty old mazda bongo it was time to head out !
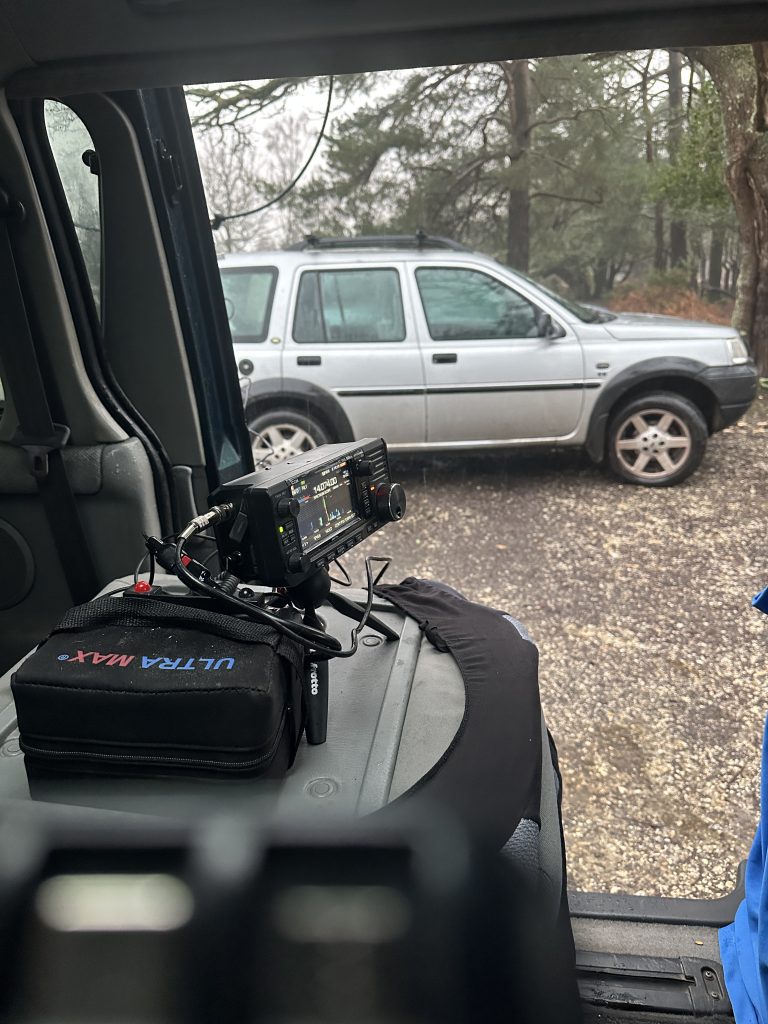
Despite not having being out in the field for quite some time, it was a quick and easy setup, even with a bit of drizzle coming down. 20m was dialled in quickly on the alex-loop and close to 1:1 SWR on the radio. I hit the bands with FT4 to start with as I like how quickly the QSO’s happen and the limited key-down time. I was not to be disappointed with 3 FT4 QSO’s in quick succession, with HG7WDL, IW1PPB and IW0RLC all in the log book. I then ventured slight down the band to FT8, all made incredibly easy with the excellent SDR-Mobile on my iPhone.
Sunny it was notbut the radio was dryas was I
It was around this time the weather really took a turn for the worst, with heavy rain really pelting down on the bongo and antenna. I done a quick check and radio and antenna was fine – cant praise the build quality of the Alexloop HamPack enough, it really is a robust piece of kit ! Being sat in the Bongo, albeit today with the side door open, kept me and the radio nice and dry – i even had time for a sausage roll ! 🙂
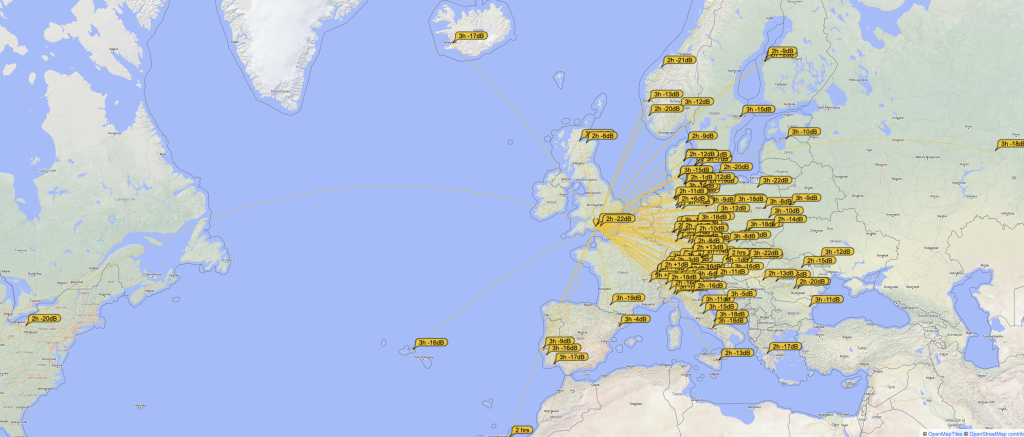
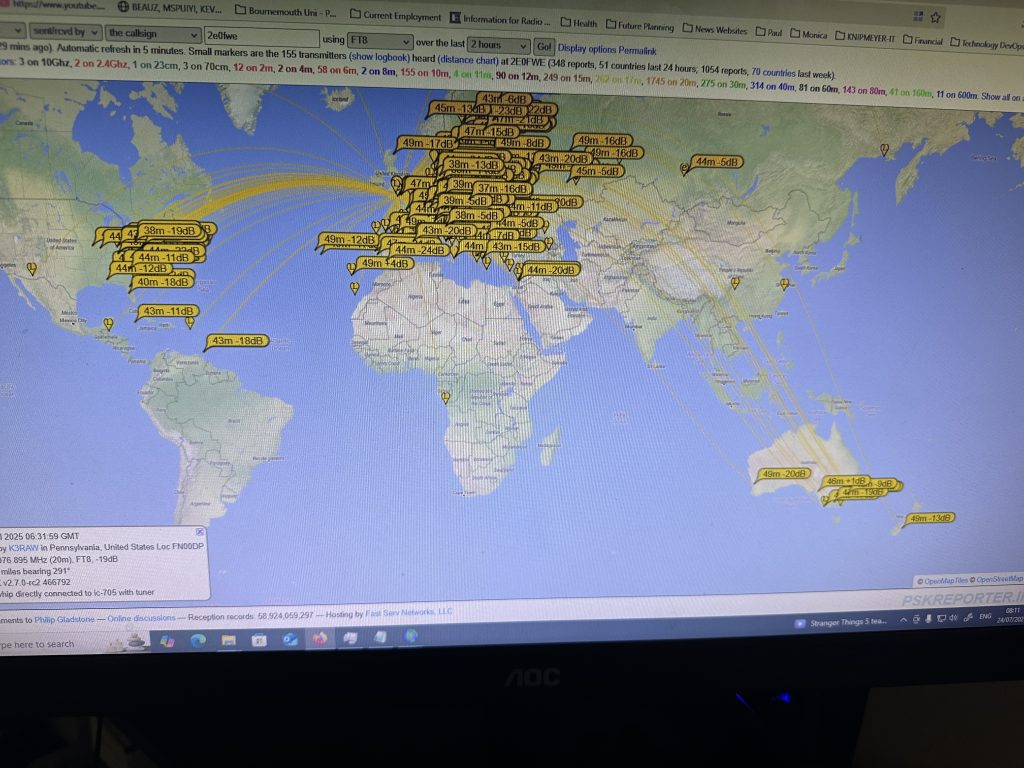
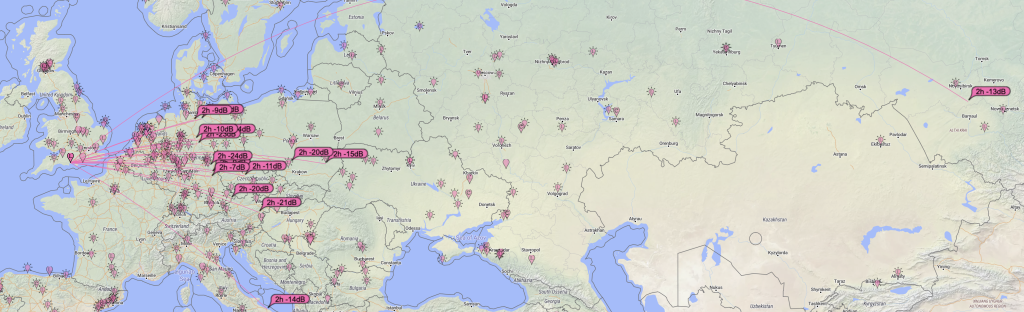
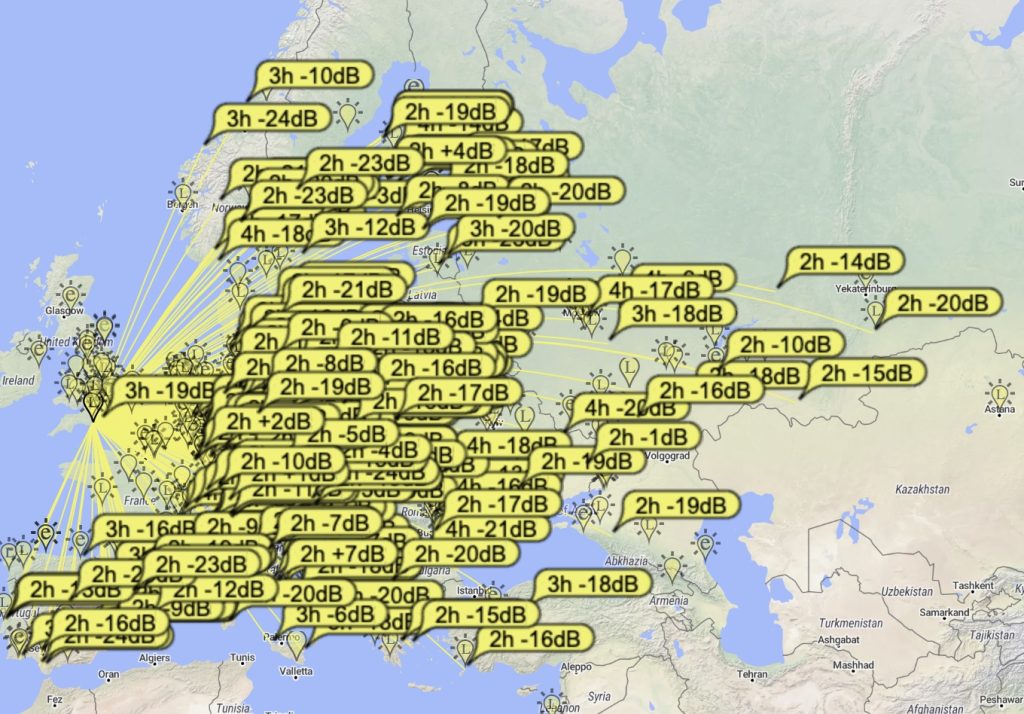
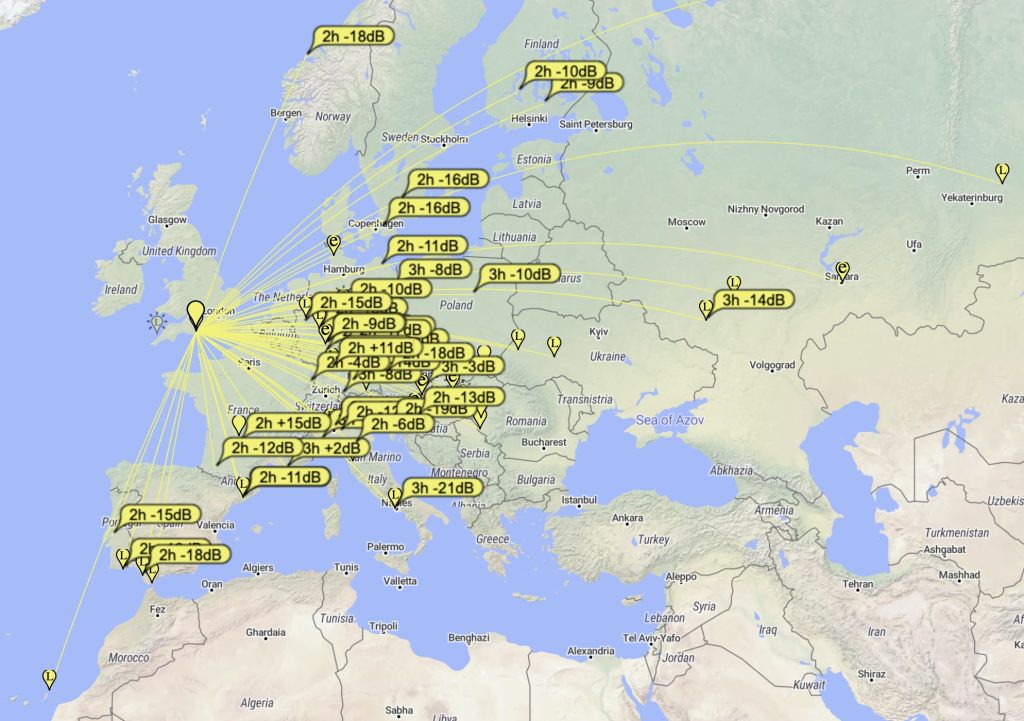
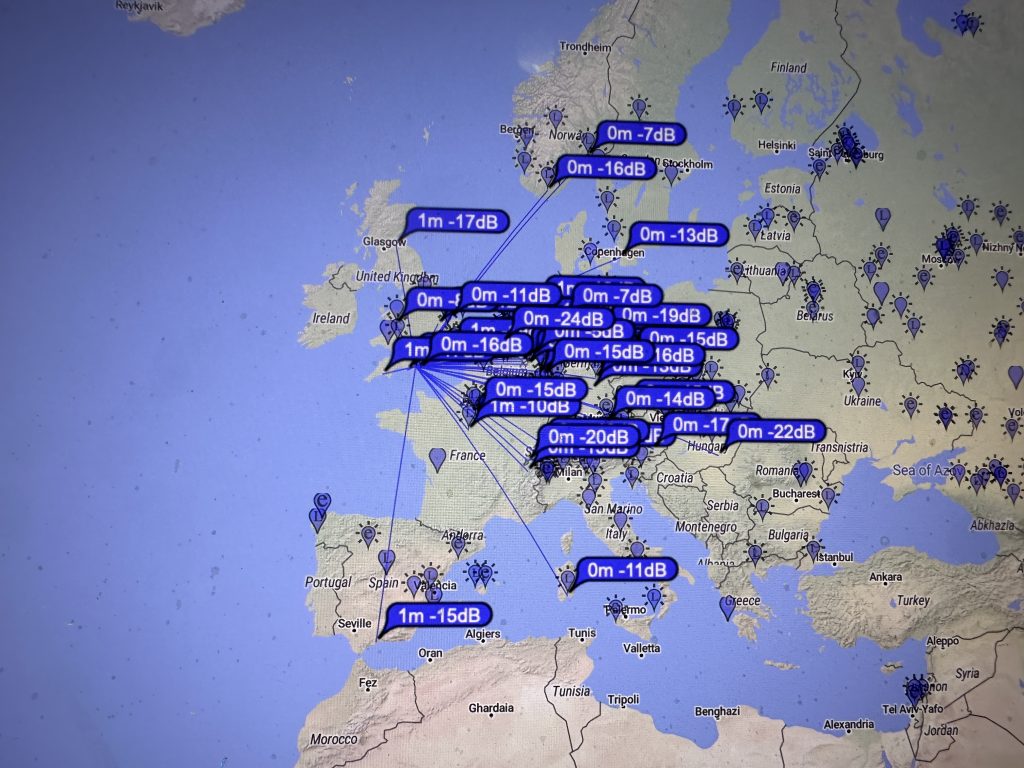
PSK Reporter back at the QTH – amazing reach on 10W
After getting back home I manually uploaded my log on the POTA website, i was really please to see 2 POTA Hunters in the log, IK1IYU and F5STL, it really makes a difference getting the log entries and knowing I have also helped someone else Hunter awards.
It was a really great, albeit shorter activation, but I thoroughly enjoyed the location, the drive to and from it and then making some great contacts. I’m determined to get out much more now even tho i have a busy professional and academic schedule, its really done me a world of good to get back out and get on the air.
Until next time, 73 and thanks for reading the blog !
So without seems a blink, June and July passed so quickly I only realized that I’ve not really posted an update on the ham radio blog ! Still it gives me plenty to update about.
Beyond QRP with the IC-705
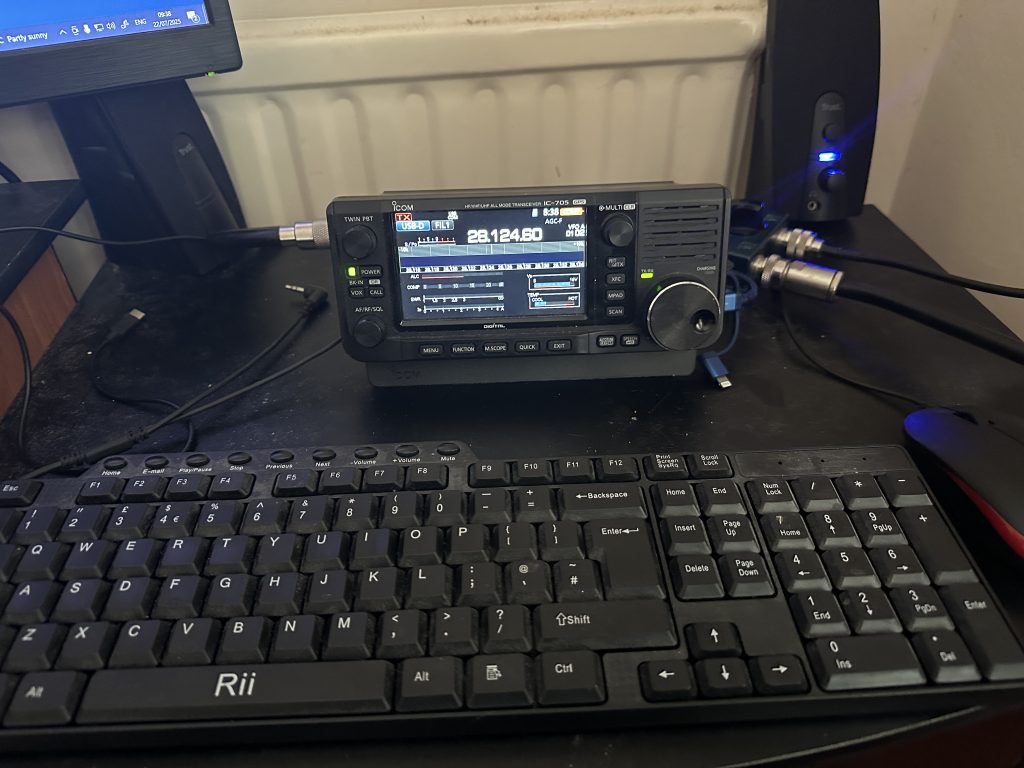
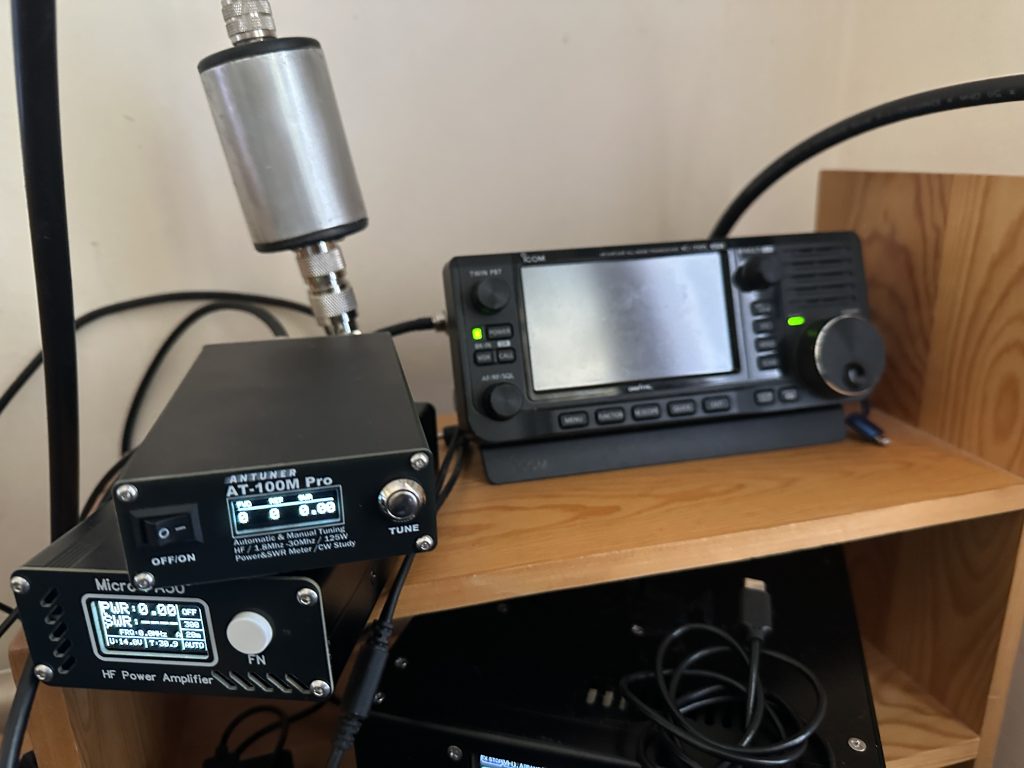
I’ve been using the IC-705 at home since last December, I’ve not been out with it since last October due to work and study commitments, but I’m sure that will change soon. With more operating from QTH I decided to go beyond the 10W the 705 puts out. Having seen as many favourable reviews of the MicroPA+ and as many unfavourable ones, I decided that it had progressed to a point that the favourable reviews and recent software updates had stabilized the issues seen in earlier versions.
Having also used a ‘tripod’ stand that I used in the field, this can be slightly ‘wobbly’ on the desk. A simple, but elegant looking mount mand the 705 ‘firm’ to the touch and looking tidy.
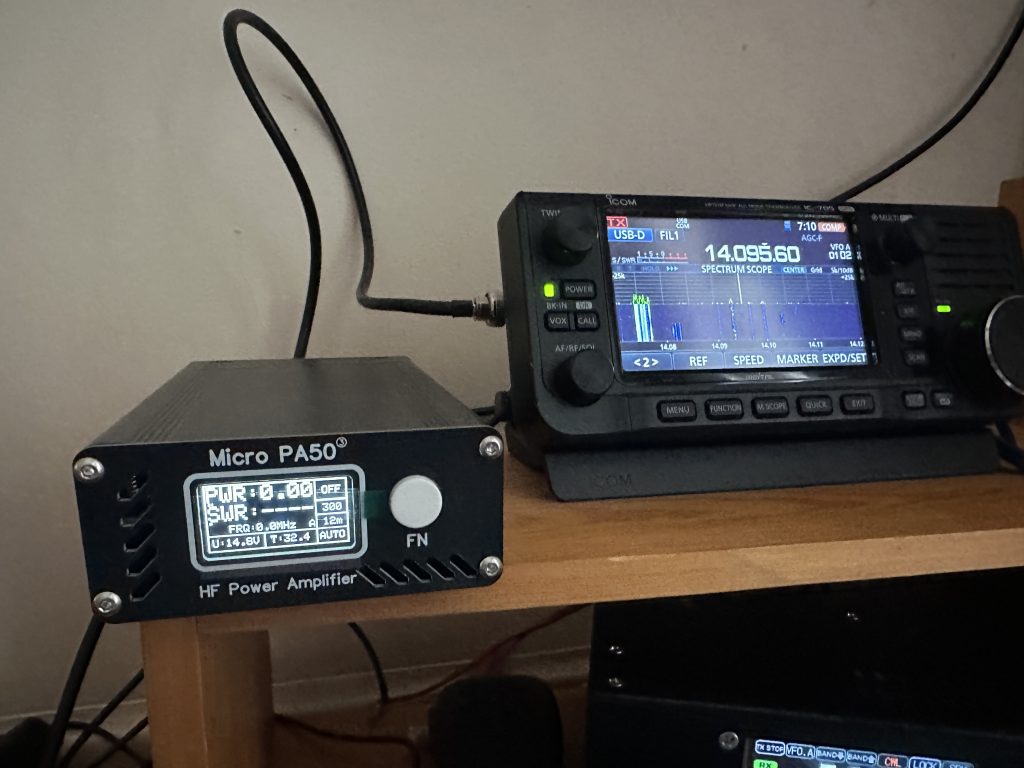
I received the Micro PA50 – and it rather than a + it was (3) – i found this was the latest version, and not to worry about it, it was a good thing ! I ran the MicroPA for several hours, but then sadly it completely stopped working – not even a power on – having been so excited for this tiny amp, I really gutted that it failed in such a short time. I packed it up and sent it back, and got a full refund credited to my account, and I got another. I had to spend £1 extra, but wanted to give the amp another chance. I was impressed with the engagement from the vendor and the refund was done so quickly tho.
Having had time to rejig the shack, i took the feed from the UHF/VHF vertical into a switch, so I can easily go between HF, 2m and 70cms – getting full utility from the 705 – the vertical also works really well with airband ! In no time at all my replacement amp had arrived and i was testing with FT8 quickly and was impressed that it worked great – no issues at all. I kept the drive power down to 2W on 20M and was able to get 25W from the amp – and really good SNR readings from PSK reporter.
Whilst I’ve not been able to get out for PoTA, I have had a great time being a ‘hunter’ – band conditions are not the best at the moment, so i’ve been really impressed with the activtations that have been done. Since having the amp I’ve really taken to SSB Telephony but for PoTA hunting and on the bands at night when conditions have been better. With such low power its been amazing to make such good contacts.
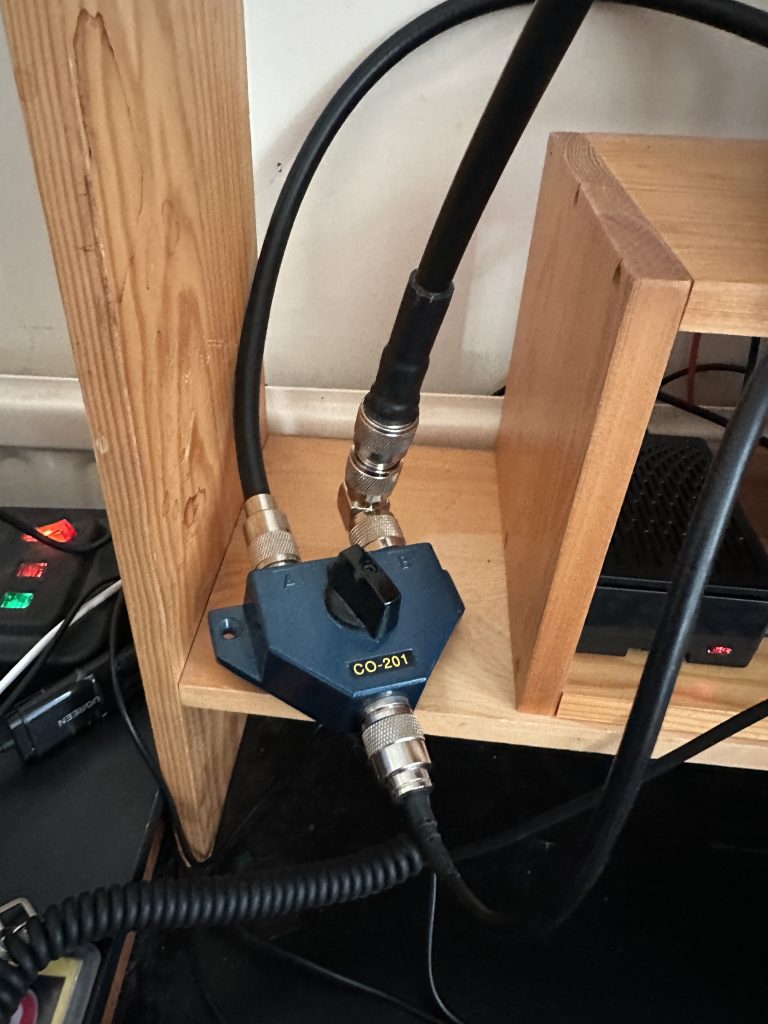
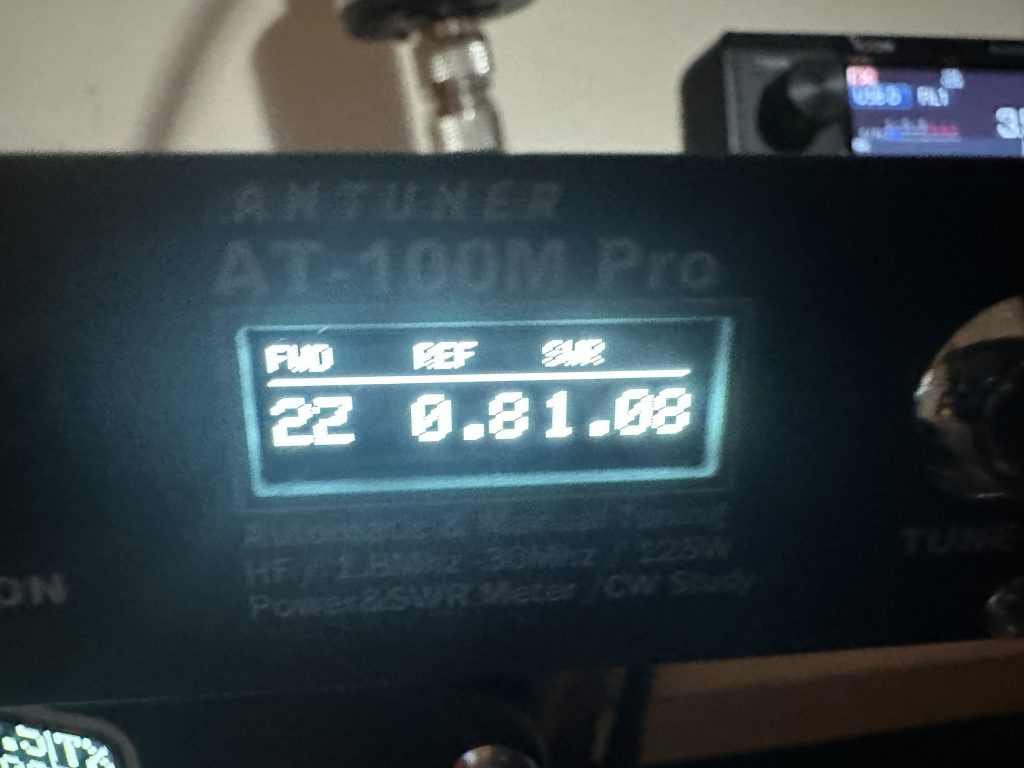
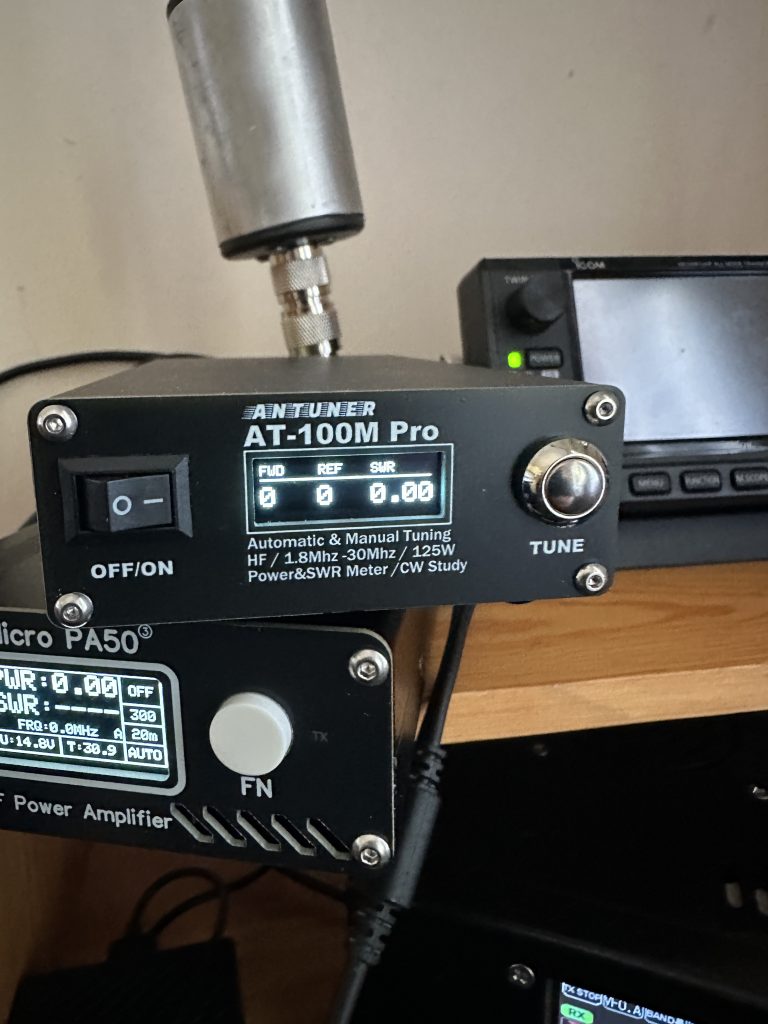
My ambition is to get out and get on the air, at home i have an excellent UK Antenna EFHW 80m multiband wire, which is brilliant, where as in the field I have less options and much less resonant antennas, making a tuner essential. I already have the MAT tuner specifically for the IC-705, but that is only capable of tuning 10W max, so an upgrade was required. I search and the AT-100MPro looked a very capable ATU – I hooked up the amp first, then the ATU connects to the EFHW (with a nice 1:1 Balun). I had no trouble tuning the antenna to any band i wanted to get on, even top band !
The plan is to get the amplifier and the tuner into the IC-705 LC-192 Backpack which has my vertical ‘toybox’ antenna on it. Getting this setup and on the air is my ‘target’ objective, as the antenna will take the power no problem and i’ll be really interested to see how it performs.
I will make more updates as I test this at home first then hopefully get out POTA soon !
So more and more NOAA sats are going off line, see the excellent video from save it parts here.
There is still METEOR stats, but I’m slowly finding that even the noaa-pi setup being very ilght touch, it does take mantainence/keeping it online. As Rasperberry Pi’s are always needed by me, I may well permentatly turn off my NOAA-PI setup. I’ve had it off for a week now, and found i’ve not really been that bothered by it. I’ll be far more interesed to get my wellbrook antenna back on line and some form of WebSDR that doesn’t have a compromised back-door into it…
Considering the full licence and getting back to ‘clubs’
So I spend alot of my time on research – I dont really have much time for ‘social’ aspect of amateur radio when it comes to clubs and training. I am certianly not in favour of remote learning, I quite like having a tutor/mentor here with me that can explain stuff. It was good during covid to provide remote/teams, but thankfully thats now hopefully all over with.
I do enjoy socialising with fellow amateurs and it will be good to bounce questions of people as I run into them. I’m kind of keen to get my full licence so I can operator overseas, its not about the power, i’ve always enjoyed low-power/QRP over running 1KW and blasting the bands, even when i had 100W, i tended to use lower powers (<10W).
So I’m going to get in touch with some fellow hams and seeing if I can be a bit more socialble, it will probalby help me with having some breaks from always consuming my spare time with research.
Whilst I’ve been getting on air from home with the IC-705, even calling CQ on 17 and 80 meters a couple times and getting a few contacts, I’ve also been getting prepared for the changing climate.
NOAA Antenna move
It was easy to spot that my NOAA and METEOR reception had taken a turn for the worse.
Bad scans
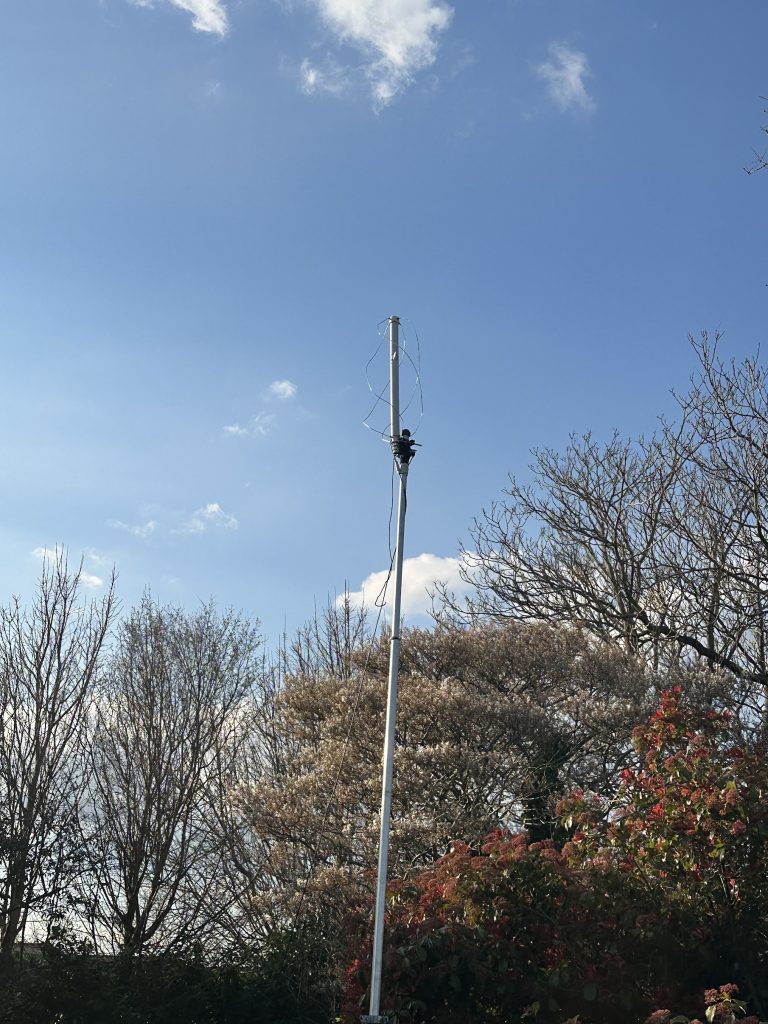
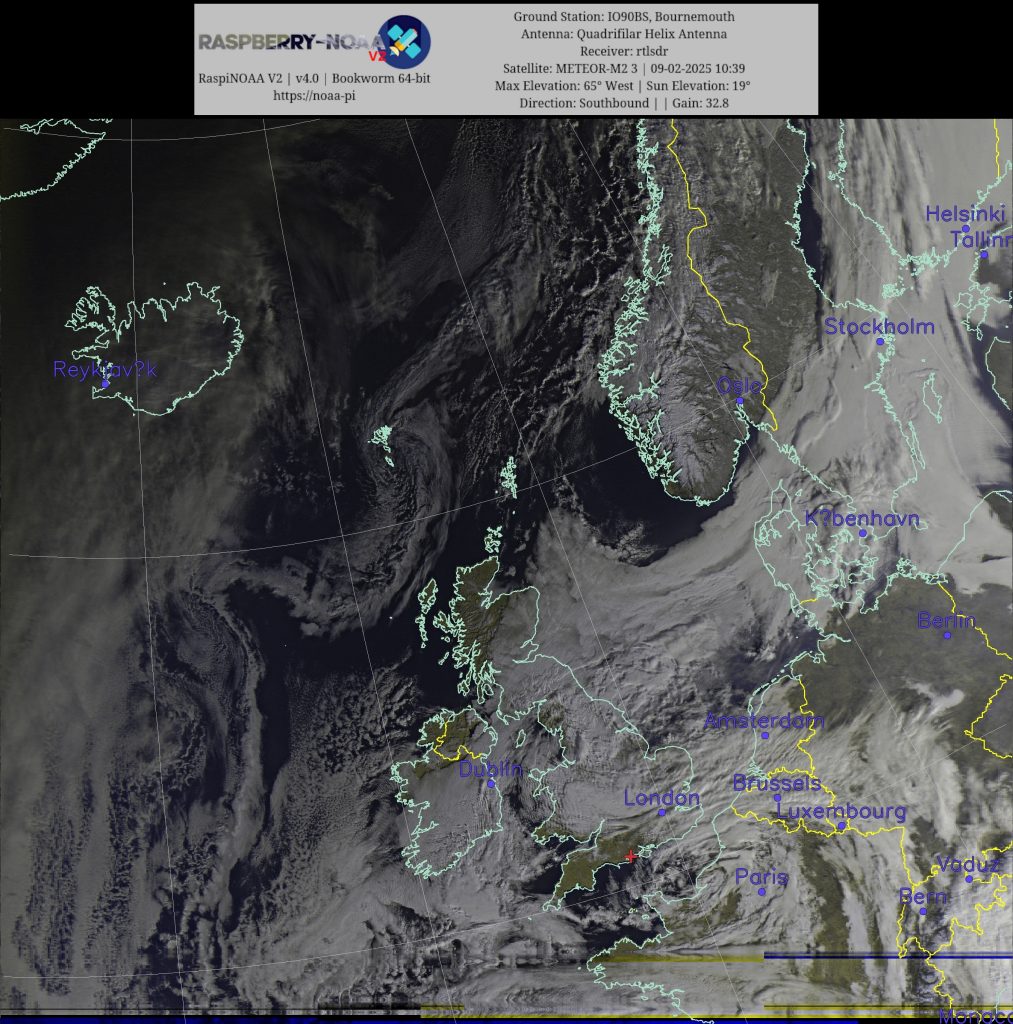
Looking at the postion of the antenna, it was surrounded by trees which are now beginning to grow their spring time leafs and flowers. Having checked the rest of the RPI/Amp/Filter setup, I thought it likely the signal quality was most likely due to those trees blocking the signal.
relocated further from treesnext to EFHW
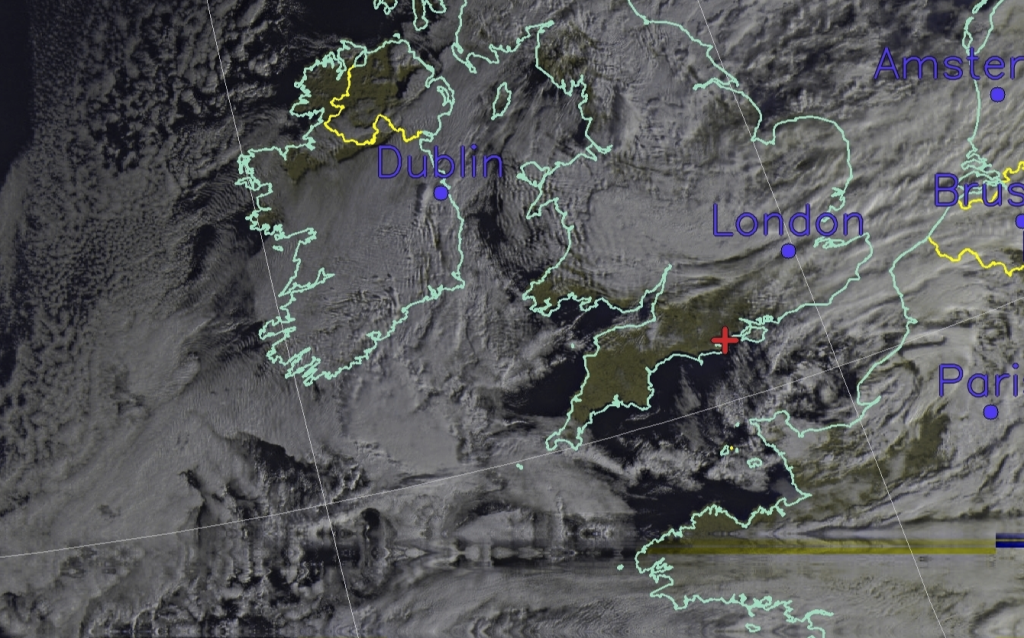
Moving the antenna was easy enough, I basically untethered it and moved the whole tilt base, whilst cumbersome, it wasnt heavy and I could get it to the front of the garden away from the trees and a better line of sight to the horzion to the south, east, west and improved to the north, although the trees are still there, i think they are further from the 30 degree LOS that NOAA and METEOR are picked up from.
much better
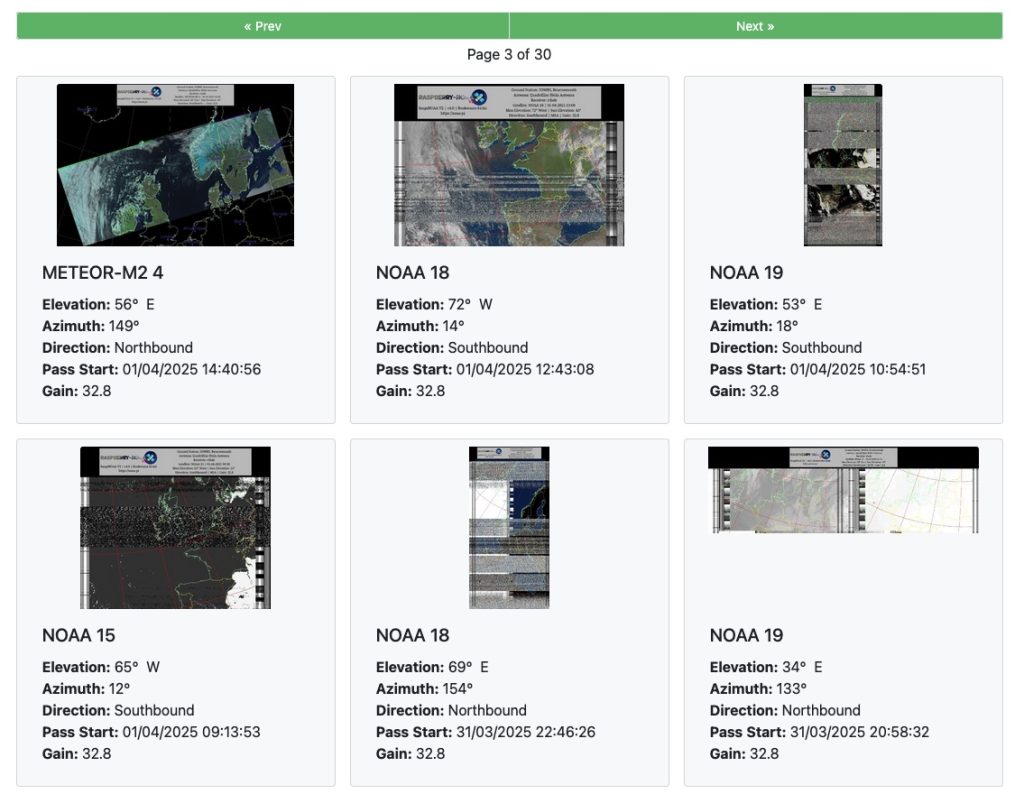
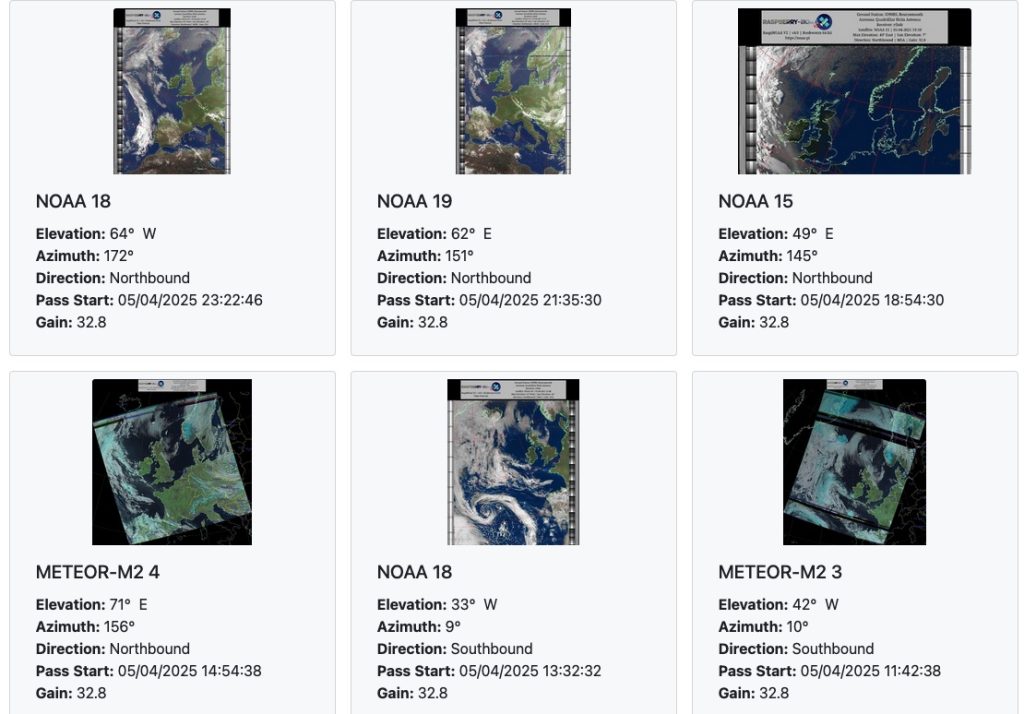
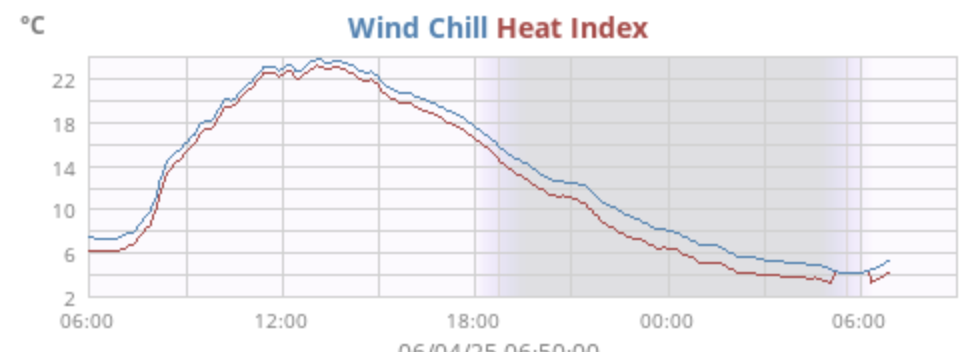
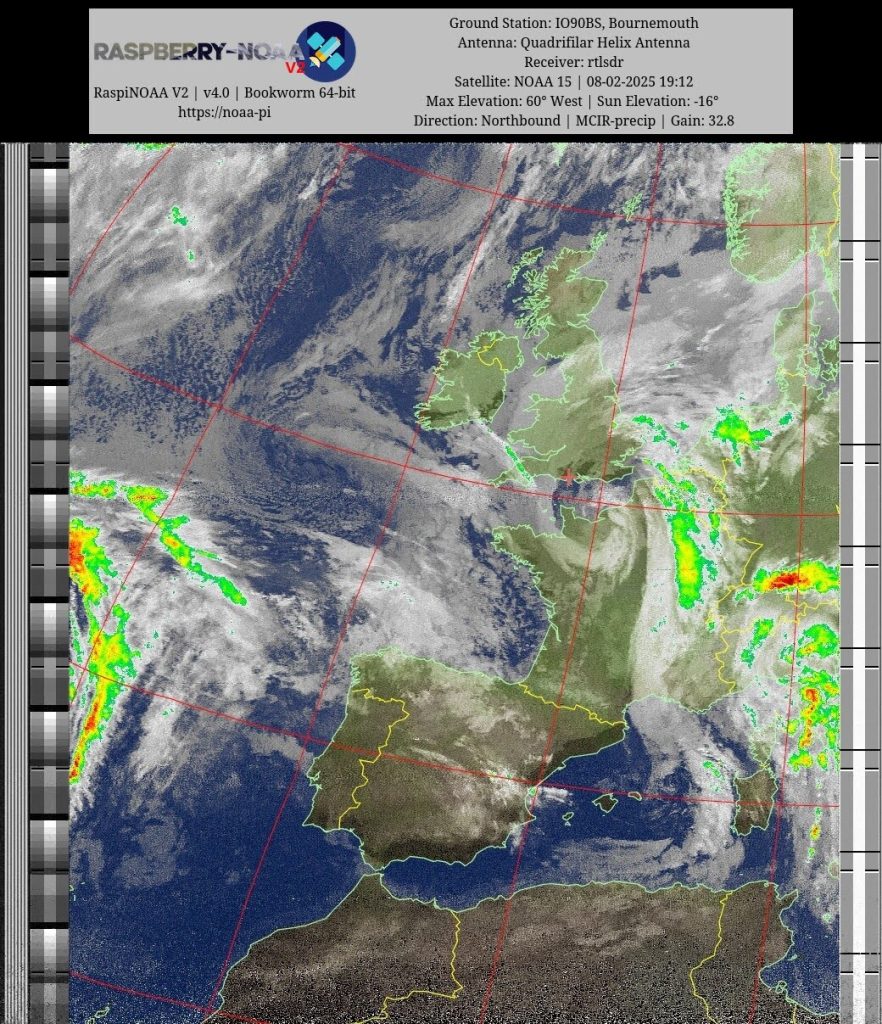
Having run the antenna in its new location for several days now, its proven much better, if anything all the signals are coming in much better now, there is the odd occasion, but as the above picture shows, I’m getting all the scanns in from the operational weather satellites when they pass over. I’m also seeing that whilst I set my RPI to pick up from 30 degrees, the reception now is lasting longer to sometimes around 20 or 15 degrees above the horizion. Not bad for an antenna thats barely 3/4 meters high !
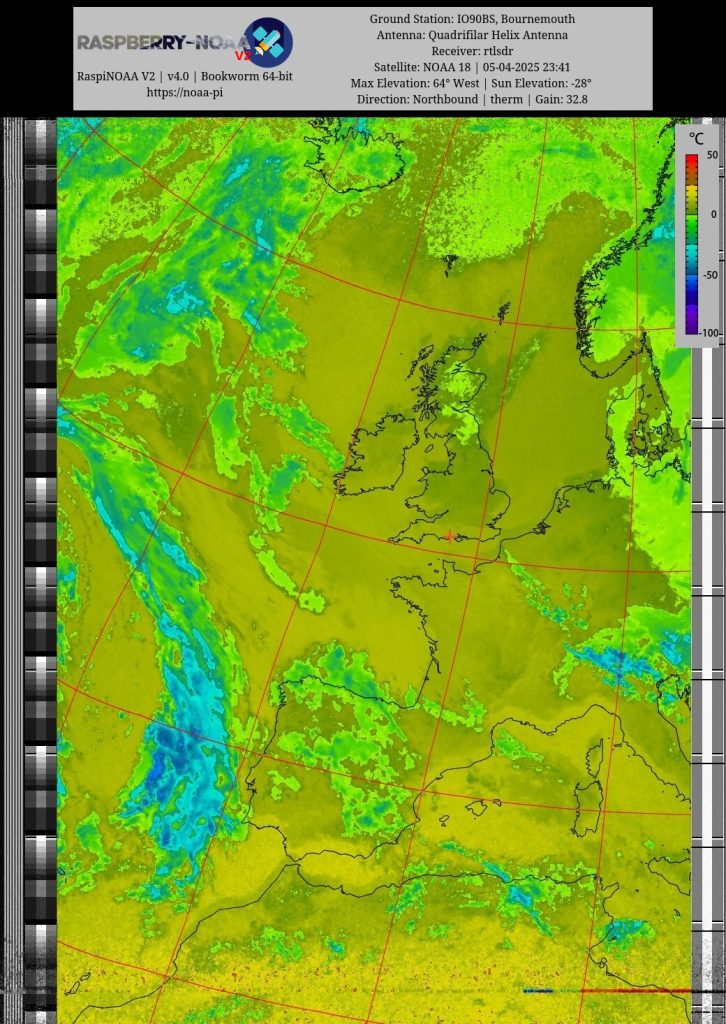
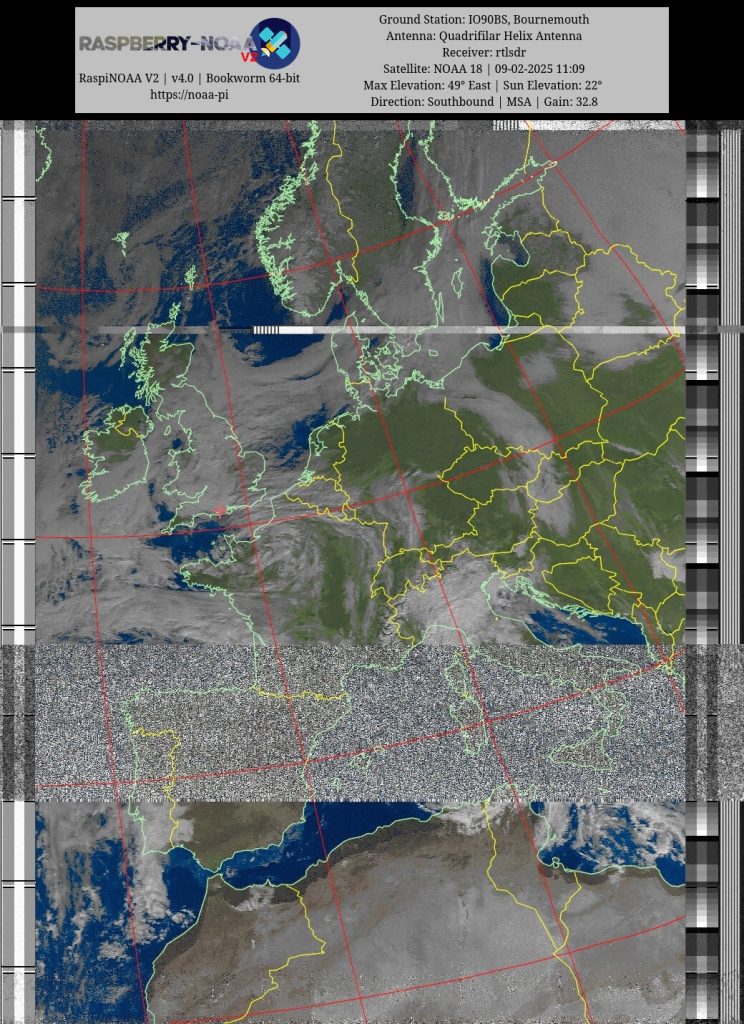
We can see from this great night-fly over of NOAA-18 and the thermal output its starting to get warmer now, with the WX topping out at over 22 celsius !
Bongo and APRS
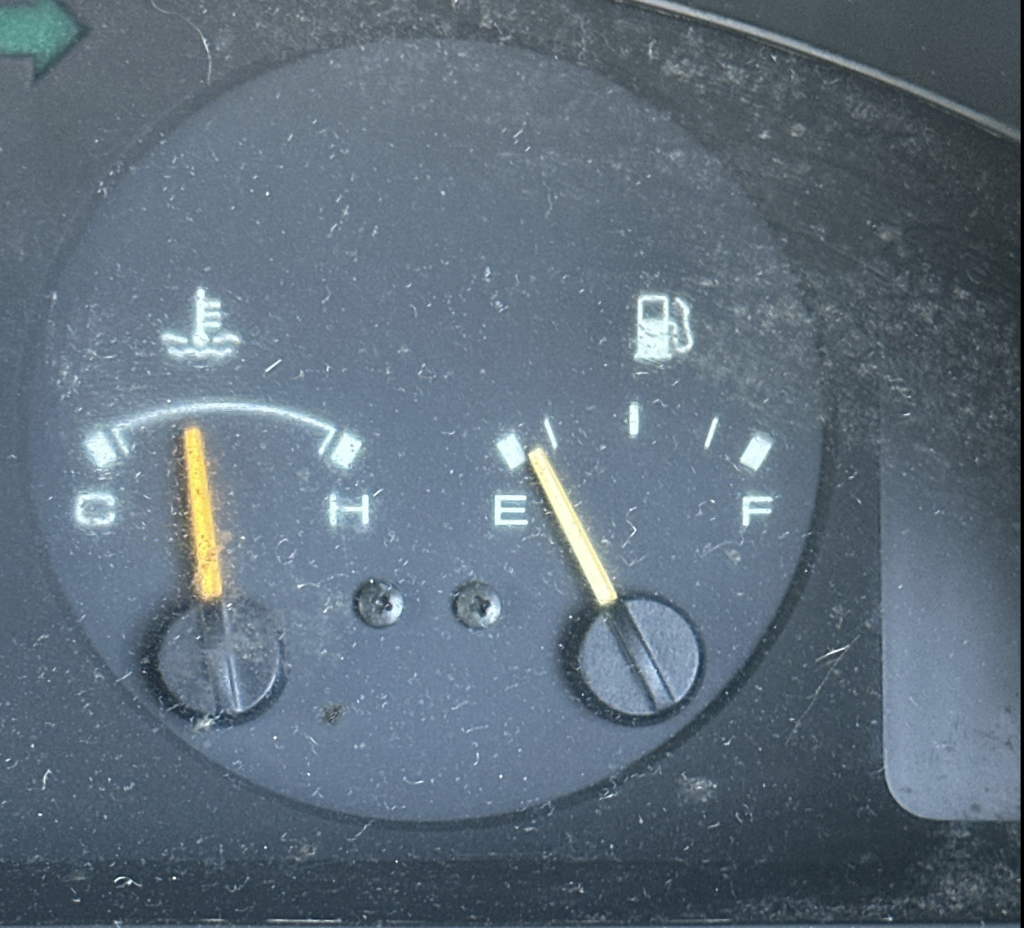
So its near time for my nearly 30 year old Mazda Bongos annual check (MoT as it is known in the UK). It has been running a bit rough of late, but the warm weather has brought the bongo back to life ! I rejoined the Bongo Fury forum, very affordable and great fact sheets, I have no doubt my problem is caused by glow plugs, however as long as it starts for now, i’ll get it thru its MoT and then see about fixing it before it gets cold again!
Bongo running cool ! but low of fuel…
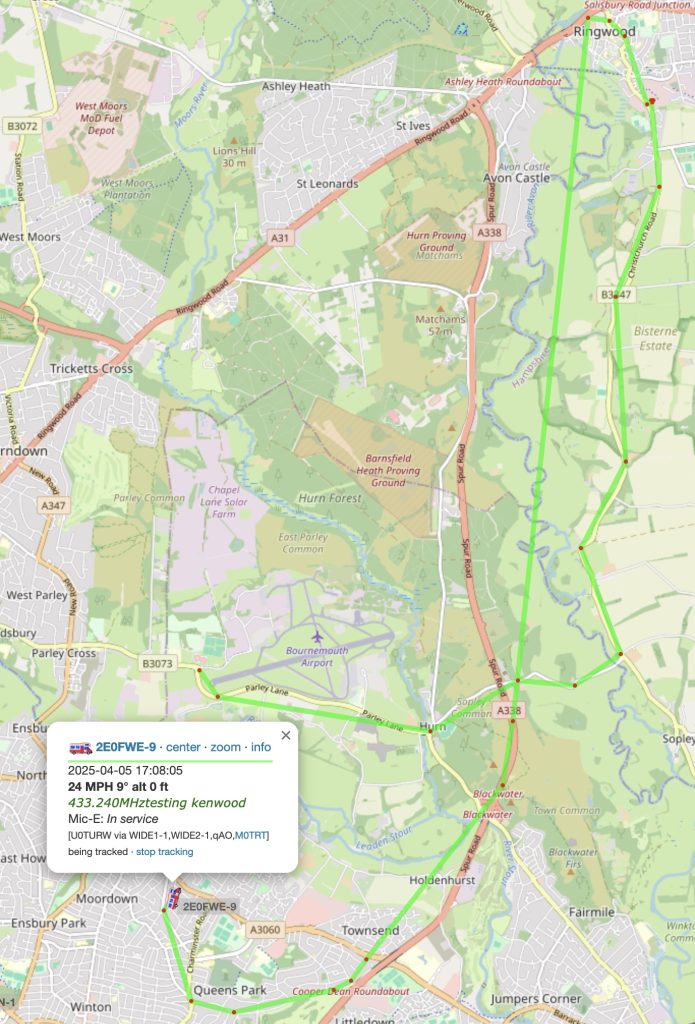
The good news is that I topped up the coolant, recharged all the batteries (lesiure and starter) and was able to enjoy a good local drive out with the Kenwood radio beaconing APRS positions on 2M really well. I’ve noticed a few more APRS digipeaters in the area and am getting better coverage than when I first started this back many years ago !
APRS from IO90BS to Ringwood
I’ve still yet to deicde to do with my 2M/70cm antenna here at the QTH, its up but currently not connected to anything. I’m tempted to setup the THD7 with one of the SSTV cams so it runs independent of any computer, and a CTCSS tone will force it take a picture. Which I think could be fun, even if it ends up with me only using it !
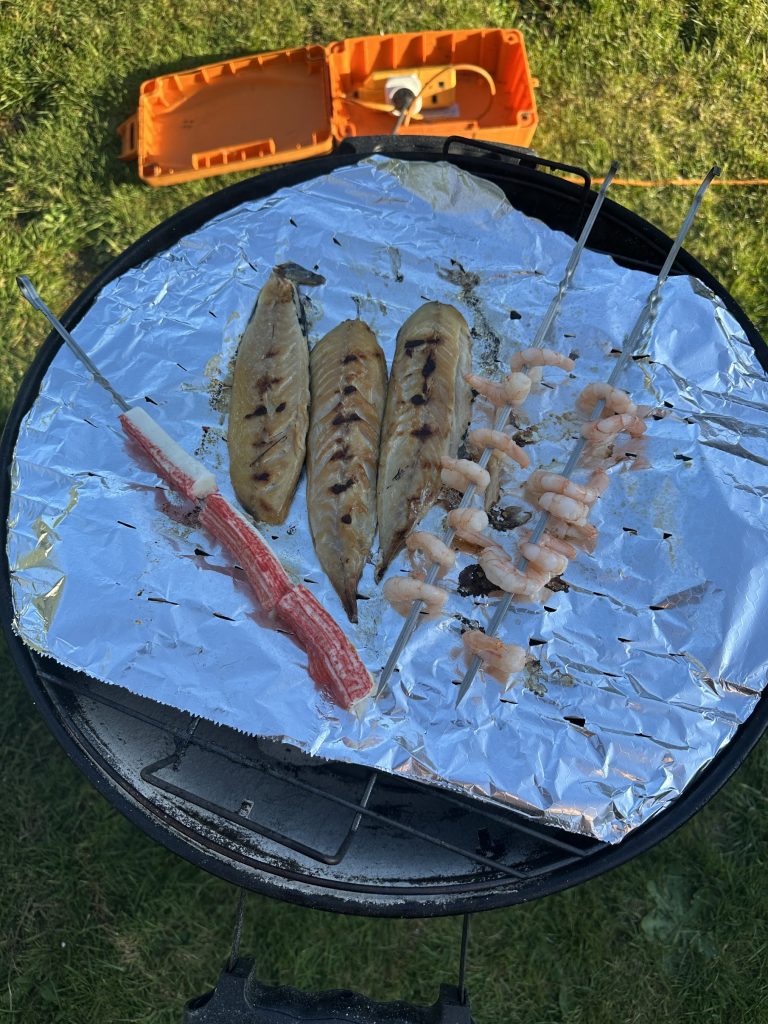
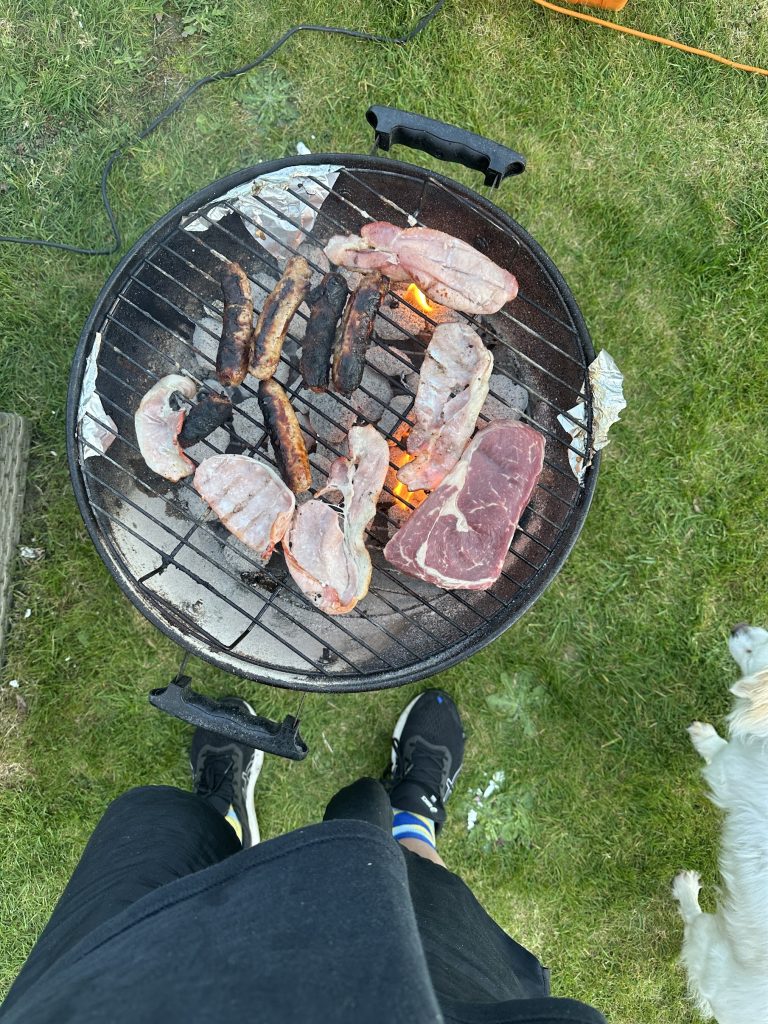
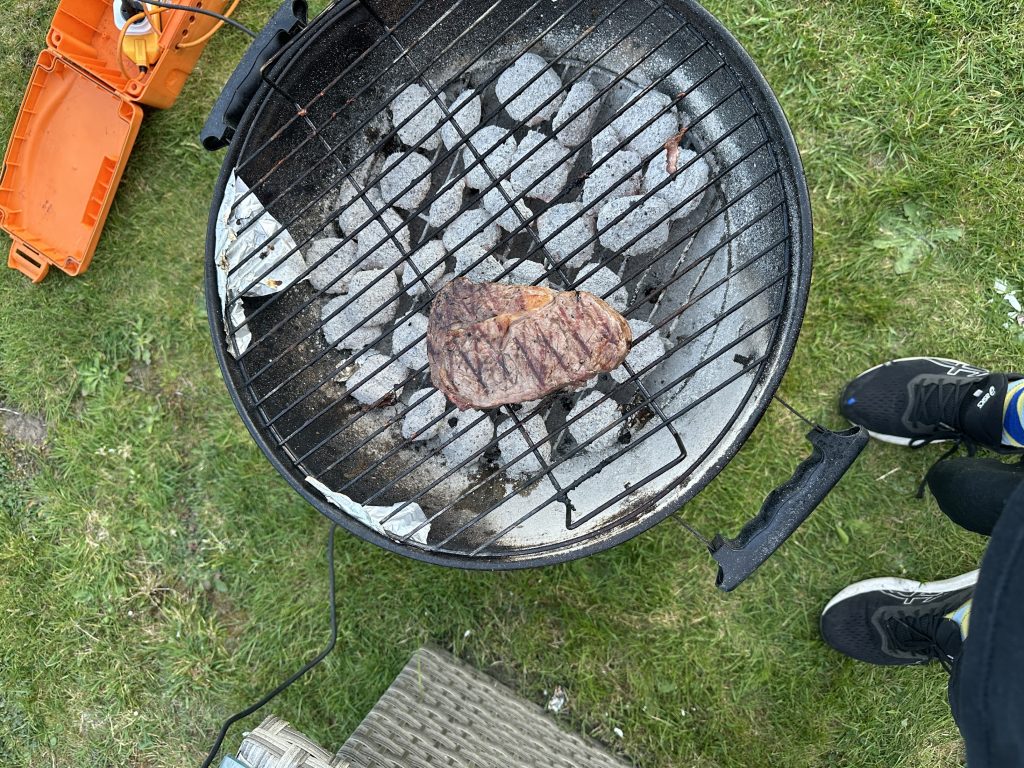
I ended the afternoon with a lovely BBQ, pre-cooking a steak for dinner and some sasuages which i’ll put into a toad-in-the-hole for eating this week 🙂 I also tried cooking fish and prawns for the first time on the BBQ for XYL Monica, and the fish was very well received !
fish!p0rksteak
I’m confident I’ll be able to get the Bongo thu the MoT and again start getting out with the Bongo and doing more POTA, I’ve spotted a few more new parks pop up nearby as well !!
I have been on the airwaves with 10W power from the IC705 at QTH for just over a month now, and I have to say when I’ve been able to get on the air, its been fantastic. I’ve had several SSTV QSO’s with really good signal reports, and I continue to scan and upload pictures from 20m and 80m SSTV CoA’s. I was also impressed that the MAT-705 ATU was able to make the 80m EFHW antenna ‘tune’ to top-band, and I was able to have FT8 QSO’s on 160m.
Who needs 100W when 10W will do
Whilst do my model train, i’ve also enjoyed just doing SWL on 80m, there are some really good converstaions to be had and being 80m I have no problem hearing both ends of the conversation. I was thoroughly impressed to pick up a DX station from East USA having QSO’s all over Europe, most of which I could easily copy on the IC-70% internal speaker with no need for external DSP and speaker.
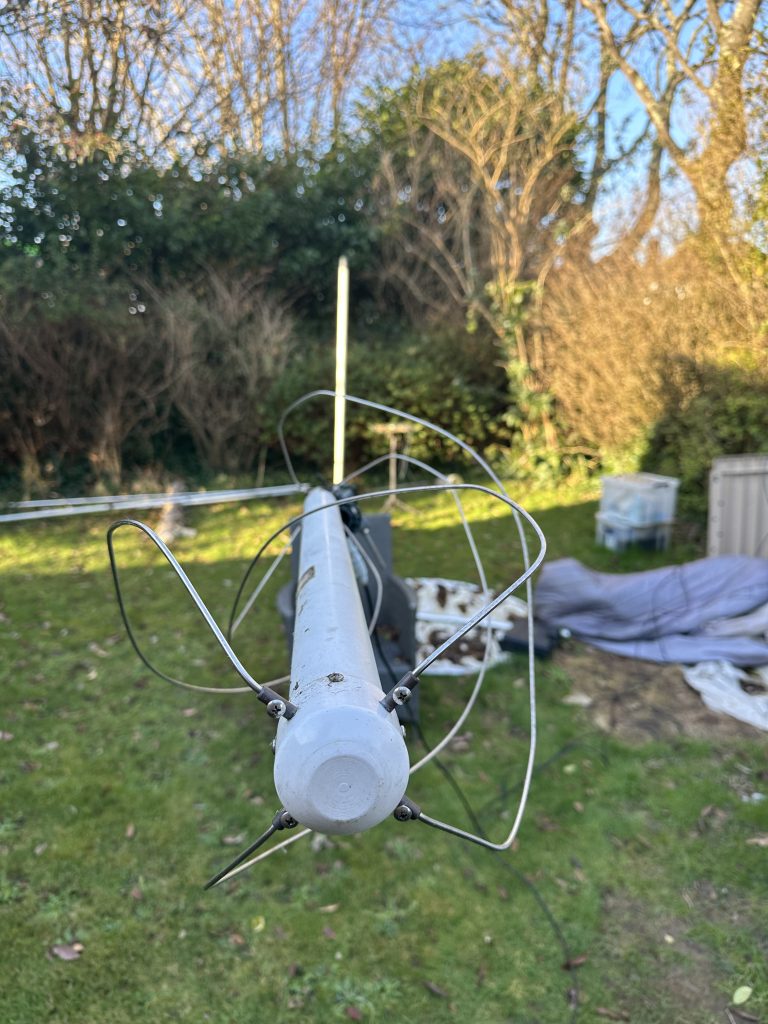
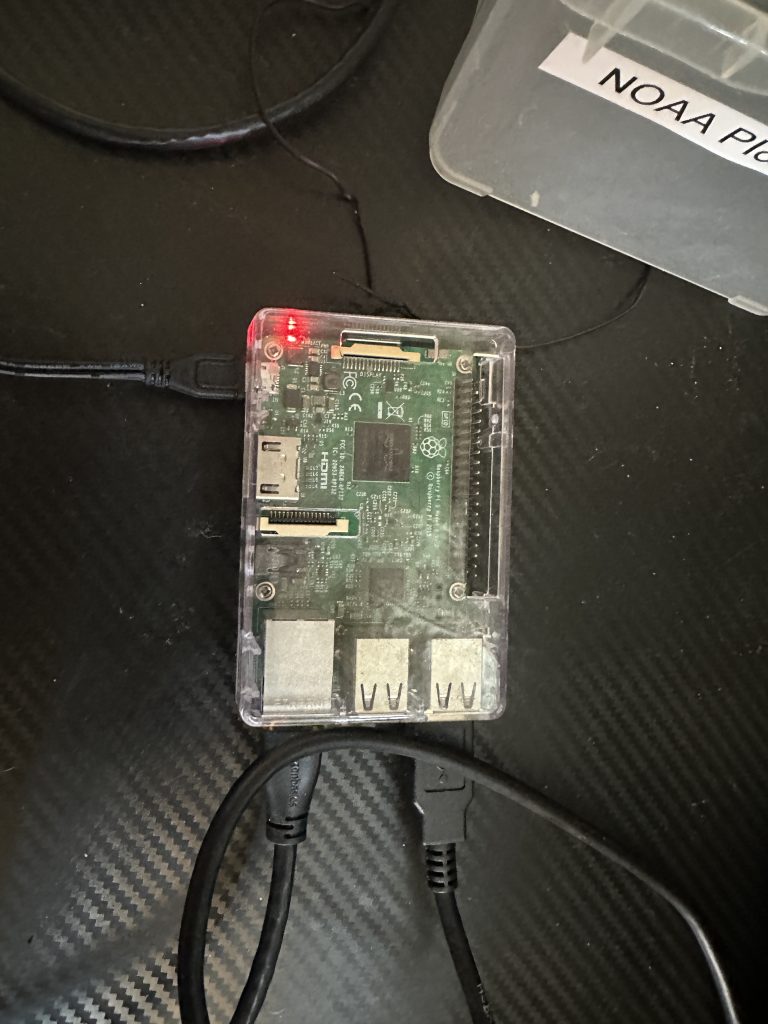
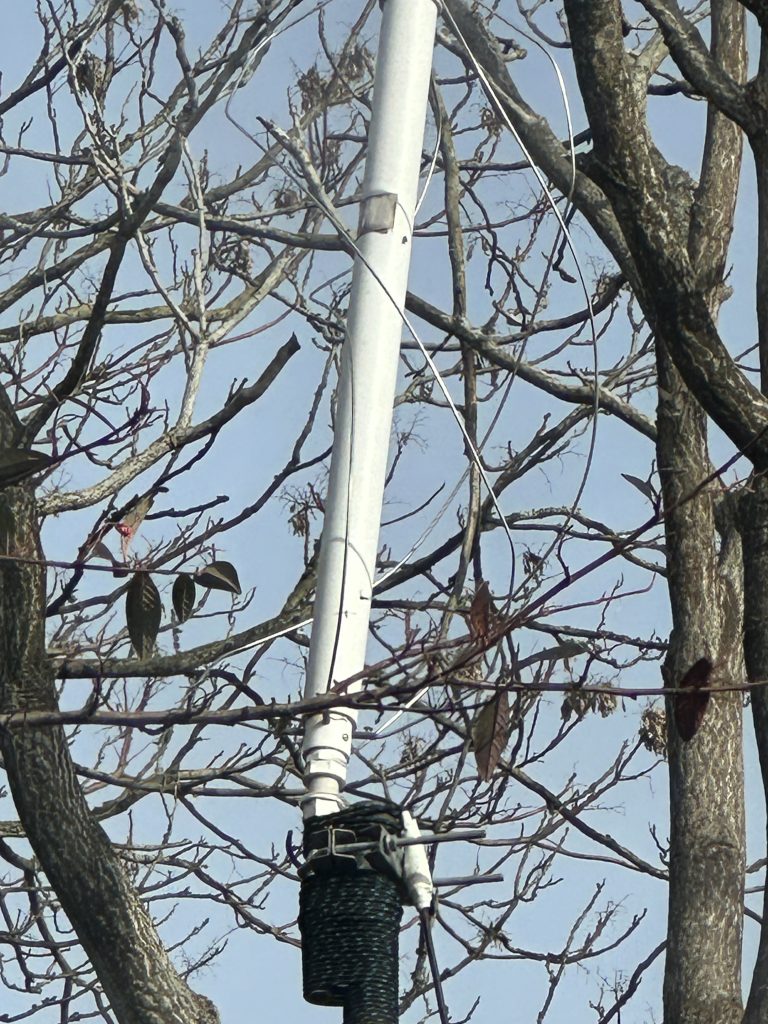
NOAA Setup
As I dont have alot of time for interactive radio, I wanted to use the equipment I do have. As such my Quadrifilar Helix antenna which was shipped from the USA several years ago had been sat neglected in the garden for many years, as well as the coax (PL259 to BNC).
I first set about making sure the antenna was in working condition, I attached it to my Rigmaster which covers all the frequencys, including the NOAA frequency of 137.9Mhz. Sure enough SWR/Return loss on the antenna was fantastic. So I set about restoring the feed line to good use.
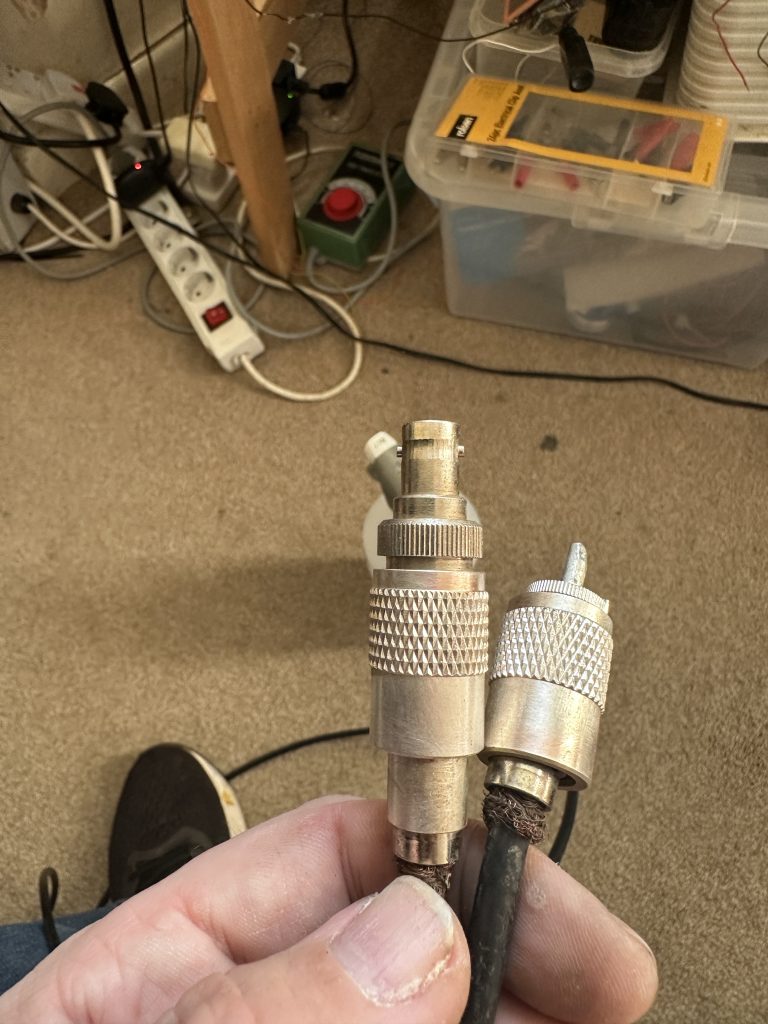
metal brushbeforeafter
Having used pure alcohol and a metal brush I restored the connectors, getting all the collected dirt from inside the connection joins and external, whislt comestic at this point, it would be important for later when adding tape to protect the connection.
Sure enough after cleaning the connectors I was amazed that the coax had very low (almost nil) reistance between both points, meaning the years of abuse in the garden hadn’t destroyed the cable.
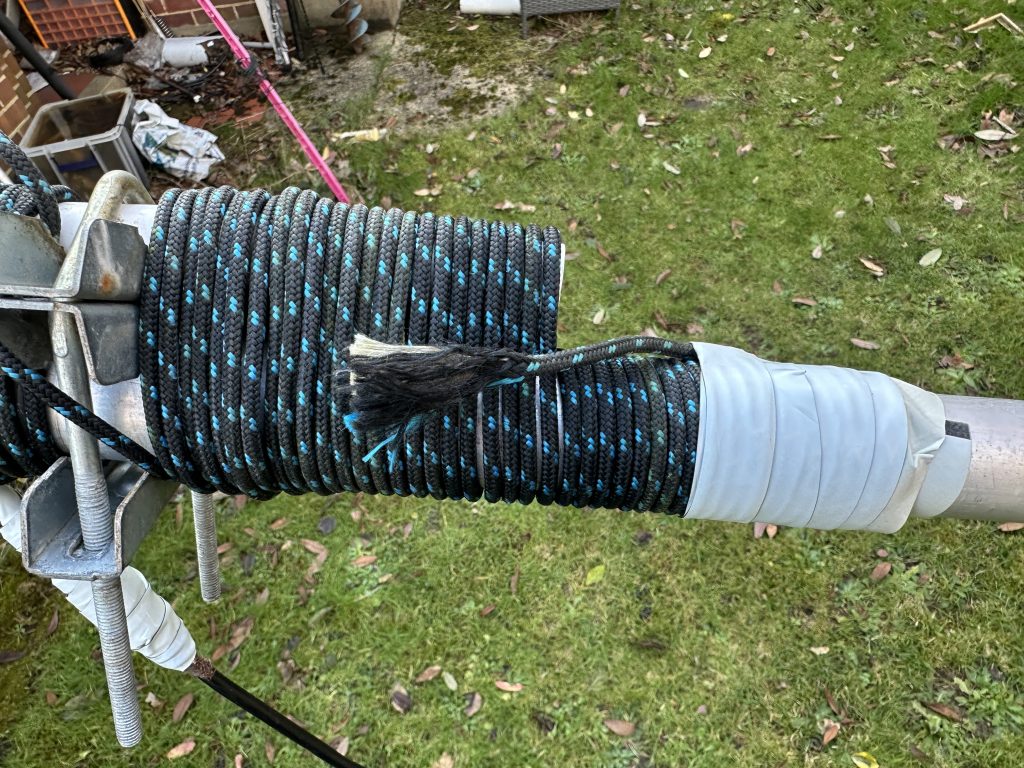
binding to masthalf-mast viewvertical
Having checked the antenna and coax, it was left to the elements to get the antenna up. Thankfully there was a brief period of time in Janurary to get outside and so some antenna work, so I binded the antenna to the mast, first with a clamp, then with tightly bound guying rope. That way I can be sure the antenna will stay as close to vertical as the mast allows.
With Debian up and running it was time to run the Raspberry Noaa install script, and my, what a majestic piece of coding this is. It really is a superb piece of automation, all that is required is to setup the confg file correctly. I give mine below as-is as getting the gain values right was the trickiest part, the install script took care of everything else.
cd $HOME/raspberry-noaa-v2/
./install_and_upgrade.sh config/settings.yml
The config file I used for my location in IO90BS./ Bournemouth is as follow, the coordinates are actually for the center of Bournemouth.
---
# base station configurations
#   latitude: south values are negative
#   longitude: west values are negative
latitude: 50.721680
longitude: -1.878530
altitude: 0.0

#Website language settings
#   lang_setting: see the 'webpanel/App/Lang' folder for available
#                 languages (2-letter filename - e.g. ar, bg, de, en, es, nl, sr, ru, it, hu, gr, lt, kr, ro)
lang_setting: en

# ntp configurations
#   ntp_server - if you have a local server (e.g. stratum1), you can use this setting
#        to specify a hostname or ip address to communicate with the ntp server
ntp_server: '131.111.8.171'

# receiver settings
#   receiver_type - the receiver type which program uses ('rtlsdr', 'airspy_mini', 'airspy_r2', 'airspy_hf_plus_discovery', 'hackrf', 'sdrplay' or 'mirisdr')
#   noaa_decoder - which receiver method to use (either 'wxtoimg' or 'satdump')
#   meteor_decoder - which receiver method to use (either 'meteordemod' or 'satdump')
receiver_type: 'rtlsdr'

noaa_decoder: 'wxtoimg'
meteor_decoder: 'meteordemod'

# test settings when running test scripts
#   test_gain - gain to use for scanner test scripts
#   test_sdr_device_id - device ID of the SDR device to be used for scanner test scripts
#   test_enable_bias_tee - whether to enable bias tee when running scanner test scripts
#   test_freq_offset - receiver frequency offset (PPM)
test_gain: 32.8
test_sdr_device_id: 0
test_enable_bias_tee: true
test_freq_offset: 0

# whether to schedule specific orbiting objects for capture
#   <satellite_name>_schedule - whether to schedule captures for the satellite
#   <satellite_name>_sdr_device_id - device ID of the SDR device to be used for recording for the satellite
#   <satellite_name>_freq_offset - receiver frequency offset (PPM) for the satellite capture
#   <satellite_name>_enable_bias_tee - whether to enable bias tee for the recording of the satellite
#   <satellite_name>_gain - gain setting for specific satellite captures
#   <satellite_name>_sun_min_elevation - threshold for sun elevation for specific satellite captures
#   <satellite_name>_sat_min_elevation - threshold for sat elevation for specific satellite captures
#   <satellite_name>_memory_threshold - for METEOR satellite, minimum free memory (MB) required to store pass in RAM
#   select_best_overlapping_passes - whether to select the best overlapping pass when multiple passes are available, or let user manually delete the passes
#   select_meteor_pass_over_noaa - whether to select Meteor passes over NOAA when both are occuring at the same time
#   use_device_string - whether to use the device string scheduling passes when you have multiple SDR devices connected of the same type (most users should leave it to "false")

noaa_memory_threshold: 50
meteor_m2_memory_threshold: 10

select_best_overlapping_passes: true
select_meteor_pass_over_noaa: true
use_device_string: false

noaa_15_schedule: true
noaa_15_sdr_device_id: 0
noaa_15_freq_offset: 0
noaa_15_enable_bias_tee: true
noaa_15_gain: 32.8
noaa_15_sun_min_elevation: 6
noaa_15_sat_min_elevation: 30

noaa_18_schedule: true
noaa_18_sdr_device_id: 0
noaa_18_freq_offset: 0
noaa_18_enable_bias_tee: true
noaa_18_gain: 32.8
noaa_18_sun_min_elevation: 6
noaa_18_sat_min_elevation: 30

noaa_19_schedule: true
noaa_19_sdr_device_id: 0
noaa_19_freq_offset: 0
noaa_19_enable_bias_tee: true
noaa_19_gain: 32.8
noaa_19_sun_min_elevation: 6
noaa_19_sat_min_elevation: 30

meteor_m2_3_schedule: true
meteor_m2_3_sdr_device_id: 0
meteor_m2_3_freq_offset: 0
meteor_m2_3_enable_bias_tee: true
meteor_m2_3_gain: 32.8
meteor_m2_3_schedule_sun_min_elevation: -6
meteor_m2_3_sun_min_elevation: 10
meteor_m2_3_sat_min_elevation: 30
meteor_m2_3_80k_interleaving: false

meteor_m2_4_schedule: true
meteor_m2_4_sdr_device_id: 0
meteor_m2_4_freq_offset: 0
meteor_m2_4_enable_bias_tee: true
meteor_m2_4_gain: 32.8
meteor_m2_4_schedule_sun_min_elevation: -6
meteor_m2_4_sun_min_elevation: 10
meteor_m2_4_sat_min_elevation: 30
meteor_m2_4_80k_interleaving: false

# how many days to schedule passes - note this MUST be an even integer,
# and the current day counts as "1" - passes will be scheduled until midnight
# of the `days_to_schedule_passes` final day
#
# NOTE: If you want to set this value LOWER than a previously configured
#       value, you must run the schedule script manually and pass the '-x' switch
#       after re-running the ./install_and_upgrade.sh script to align the variables:
#           ./scripts/schedule.sh -x
days_to_schedule_passes: 7

# pruning capabilities - must be configured in cron (see documentation)
#   delete_oldest_n - how many oldest captures to delete on each run
#   delete_older_than_n - delete all images older than this many days
delete_oldest_n: 0
delete_older_than_n: 30

# whether audio files should be deleted after images are created
# if you choose to keep files, they will be automatically deleted after set number of days in delete_files_older_than_days (default is 3 days)
delete_noaa_audio: false
delete_meteor_audio: false
delete_files_older_than_days: 3

# processing settings
#   flip_meteor_image - whether the meteor image should be flipped
#   produce_spectrogram - whether to produce a spectrogram image of the audio recording
#   noaa_crop_telemetry - whether to crop the left/right telemetry in image captures
#   image_annotation_location - where to place the annotation in images - valid options are:
#        NorthWest, North, NorthEast, West, Center, East, SouthWest, South, SouthEast
#   extend_for_annotation - whether to create a black extension on the north/south location of
#        the image to place the annotation into (vs. overlaying on the captured data)
#        (note: this will ONLY work if the image_annotation_location is NOT one of [West|Center|East])
#   produce_noaa_pristine_image - whether to produce a pristine image (unmodified) for larger
#        composite-based use cases
#   produce_noaa_pristine_histogram - whether to produce a histogram of the NOAA pristine image
#   produce_polar_az_el_graph - whether to produce a polar graph that shows the pass
#        azimuth and elevation over the course of the pass, truncated to satellite min elevation
#   produce_polar_direction_graph - whether to produce a polar graph that shows the pass
#        direction over the course of the pass, including AOS and LOS
#   ground_station_location - free-form text for indicating ground station location in image
#        annotation (leave blank if you wish to exclude the ground station annotation)
#   antenna_information - free-form text for indicating antenna information in image
#        annotation (leave blank if you wish to exclude the antenna information annotation)
#   show_sun_elevation - whether to show sun elevation in annotation
#   show_pass_direction - show which direction the satellite is moving in the image annotation
#   noaa_daytime_enhancements - list of enhancements to create images using during daytime captures
#        (note: default value seen includes list of ALL supported image processors excluding 'avi' which must be explicitly added when opting to 'enable_animation' below )
#   noaa_nighttime_enhancements - list of enhancements to create images using during nighttime captures
#        (note: default value seen includes list of ALL supported image processors excluding 'avi' which must be explicitly added when opting to 'enable_animation' below )
#   noaa_crop_toptobottom - whether to crop the top and bottom noise out of the noaa capture
#   noaa_interpolate - whether to interpolate and oversample the images (larger images produced)
# settings for thermal map output for NOAA captures
#   noaa_thermal_temp_overlay - whether to overlay a thermal map for color codes to temperature
#   noaa_thermal_temp_overlay_location - where to place the thermal map in images - valid options are:
#        NorthWest, North, NorthEast, West, Center, East, SouthWest, South, SouthEast

# noaa map configurations
# http://usradioguy.com/wp-content/uploads/2020/05/wxtoimgcommand-line.pdf
#
# note - colors are in format 0xRRGGBB (only applicable when the
#        feature is enabled), where:
#   RR: Red hex value
#   GG: Green hex value
#   BB: Blue hex value
# Colors can alternatively be specified as one of the following:
#   black, white, gray, light-gray, dark-gray, red, pink dark-red,
#   light-red, # green, light-green, dark-green, black-green, blue,
#   light-blue, dark-blue, black-blue, yellow, light-yellow, dark-yellow,
#   magenta, light-magenta, dark-magenta, cyan, light-cyan, dark-cyan,
#   orange, dark-orange, purple, lavender, violet, navy, turquoise,
#   aquamarine, chartreuse, gold, beige, tan, brown, and maroon
#
#   noaa_map_crosshair_enable - whether to place a crosshairs on the base station location
#   noaa_map_crosshair_color - color of base station crosshair
#   noaa_map_grid_degrees - latitude/longitude lines drawn every grid degrees (default 10.0, 0.0 to disable)
#   noaa_map_grid_color - color of gridlines for latitude/longitude
#   noaa_map_country_border_enable - whether to enable country borders in images
#   noaa_map_country_border_color - color of country borders
#   noaa_map_state_border_enable - whether to enable state borders in images (Americas only)
#   noaa_map_state_border_color - color of state borders (Americas only)
extend_for_annotation: true
image_annotation_location: 'North'
produce_polar_az_el_graph: false
produce_polar_direction_graph: true
ground_station_location: 'IO90BS, Bournemouth'
antenna_information: 'Quadrifilar Helix Antenna'
show_sun_elevation: true
show_pass_direction: true
produce_spectrogram: false    #NOTE: the spectrogram option here is available for NOAA only, and the spectrogrma produced is from demodulated audio, not IQ baseband file

noaa_crop_telemetry: false
produce_noaa_pristine_image: false
produce_noaa_pristine_histogram: false
noaa_daytime_enhancements: 'MSA MSA-precip MCIR MCIR-precip HVC-precip HVCT-precip HVC HVCT ZA therm sea CC HE HF MD BD MB JF JJ LC TA WV NO histeq enhanced-IR'
noaa_nighttime_enhancements: 'MCIR MCIR-precip HVCT ZA therm NO TA sea histeq enhanced-IR'
noaa_crop_toptobottom: true
noaa_interpolate: false
noaa_jpg_image_quality: 90
noaa_thermal_temp_overlay: true
noaa_thermal_temp_overlay_location: 'NorthEast'
noaa_map_crosshair_enable: true
noaa_map_crosshair_color: "0xcc3030"
noaa_map_grid_degrees: 10.0
noaa_map_grid_color: "0xff0000"
noaa_map_country_border_enable: true
noaa_map_country_border_color: "0xffff00"
noaa_map_state_border_enable: true
noaa_map_state_border_color: "0xffff00"
wxtoimg_map_offset: 10.5                    #Change this value only if you see map offsets from the ground on WXtoImg NOAA images

meteor_daytime_enhancements: '221 321 124 MSA MCIR MCIR-precip HVC HVCT ZA therm sea CC HE HF MD BD MB JF JJ LC TA WV NO enhanced-IR'
meteor_nighttime_enhancements: '654 456 MCIR MCIR-precip HVC HVCT ZA therm sea CC HE HF MD BD MB JF JJ LC TA WV NO enhanced-IR'
flip_meteor_image: true
meteor_jpg_image_quality: 90
meteor_draw_map_overlay: true
meteor_draw_cities: true
meteor_map_crosshair_enable: true
meteor_map_crosshair_color: "#CC3030"
meteor_map_country_border_color: "#FFFF00"
meteor_create_rain_probability_overlay: true
meteor_create_equidistant_projection: true
meteor_create_mercator_projection: false
meteor_create_spreaded_images_without_overlay: true

# web server configuration settings
#   web_server_name - server name to use for the TLS certs and web endpoint - this MUST be
#                     resolvable to the IP of this host (if you don't have DNS, simply use
#                     the IP of the Raspberry Pi host)
#   enable_non_tls - whether to enable a clear-text web listener (default port 80)
#   web_port - port to run the web server clear-text (non-encrypted) endpoint on
#   enable_tls - whether to enable the TLS-encrypted web listener (default port 443)
#   web_tls_port - port to run the TLS listener on
#   lock_admin_page - whether to require username/password when attempting to access the admin page
#                     of the webpanel - WARNING: DO NOT SET THIS TO TRUE UNLESS YOU ONLY HAVE A TLS
#                     ENABLED SITE - SETTING TO TRUE AND RUNNING A CLEARTEXT SITE IS ALMOST CERTAINLY
#                     ASKING FOR YOUR CREDENTIALS TO BE STOLEN MID-REQUEST
#   admin_username - username used to access the 'admin' endpoint of the webpanel (WARNING: see 'lock_admin_page' above)
#   admin_password - password used to access the 'admin' endpoint of the webpanel (WARNING: see 'lock_admin_page' above)
#                    NOTE: MAKE SURE YOU SET THIS TO SOMETHING REASONABLY COMPLICATED!
#   web_passes_date_format - format to display the dates in the pass list view - note that this MUST conform to
#                            https://www.php.net/manual/en/datetime.format.php or else bad things will happen
#   web_datetime_format - format to display date and time in the web interface for captures - note that this MUST conform to
#                         https://www.php.net/manual/en/datetime.format.php or else bad things will happen
web_server_name: noaa-pi
enable_non_tls: true
web_port: 80
enable_tls: false
web_tls_port: 443
lock_admin_page: true
admin_username: 'admin'
admin_password: 'changeme'
#web_passes_date_format: 'm/d/Y'
web_passes_date_format: 'd/m/Y'
#web_datetime_format: 'm/d/Y H:i:s'
web_datetime_format: 'd/m/Y H:i:s'

# log level for output from scripts
log_level: DEBUG

# whether to enable the satvis visualization for satellite tracking
# in the passes view - note that this iframe-driven visualization is
# by default disabled on "extra-small" devices such as phones due to
# the processing and space requirements
enable_satvis: true


# whether to enable the "Coronal mass ejection activity" display
# in the passes view - note that the GIFs can be ~70 MiB and not cached
# thus they slow down the page & can lead to quite big data usage
enable_coronal: false

# whether to enable the image video in the passes view - note that this
# is by default disabled on "extra-small" devices such as phones due
# to the processing and space requirements
enable_animation: false

# operating system configurations
#   disable_wifi_power_mgmt - if running wireless internet and you want to
#       disable "sleep" mode of your wifi device (assuming it's wlan0), set
#       this to true (note: updating this requires a reboot)
#   disable_at_mail - if you do not want "at" to send mail after job execution
disable_wifi_power_mgmt: false
disable_at_mail: false

# push processing settings for sending images elsewhere
#   * NOTE: Make sure you set up your ~/.msmtprc file before enabling email push!
#   enable_email_push - whether to send all images to an external email
#   email_push_address - if enabled, address to send all images to
#   enable_email_schedule_push - whether to email an image of the nightly-created
#       pass-list schedule to the email destination
#   enable_discord_push - whether to push images to a Discord channel
#   discord_webhook_url - webhook url for the Discord channel
#   enable_twitter_push - whether to push images to a Twitter feed
#     * see docs/twitter_push.md for instructions
#   enable_matrix_push - whether to push images to a Matrix room
#     * see docs/matrix_push.md for instructions

# Whether you want to contribute to creation of community created Meteor and NOAA composites gathered from RN2 stations from all around the world
# We do not collect any personal data
# Thank you very much if you choose to contribute :)

contribute_to_community_composites: false
contribute_to_community_composites_url: 'https://voxgalactica.com/upload'

enable_email_push: false
email_push_address: change@me.com
enable_email_schedule_push: false
enable_discord_push: false
discord_noaa_webhook_url: 'https://discord.com/api/webhooks/1135901731918717068/ZELG3Sv1fRxQ8KgoYtMMOBYM07az0yIkzeLdad-8WxxhV-F8LhPQdZFFon044awMvLsD'
discord_meteor_webhook_url: 'https://discord.com/api/webhooks/1135901731918717068/ZELG3Sv1fRxQ8KgoYtMMOBYM07az0yIkzeLdad-8WxxhV-F8LhPQdZFFon044awMvLsD'
enable_pushover_push: false
pushover_link_url: 'https://<url-to-webpanel>/captures/listImages'
pushover_apitoken: ''
pushover_user: ''
pushover_prio: 0
enable_twitter_push: false
enable_bluesky_push: false
enable_mastodon_push: false
enable_facebook_push: false
enable_instagram_push: false
enable_slack_push: false
slack_push_url: ''
slack_push_to: ''
slack_link: 'https://XXXX/captures/listImages'
enable_matrix_push: false
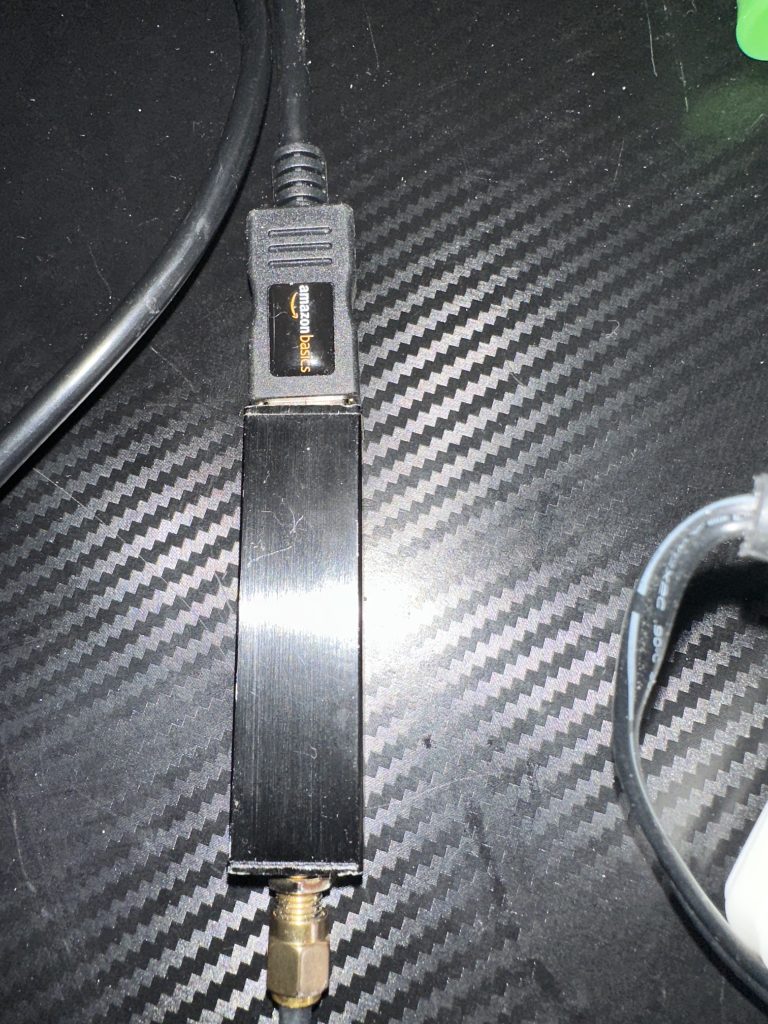
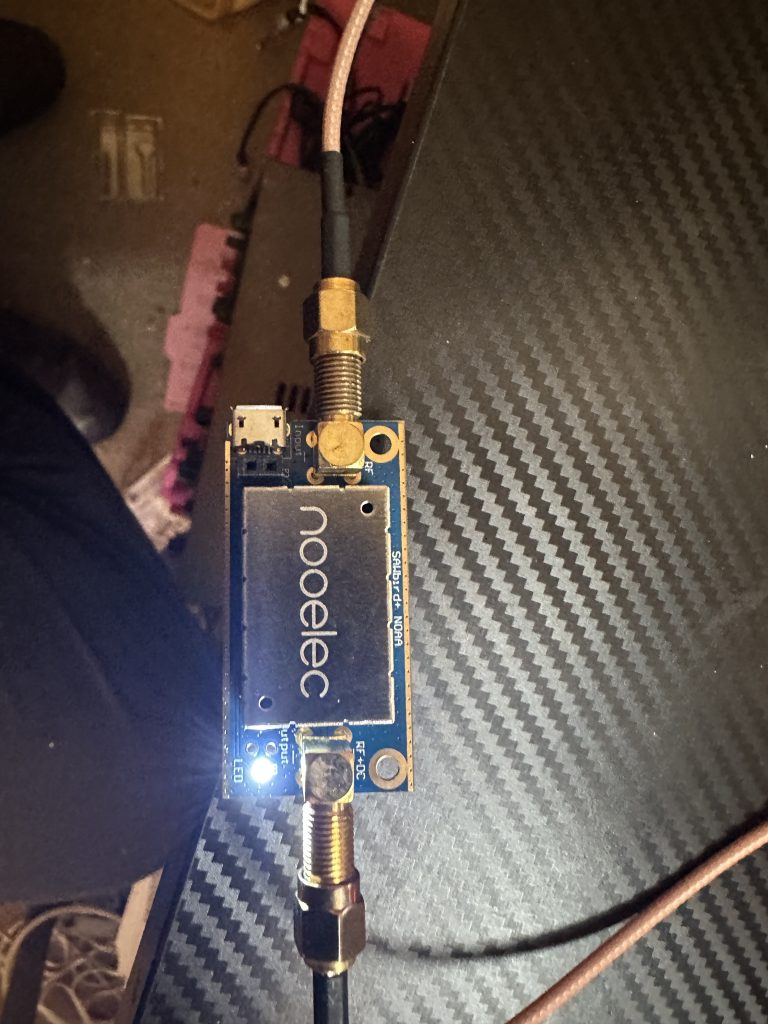
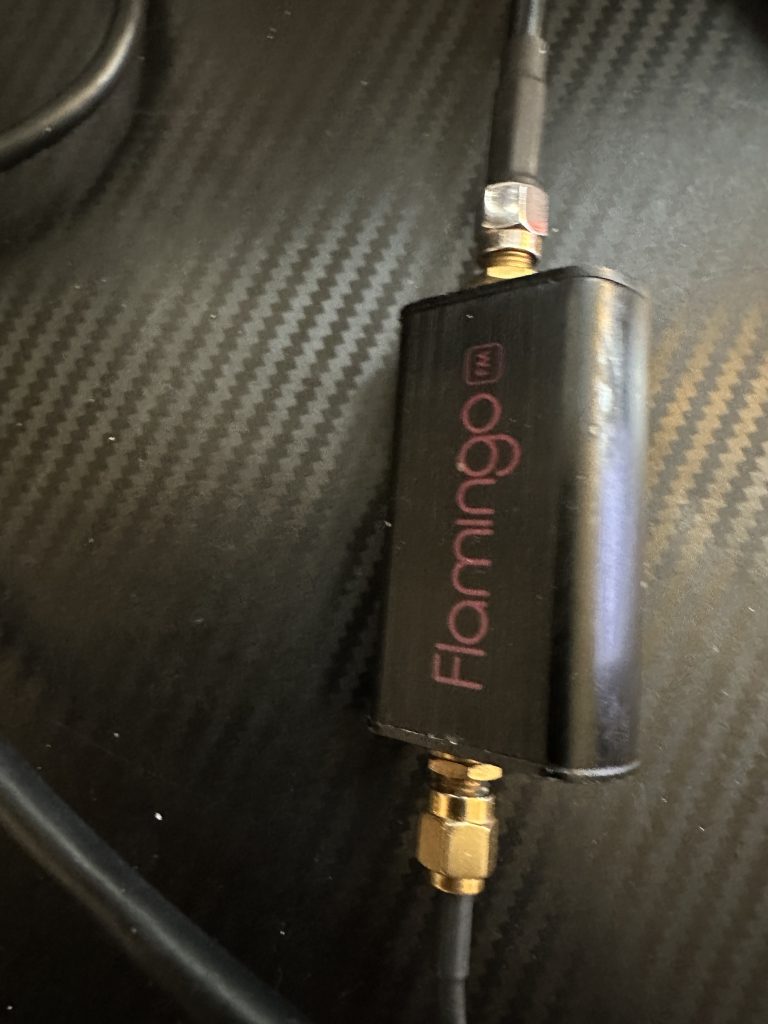
The important changes are based on your SDR. I’m using a nooelec SMARTee which produces the bias-t voltage for the amplifier and flamingo signal blocker. Please note I am *not* using a DC Blocker with this configuration as it is not required, you will need to check if your SDR needs a capacitor or Nooelec DC Block if it is not the same SDR as my the I am using
lsusb
Bus 001 Device 006: ID 0bda:2838 Realtek Semiconductor Corp. RTL2838 DVB-T
I attached my original Sawbrid NOAA amplifier and the Flamingo FM band blocker, but my first attempts at receiving the images was disappointing.
initial results
I removed other components and directly connected the SDR to the Pi and the anntenna to the SDR. This proudced better results, but nothing as good as the antenna should be capable of. Even tho this is a RPI3b and doesnt suffer from the same Wifi/Bluetooth Issues that the RPI4 does with NOAA reception, I still moved the SDR away from the Pi, as it was geting hot. The resulted in improved signals so I again inserted the Sawbird NOAA antenna.
This resulted in static being received once again, so figured that I had blown up the pre-amp by supplying it too much voltage, therefore I bought a replacement bare bones amp board from amazon, which at £37 pounds seemed reasonable. I was really impressed that I ordered the amp early in the morning (around 8am) and it was here the same evening by 6pm. Upon arrival I immediatly inserted it in the signal path.
barebones boardpower via bias-t
I was not to be disappointed, i was soon picking up NOAA pictures like before, as one of my IRC friends used ‘crisp’ defined the pictures that where now coming through.
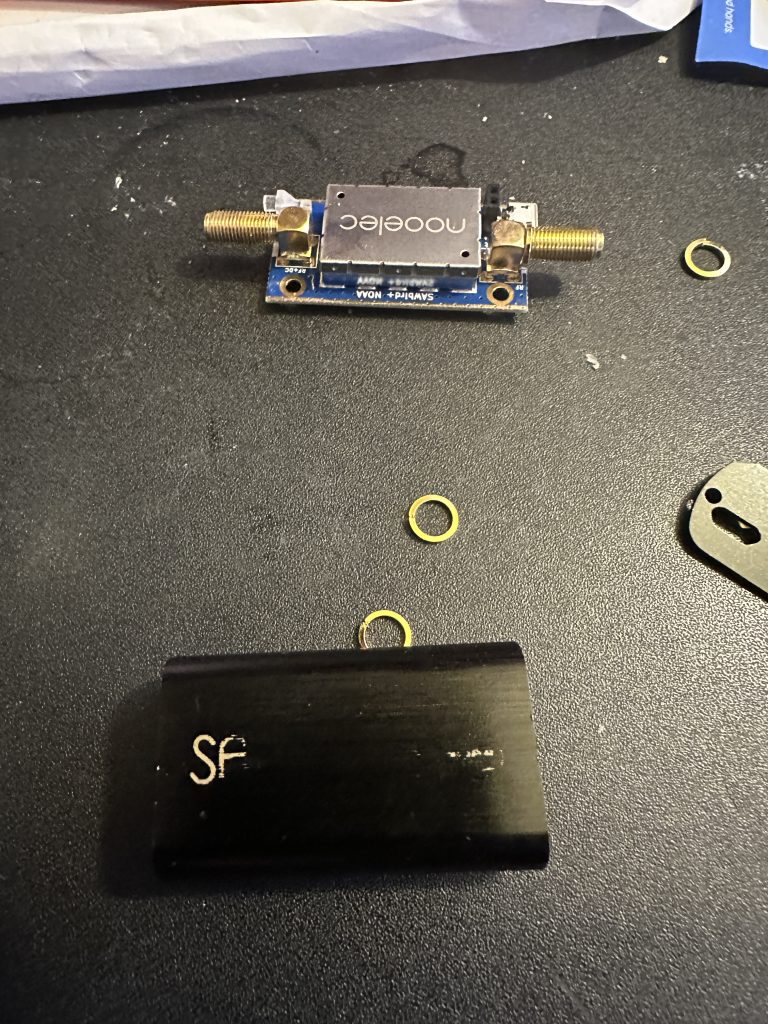
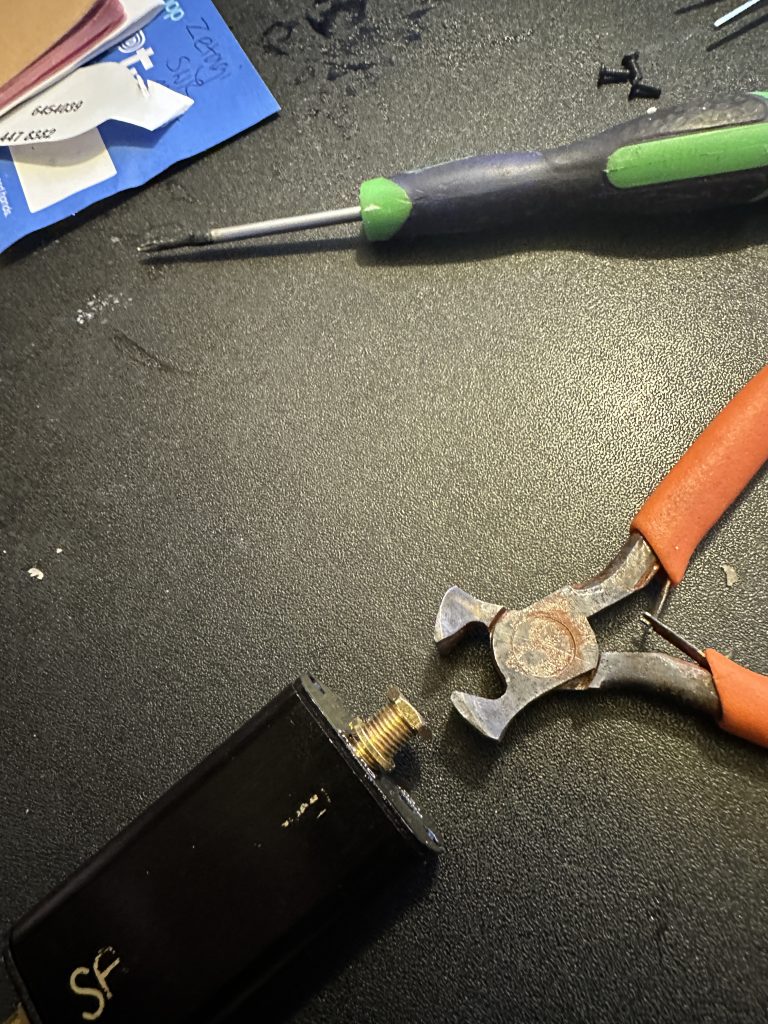
I set about re-housing the amp back in the broken amps container, but imagine i must of connected something wrong as the signal was again reduced to static.
remove old boardtighten screwsrehoused
It was a quick enough job to remove the casing and restor the amp to its ‘naked’ form, then continued to receive NOAA images and METEOR that where fantastic. I modified my config so the static was clipped from the images, resulting in even more presentable images.
fantastic imagescrisp
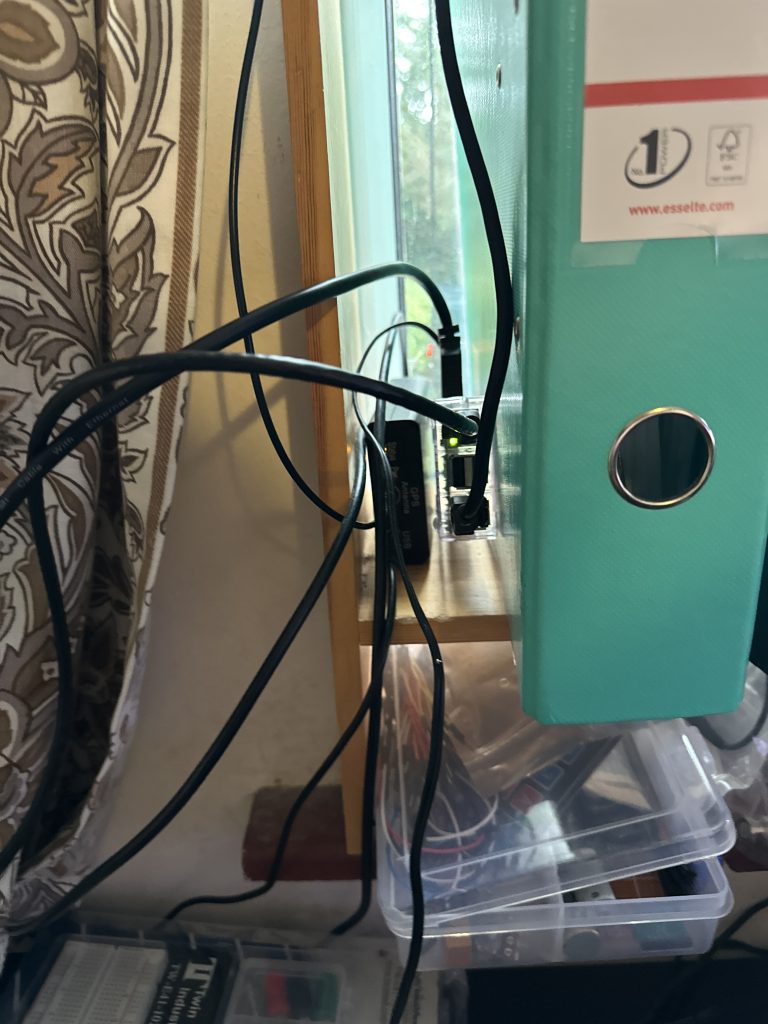
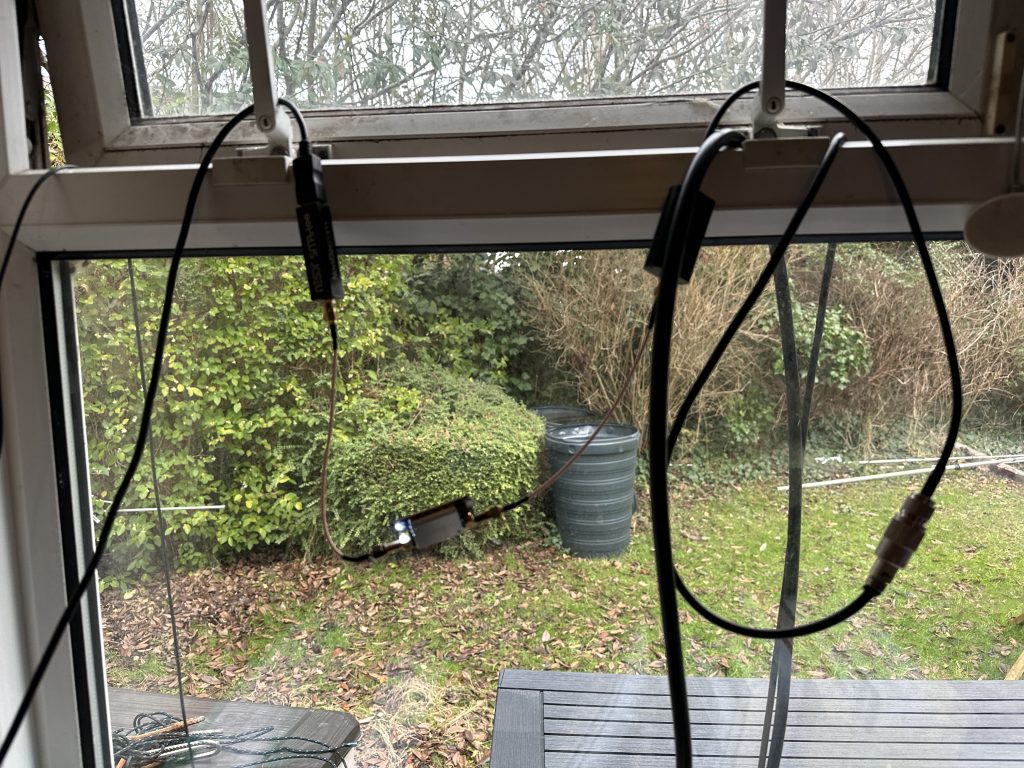
I set about making a better home for the SDR and signal chain, what is important is to keep all parts of the input signal away from any interference, espeically noticable is DC supply voltage if the amplifier or noise blanker get near a power supply or power feed wire, the ‘classic’ 50Hz mains hum is very apparent in the pictures.
Pi..SDR via extensionAnpFM Filter
So the feed chain is made totally clear, this is how I have setup my NOAA station.
To get the working setup off my desk and reclaim my research area, i have ‘hung’ all the components over my window handles, and this works really well ! The RF signal is well isolated from any interference and the components are well away from any potential sources of damage. I did consider ‘bundling’ them into a box, but thought the sake of a ‘tidy’ solution, it could introduce more issues, this way i have a nice air-cooled working solution and the light on the amp looks really cool as well !
NOAA dashboard landing page
I had modified the date format in the config so it was UK friendly which made the date the usual format (dd/mm/yy, hh:mm:ss). With that the pictures kept rolling in. It needs a degree of patience to get the settings right, your more than welcome to copy my gain settings if you have the same setup, even if not, just turn off the bias-t and see what your milage is like !
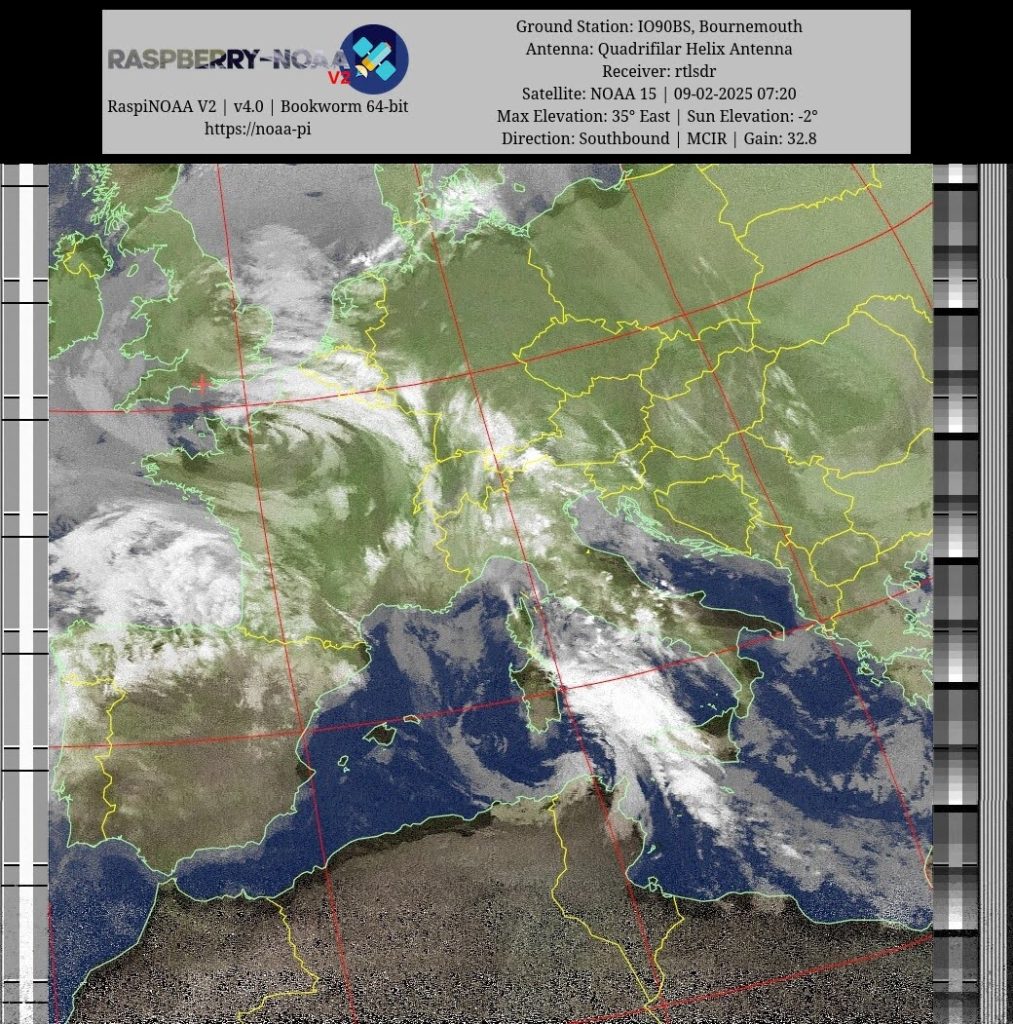
I was overjoyed at the excellent METEOR pictures, typically there are at least two passes a day of METEOR-M2 sats, and the images are very high defintion.
The above image is without clicking to get further detail out the picture as shown below..
The level of detail from these satellites really blows me away !
I went about my normal day of study activities and going out and it was always a pleasure to come back to a set of new images avaialble from my very own satellite image receiver ! Whilst the image does have a band of static across it, i was astounded that I still pick up the signal whilst the satellite went across Northern Africa ! Not sure if propergation had change, but I was really impressed with the setup and that the time spent on setting it up and now just letting it run was worth all the effort !
I will still get on the air in the evening and am setting up other SDR’s for the SSTV repeater and Wellbrook antenna to have a TCP controlled SDR I can listen to from my desktop .
Thanks again for reading my blog and I hope this inspires/helps others to enjoy other aspects of this amazing hobby that is radio.
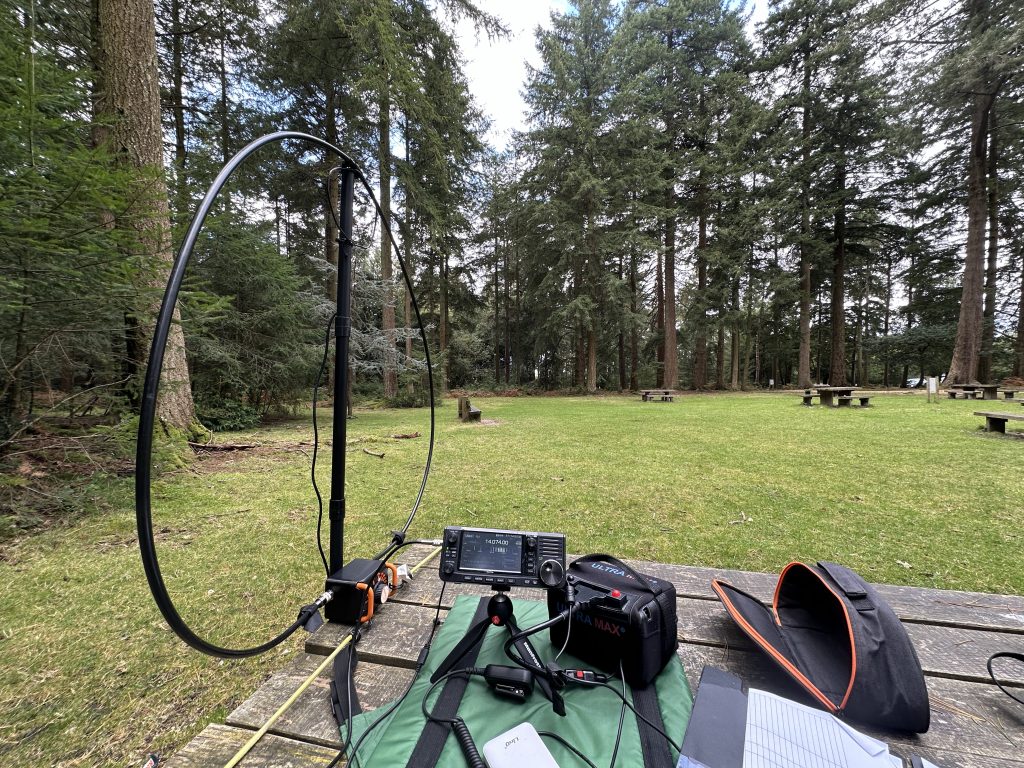
It was a bright sunny day down in IO90, so wanting to make full use I headed off to one of my favourite locations in the New Forest (GB-0112) Boulderwood. Its lovely there as it has excellent benches which my radio can be setup on quite easily, and the surrounding trees are really beautiful.
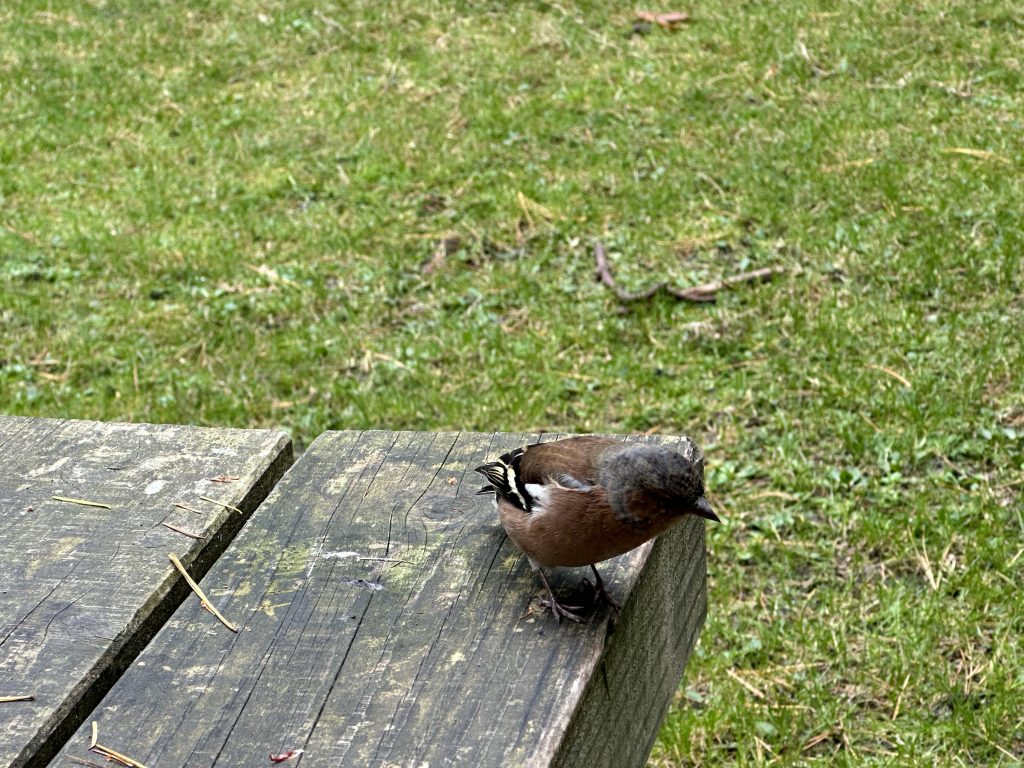
Set up on my favorite picnic tableBongo doing APRS en-routeA feathered friend looking for nibbles
I was setup in no time at all with the mag loop and started out with FT4 on 20M, then FT8. I was amazed at how good the propagation was today, with brilliant signal reports and a very steady stream of QSO’s – in no less than 20 minutes, I had made the 10 contacts required to activate the park!
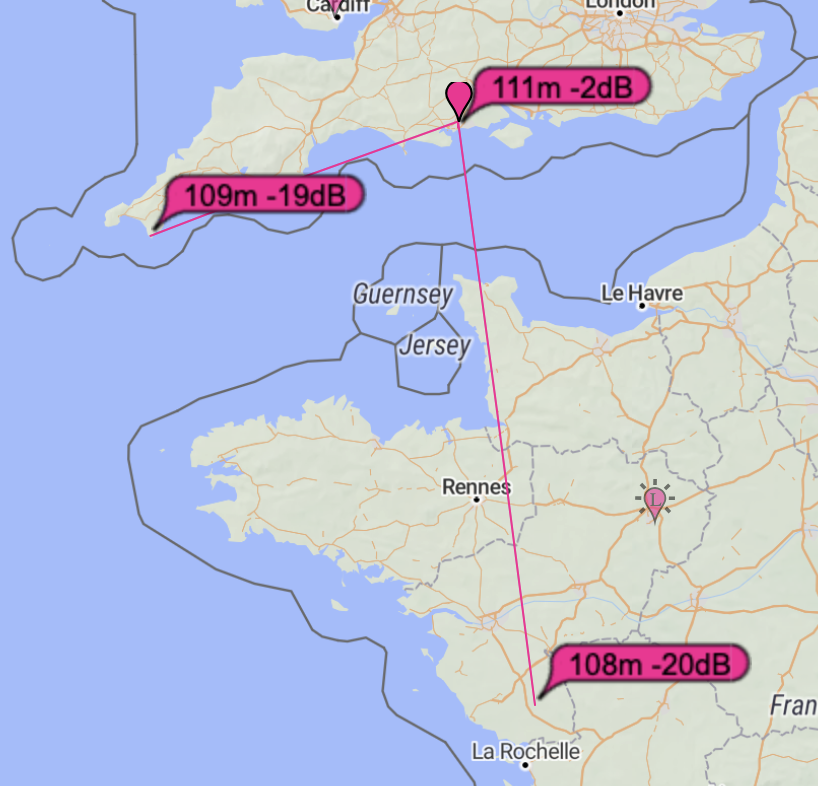
FT8 propagation on 10W into the mag-loop was brilliant
Having had so much success on digital modes, I gave SSB a try on 20m, I was not to be disappointed ! A quick self spot on the POTA app (also a benefit of this part of the New Forest, it has mobile phone coverage!) and I made excellent contacts in Switzerland with HB9HZC and HB9BWR with very good signal reports both ways (59 from me, 57 received) With no more than a few minutes wait, I was having a QSO with Jose, EA1BUL in Spain, with a brilliant signal report.
I’m not usually one for swapping bands, but I’d thought I’d give 40m a try as conditions seemed so favorable. I returned to the QRP CoA (7.090) on SSB and sure enough a contact with G0QRL, Don in Devon was to be had ! It was harder work and the SWR was slighter higher at 2:1, but nevertheless a great receive signal report and I got 55 on my 10W of power.
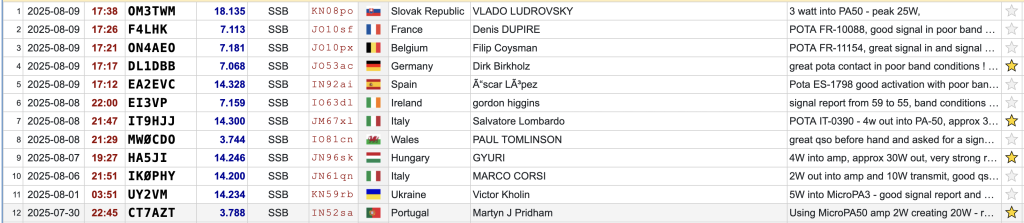
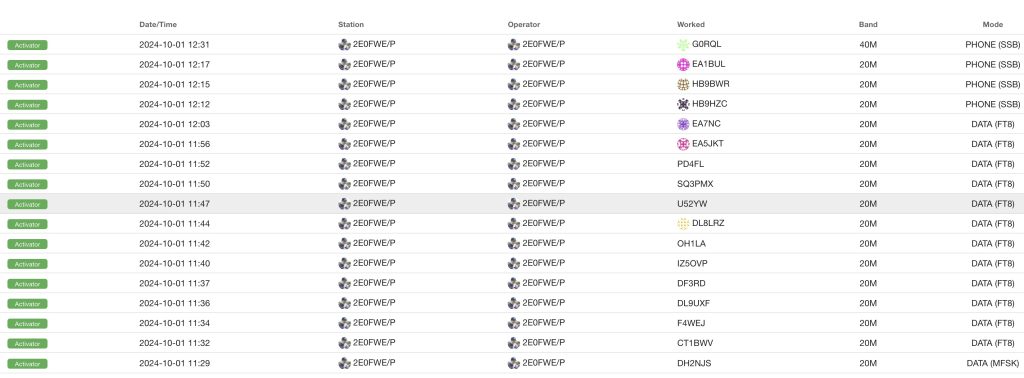
POTA Log for today – if you see yourself there *big thanks*
This was a brilliant activation, and I had a thoroughly good time. With the WX turning slightly inclement I headed back home, thoroughly excited and really impressed with the IC705 and Alexloop antenna – I really love QRP and am amazed at just how much can be done with a good antenna and limited power.
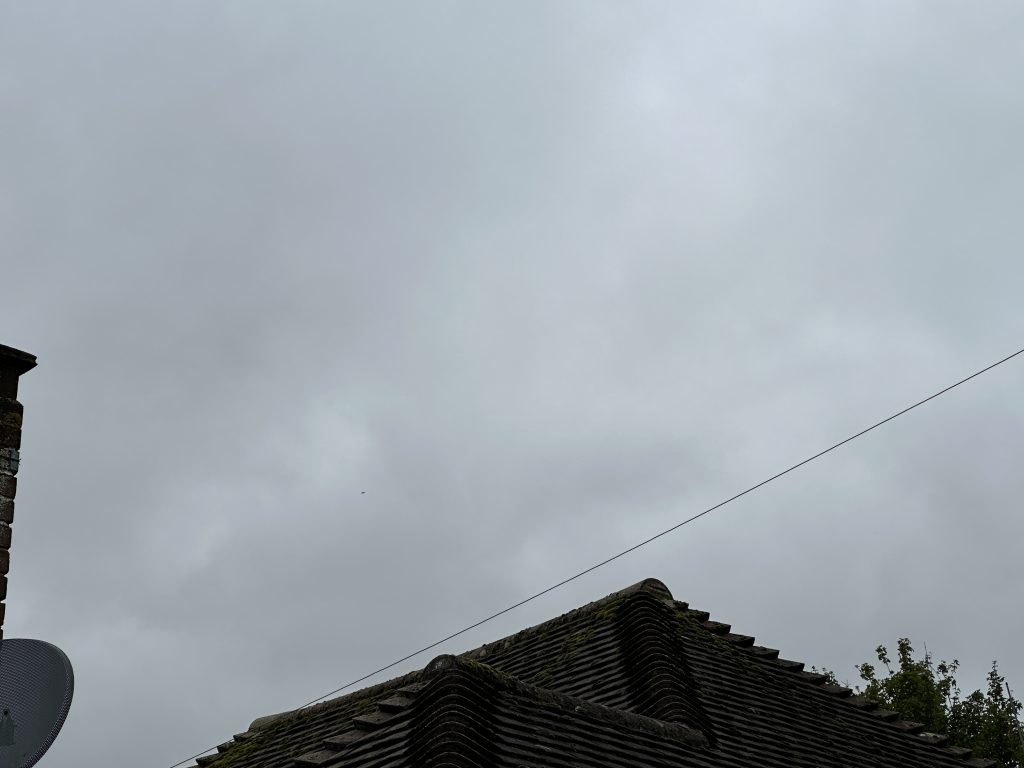
Wow, what WX (weather) we have been having lately – thankfully thunderstorms/lightining have missed me, but the wind and rain had a rather adverse effect on EFHW setup.
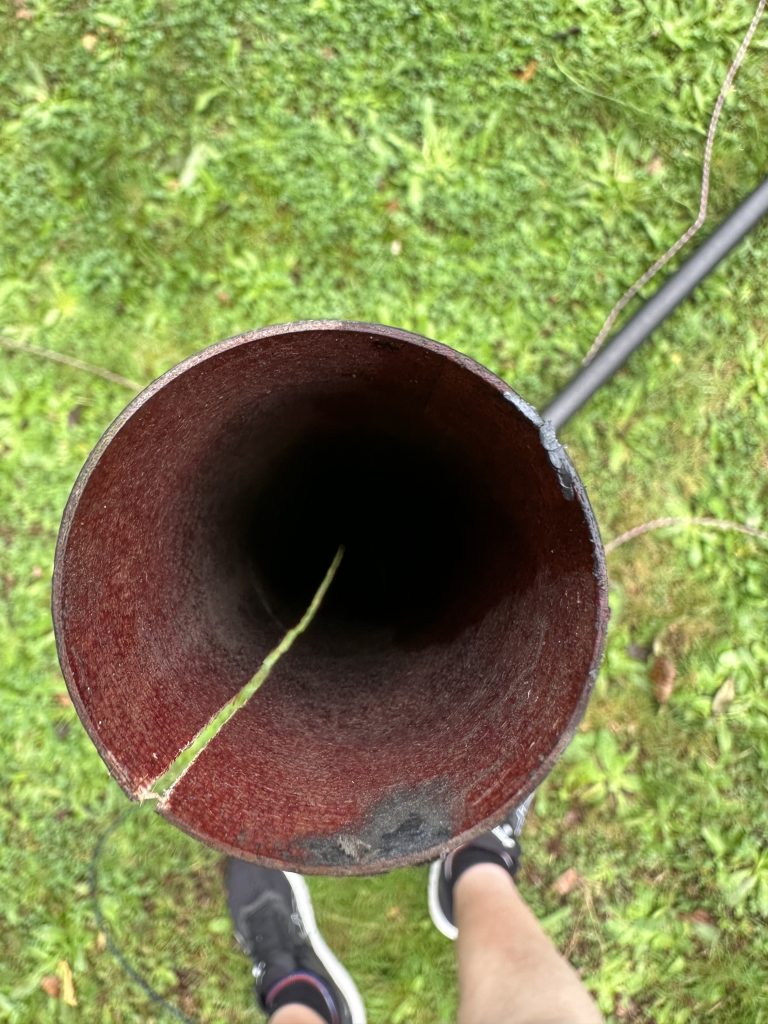
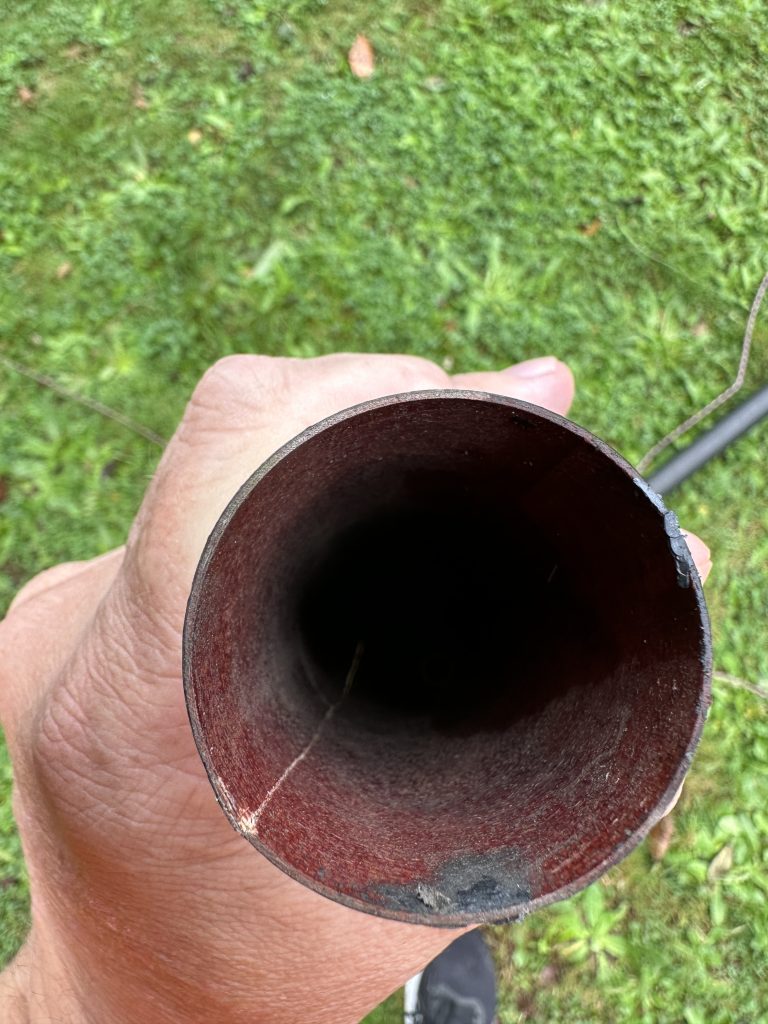
*crack*thats a biggieabout 1mm gap when held close
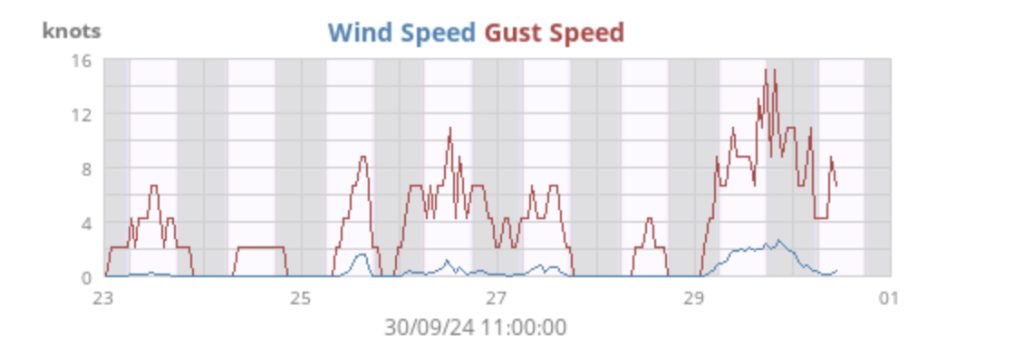
The mighty DX Commander classic mast that I used as far end of my 80m UK Antenna EFHW took the full brunt of the winds over the weekend, my weather recorder stating upto 16 knots – and that is at ground level surrounded by bushes/trees!
Ground level wind speeds
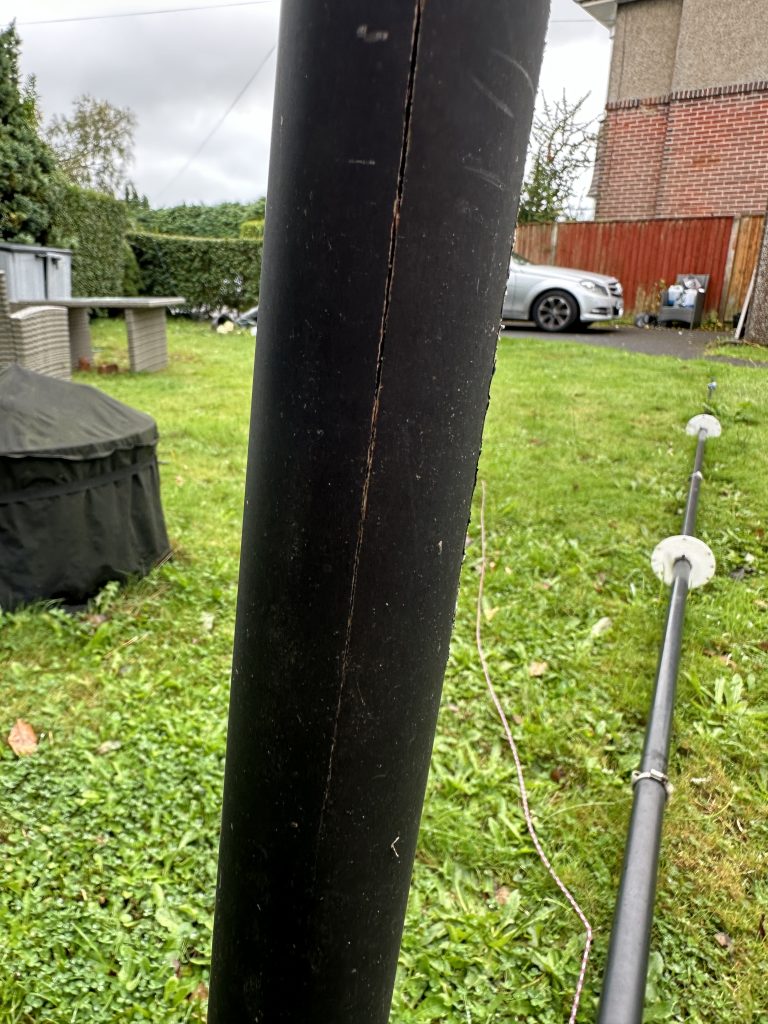
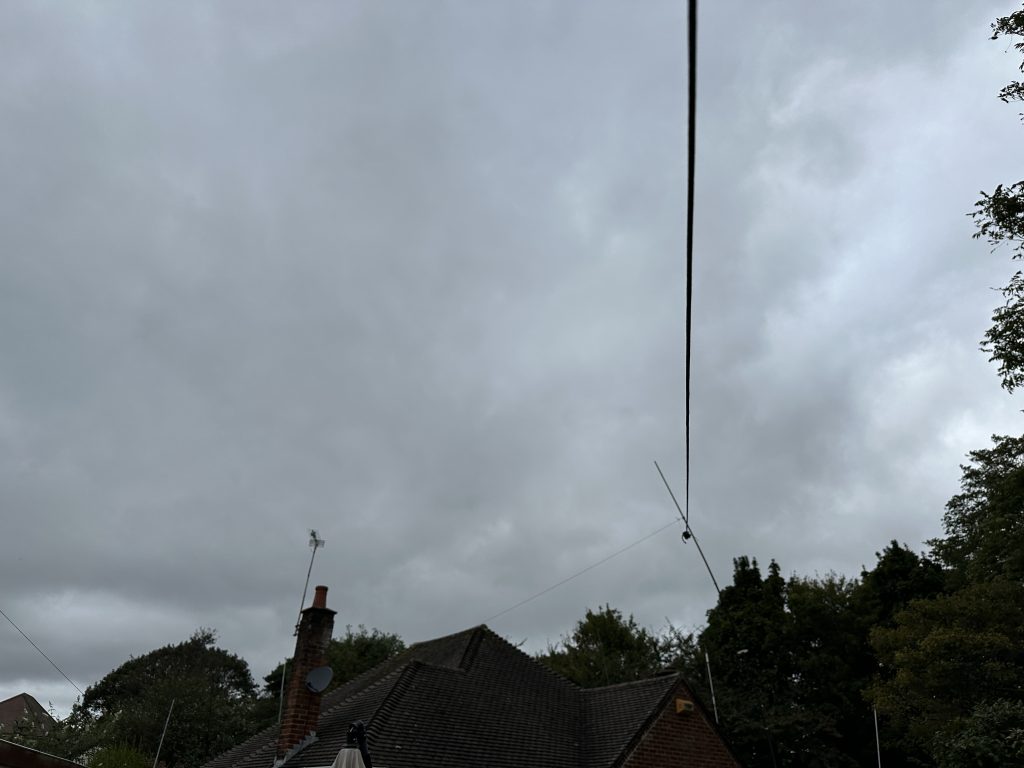
I looked around for spares and was glad to see I had a spare base-pipe for the mast, but that would mean stripping it down and then feeding the pipe through, so I’d though id see if I can just move the mast a little bit, lose a little height but still clear the bungalows roof.
just above the roofgoing strongwell rigged
I was really happy that the mast would continue to function, i rigged it back up with 4 ropes to ensure it should stay up right, no further storms are forecast currently!
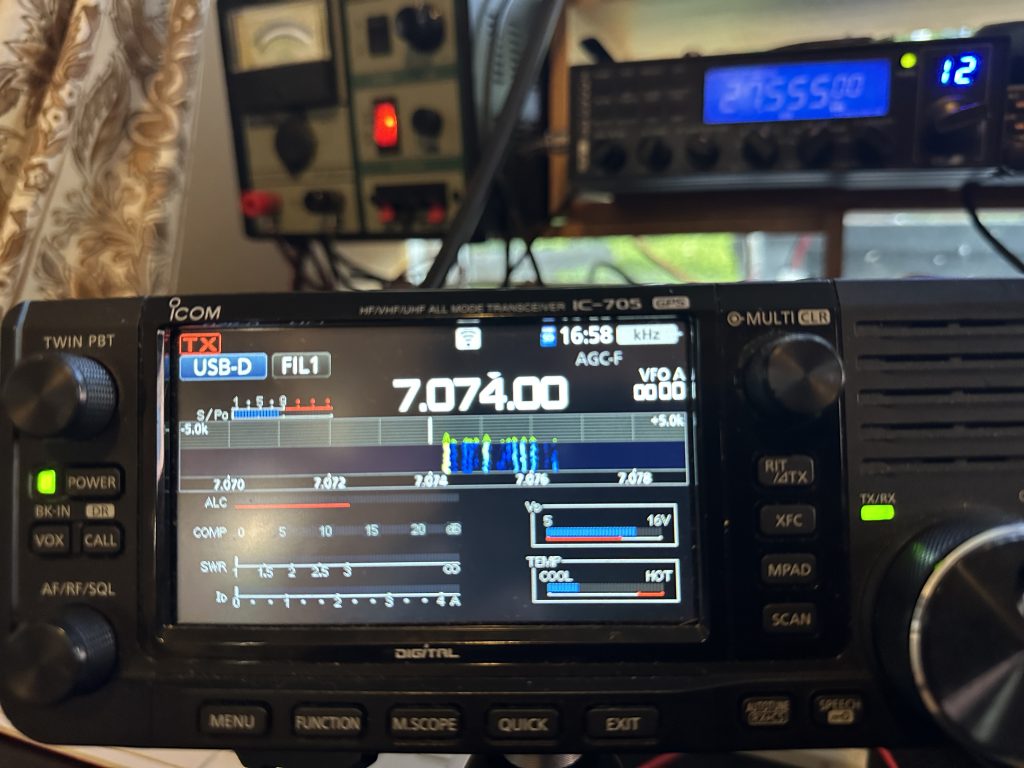
I went back to the shack and tested out SSTV on 20M – 1:1 SWR with 100W and my pic using Robot 72 was well received across Europe !
My other antennas and the bullet proof 6BTV was totally uneffected by the weather, but the 2m/70cm mast needs a bit of a push up, but I’m getting older and that antenna is getting heavier… 😉
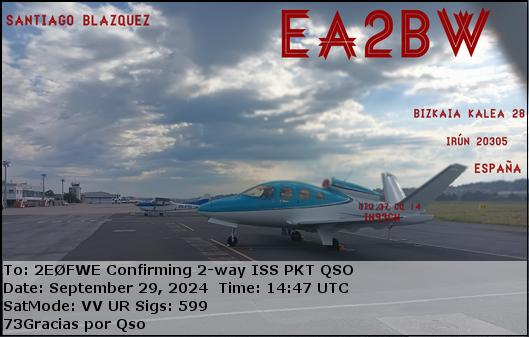
I was very happy to have a QSO via the ISS Digipeater and received an excellent QSO card from EA2BW.
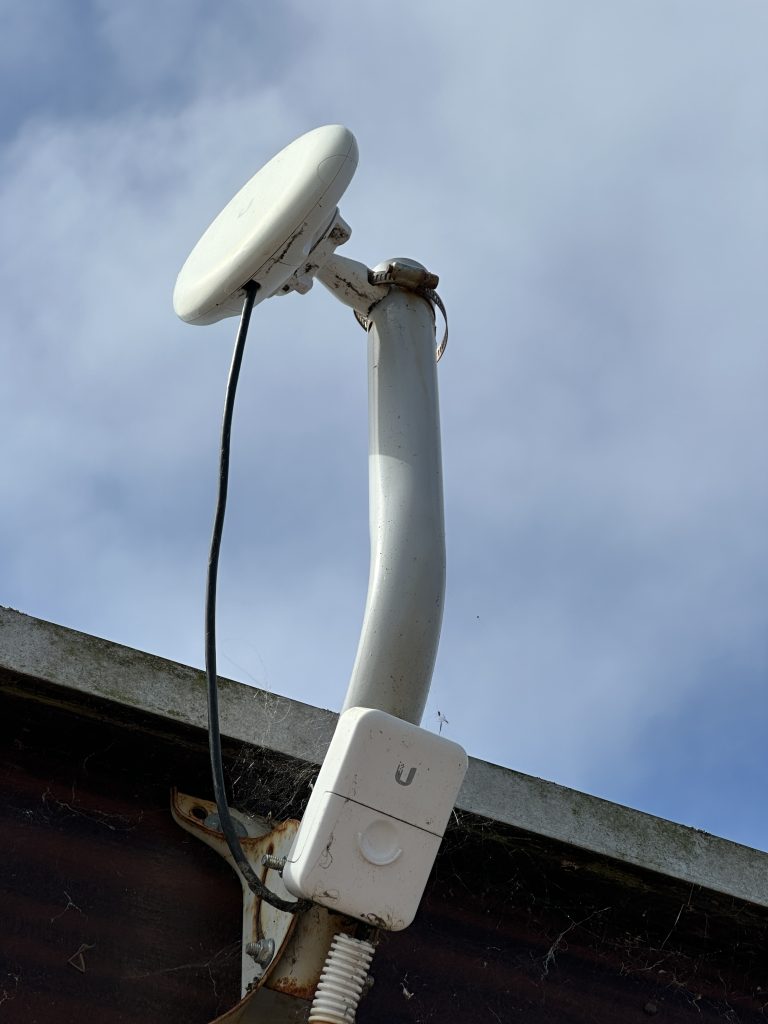
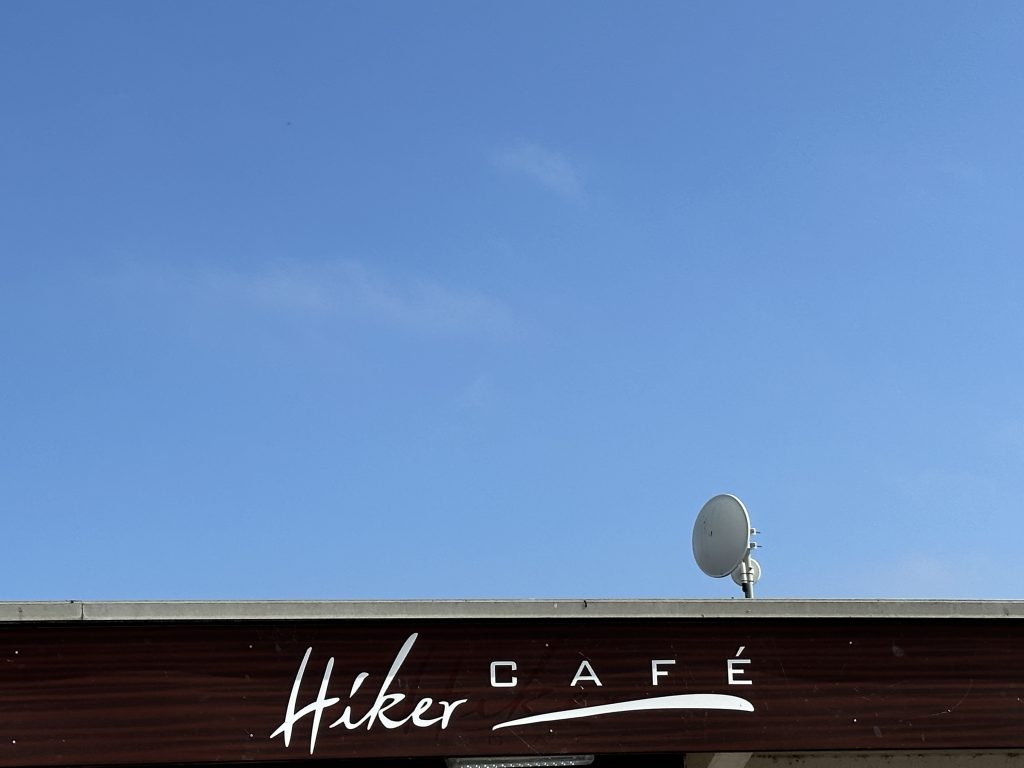
With another gorgeous sunny day it was an opportunity to get out the shack and on the air, but before heading out, I had a nice walk/exercise to Hengistbury Head, whilst I had no radio with me today, I did notice these small microwave dishes at the end of my walk on the cafe. I wonder what they are ?
small dish side of cafelarger dish on topfront side
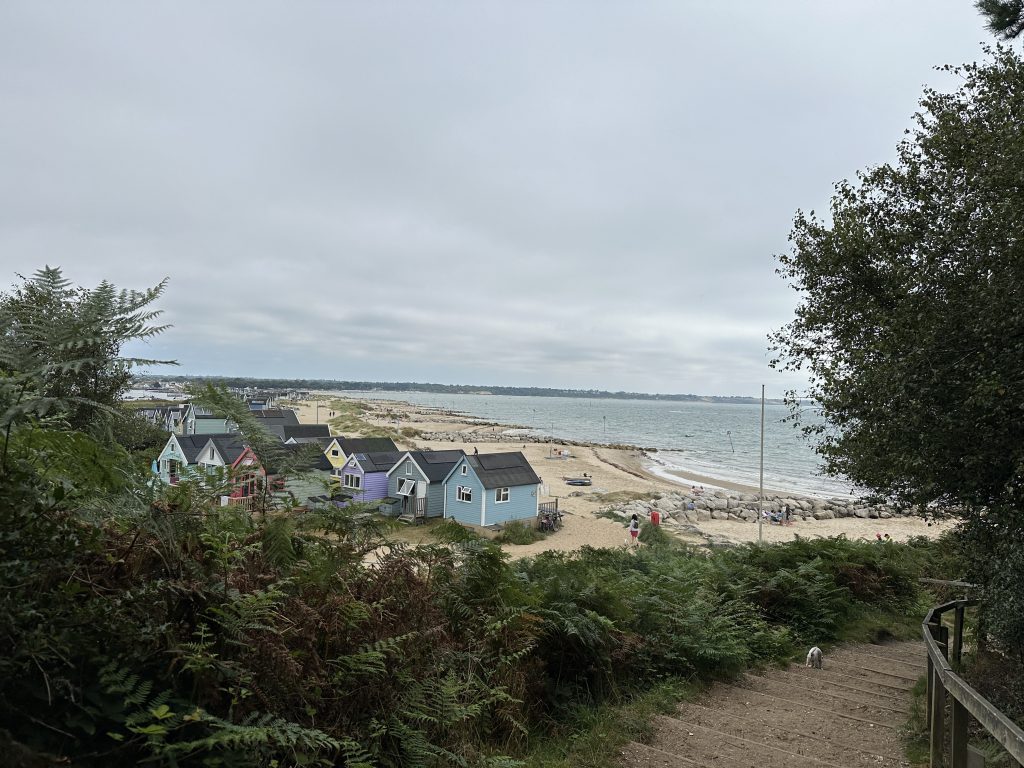
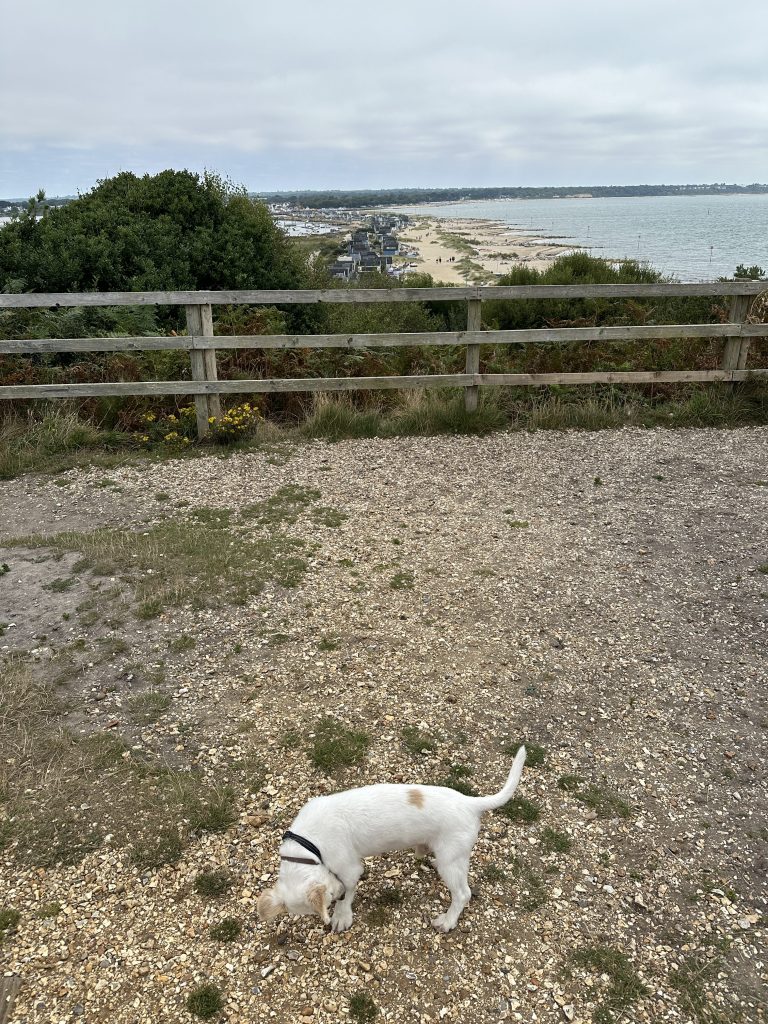
Maybe they are some kind of digital voice repeater, they look very ‘directed’ so not the kind of antenna I’d expect something like the ‘land train’ to use, maybe its to the other cafe near mudeford sandback ? Still Sweety and I had a great walk !
cheap little shedsSweety enjoying the beach
Once back home I quickly assembled my radio and headed off to the New Forest, I did a quick check of the 17m band before heading out and everything look good on the bands, despite the reports of poor conditions.
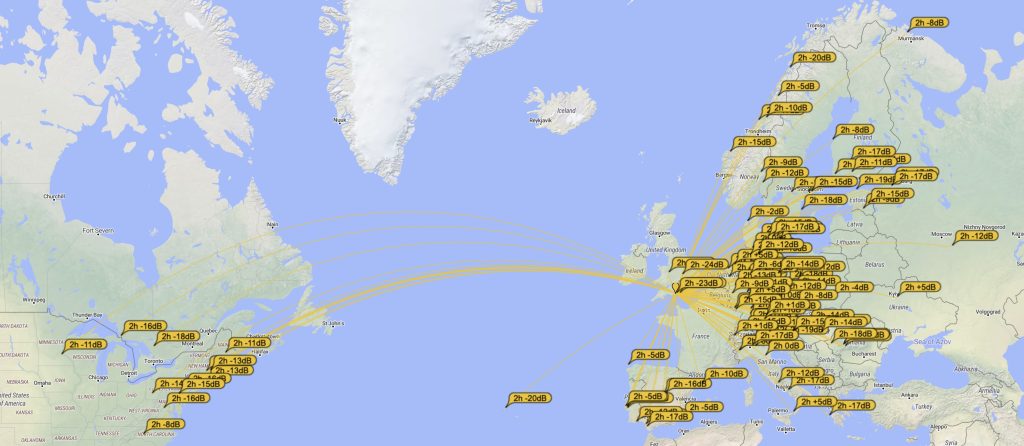
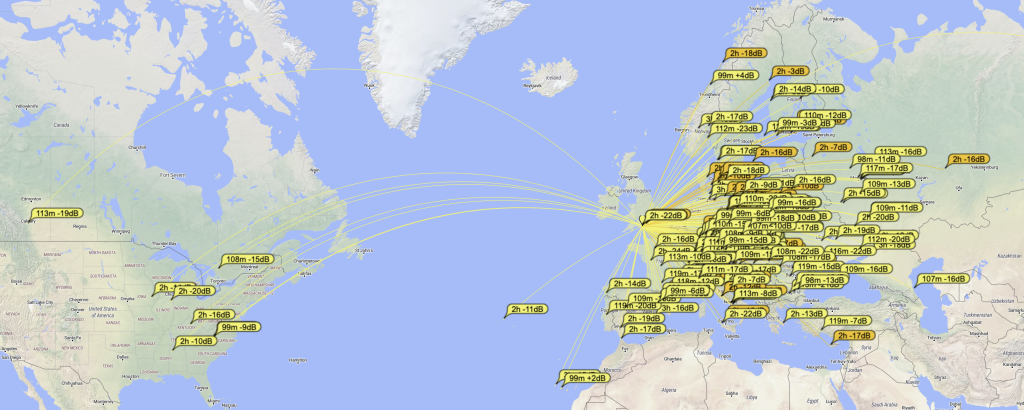
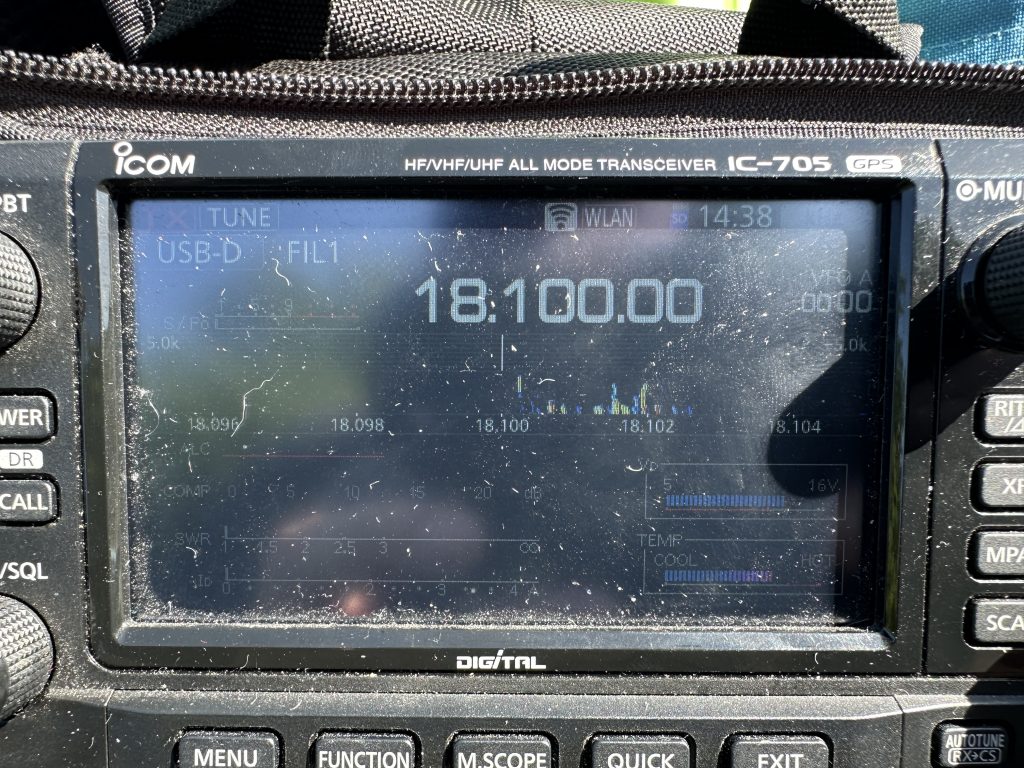
Once setup, I was able to get onto FT8 on 17m in the park and my reports on PSK Reporter was really good ! I’m quite amazed how well this little whip and radials works.
17m FT8 & 10W of power
I had to do some band and mode changing to get the 10 contacts to activate the park, but sure enough today it was in less than an hour, which was great, maybe coming in the afternoon when more Europeans are awake/about for radio helped as well.
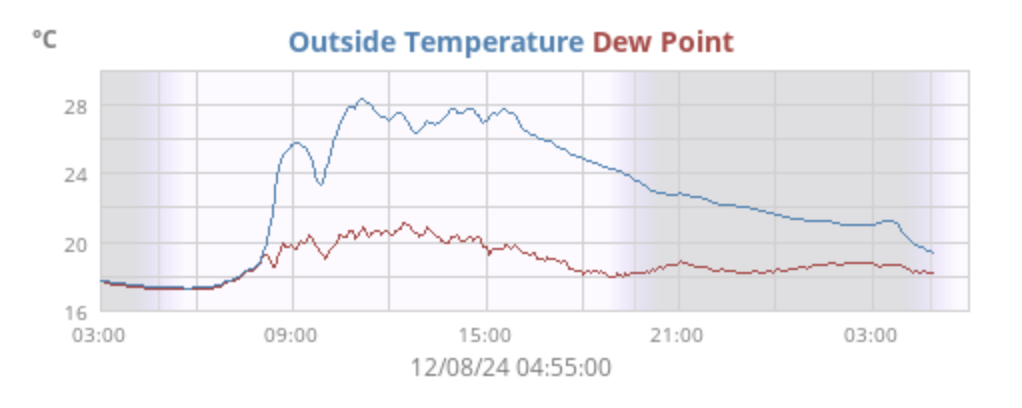
After about 90 minutes on digital modes I noticed my IC-705 has got really hot, as in hot to touch and the temp meter on the front was getting high as well ! I gave the radio about 15 minutes of break and the temp got back down to below the red zone. I think the combination of hot weather (was about 28c air temp at this point, the breeze kept me somewhat cool) and the radio being in the bag restricted its ventilation.
It got hot in the afternoon !
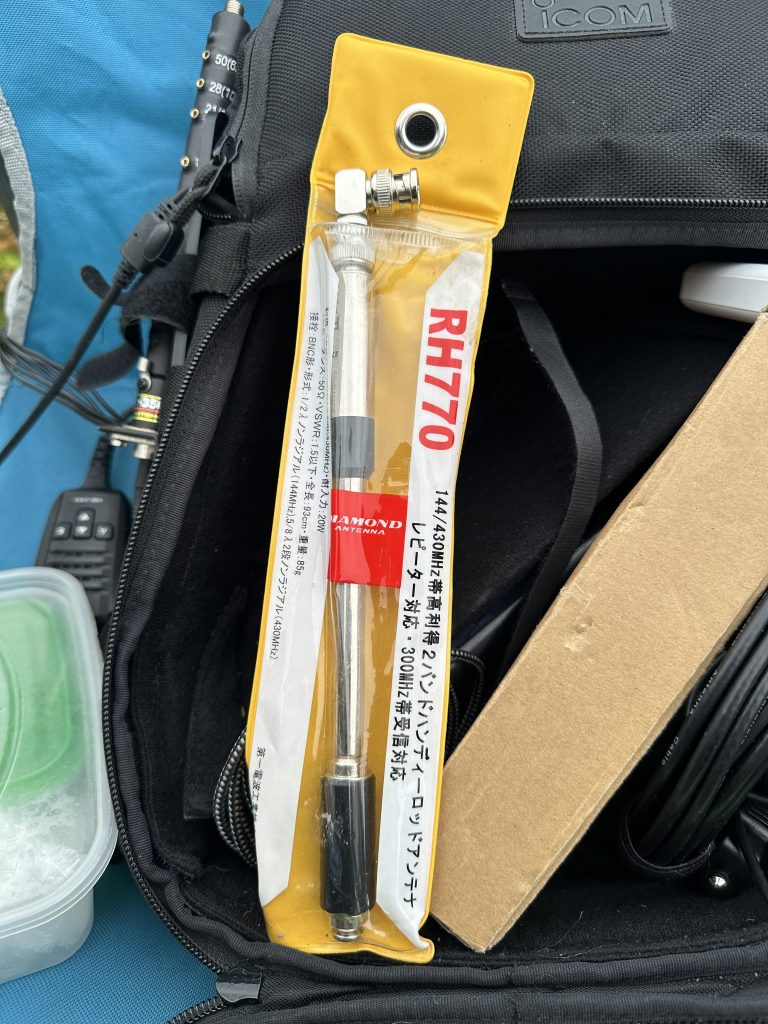
I found that taking the radio out the bag and letting the breeze pass over it considerabley reduced the temperature. As I already had enough contacts I’d though I give 2M FM a try on the RH770 Whip antenna.
To my amazement, i was able to make a contact with 2E1KJB on the Isle of White in Cowes ! Given I was in the New Forest so this was well over the horizion on a whip antenna, i was really pleased to make the QSO and add a FM contact to my list – I notice the temperature of the radio had once again increased, so I thought it was a good way to finish off and pack up.
IC 705 back home and cooled down, working great
I felt it prudent to check the IC-705 once back home as it had time to cool down on the short journey back and borrowing the 6btv antenna from the WSPR station was able to confirm that all was good with the transmit, so no damage done to the finals due to the hot weather.
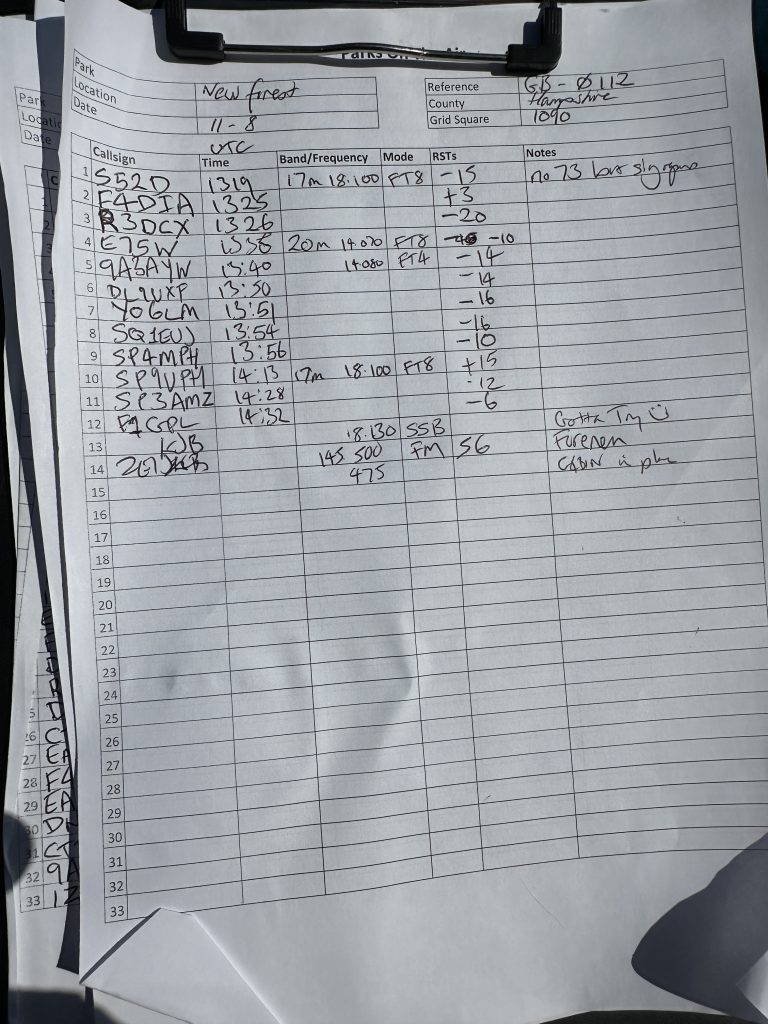
new forest trafficnot a full log, but enough
I was really happy to get out with the radio 2 days in a row and make enough contacts to add to my new forest activations – having now reached 10 activations in the New Forest, i’m half way there on completing the award, and with still plenty of time for radio between now and getting back into alot more studying, I’m confident I will get the 20 activations in no time at all !
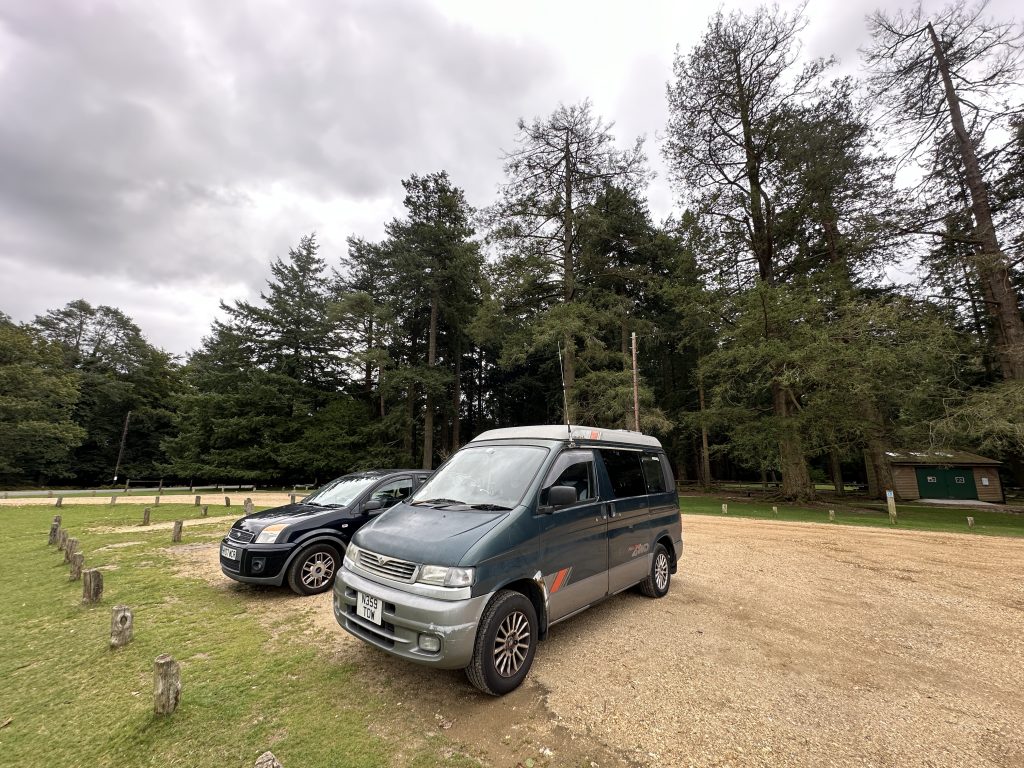
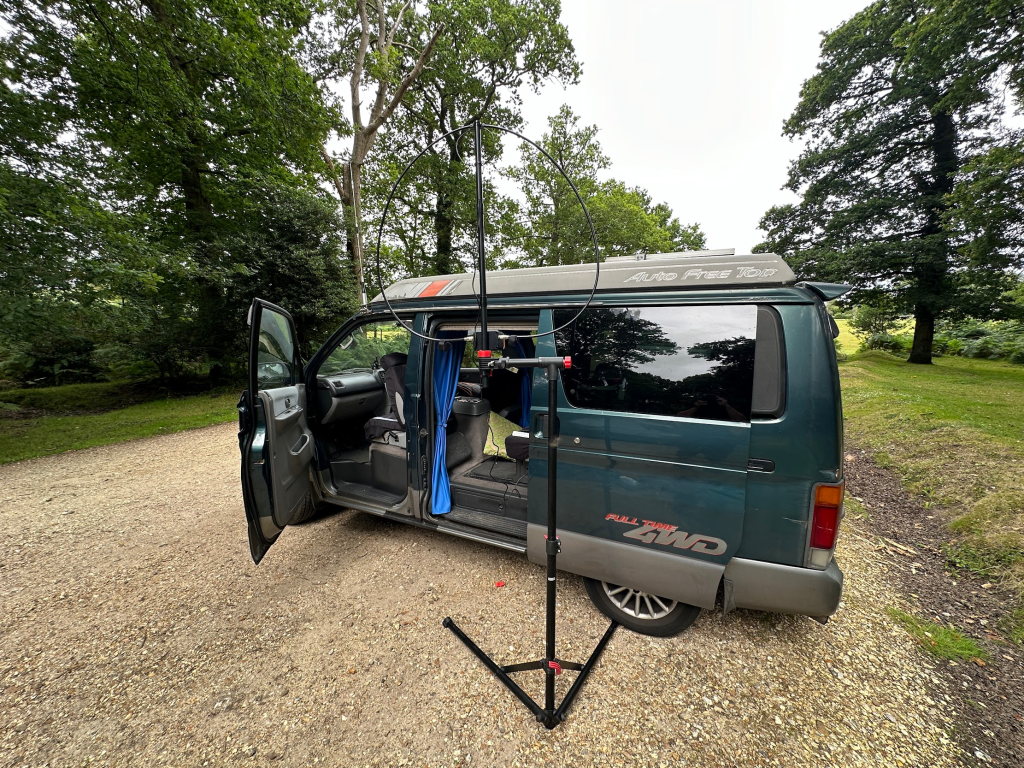
Bongo and magloop
With the issue of heat and the radio being in the Icom back-pack I may revert to the magloop again and try to work out a way I can use it portable, as I tend to either bungee it to a table or use my ‘bike stand’ mast which under the rear wheel of the bongo as shown above.
Still I’m sure I’ll find a way, i do enjoy getting out of the house and out of the Bongo when the weather is this nice ! Until the next time and thanks for all those who responded to my CQ’s ! 2E0FWE 🙂
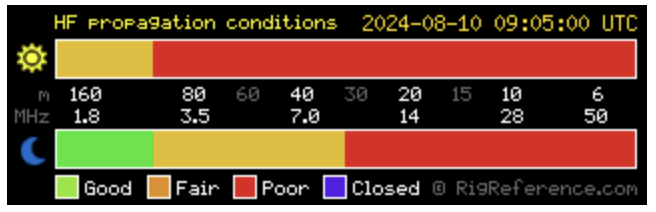
HF Band conditions have not been at their greatest this week (10/8/24) with intemittent SSTV pics on 20m and visibly varying conditions on other bands, courtesy of the WSPR transmitter I run here. Not to be defeated, I still headed out to The New Forest see if any contacts could be made…
Band conditions are not good on the HF bandscurrently
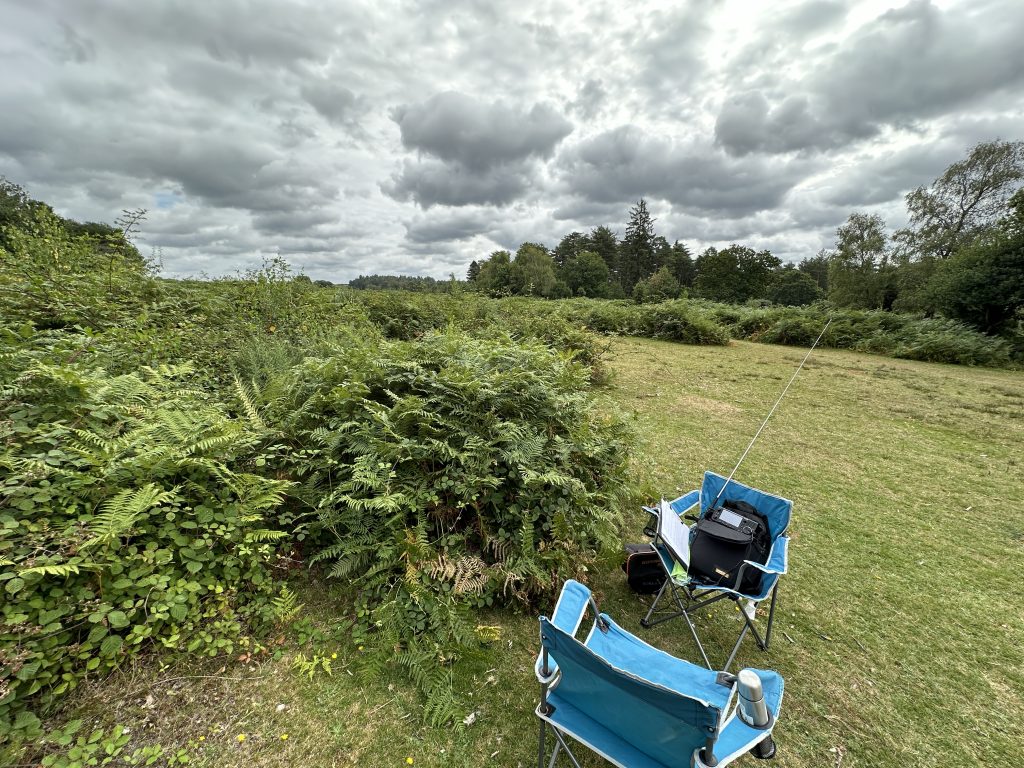
I setup in the same place as last week, with the same antenna. I did unfurl the counterpoises 2 times just to get a better placement and spread and even without the tuner, was getting good SWR of 1.5:1 on the Toybox antenna on 17m. Setup was really easy and no tangled radials.
I started with FT8 on 17M, it was taking some time to get out, but PSK Reporter and self-spotting on the POTA app meant I could see myself via the reverse beacon network as well, so it was just a question of being patient to make a contact.
17M FT8 – despite the poor conditions, my signal was getting out nicely on 10W
Sure enough with 10 minutes, I had my first contacts and QSO’s into Europe. It was certianly taking longer than last week, but nethertheless the QSO’s where coming in. I continued on 17M and it was really evident of just how fluctuating the band conditions where, one minute I was hearing/getting into Australia and New Zeeland, the next the whole band seemingly ‘collapsed’ with only the very strongest of signals getting thru. I had made 6 contacts and I wasnt in a big rush, so peristed with FT8 on 17m. I was pleased to be getting into Denmark and a good report back from OZ9FF was good to get in the logs. Having got my 10 QSO’s in the log after about 90 minutes, I tried different modes and bands.On FT4 on 17m I was pleased to get another POTA user, IK2QEB, who had hunted me from the POTA app.
I bounced to 20m – this was really easy with the Toybox antenna, just changing the ground-wire onto the coil and re-tune the antenna with the ATU, and I was on a 1.3:1 SWR. I managed one contact and with a total of 14 contacts, started to play around the bands and see what else the toybox antenna could do.
I adjusted the ground wire to 10M, no adjustment in the antenna itself was required, and was pleased to see so many signals getting in. Looking at PSK report my signals where getting out albeit with a predominate ‘skip’ to the East, but it was cool to try out a different band in poor conditions, despite not managing a QSO today.
10m FT8 provided signal reports getting into Easten Europe and very far into Russia !
At this point I thought why not give the 2m/70cm whip antenna a try before packing up, just for the fun of it. Whilst I didnt make any QSO’s, it was great that my signal was at least getting out on this little whip antenna !
All in all, despite the bad conditions, i had fun experimenting with the different configurations of the toybox antenna and even tryign out the 2m/70cm whip antenna. I had a nice relaxing time and felt great for getting out with my radio and enjoying the lovely new forest.
I’ve still got a 11 more activations to complete before my repeat award, but am confident with my current setup that figure will steadily decline and hopefully I’ll make more POTA contacts along the way, no matter what the conditions !
Having had some recent setbacks with not making any (i.e. ZERO) contacts and then NINE and not activating the park (I had a double, so counted 10 contacts, but it was only 9…), I was determined to get out and actually add to my activations of the New Forest. Prior today I’m two away from the award for visiting the park and activating it multiple times (20 needed).
APRS Spotting via 2M (144.800)
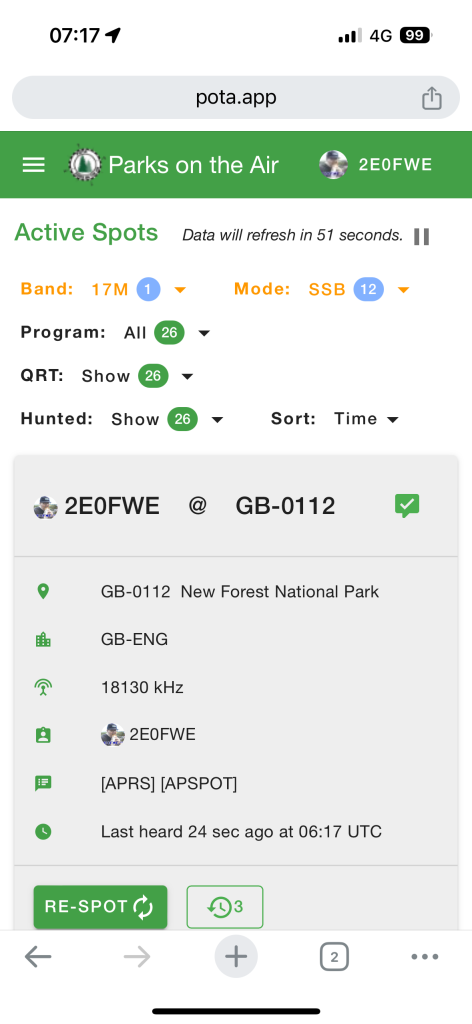
Having tested at the QTH with a quick test then a QRT I could see that I could use APSPOT to self-spot to POTA. Some areas of the new forest have limited phone signal, where as today I could reach the internet on my phone, it was great to see RF->Web via APRS DigiPeaters – Many thanks to the people still keeping APRS alive ! I am truly thankful for the digipeaters !
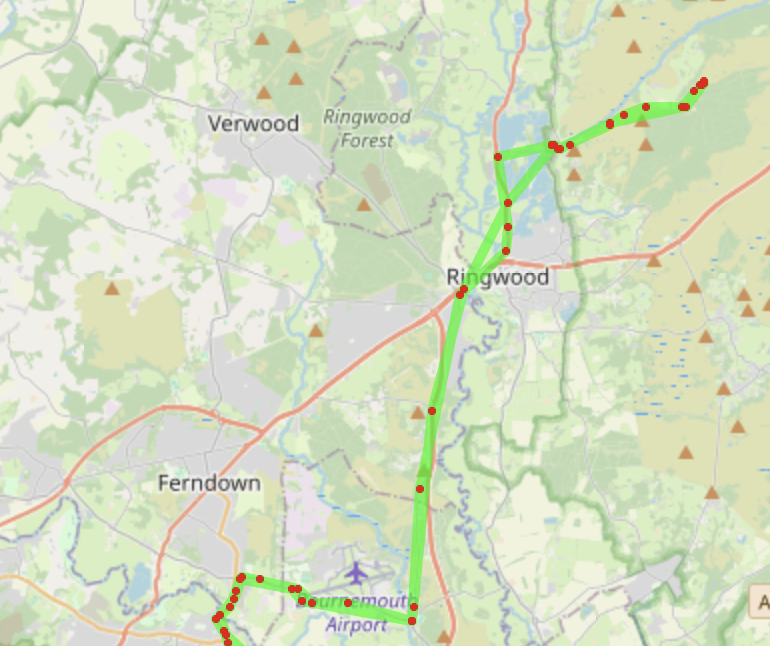
APRS Beacon received en-route and back from POTA activation – thanks to the many APRS Digipeaters!
Beaconing and sending a message for POTA is different, on my Kenwood it is very similar to how shown in the excellent video from Ben Soper, obviously the Frequency changes to the UK APRS of 144.800, i also kept all the text in the message *lower case*
excellent demo of how to self-spot POTA via APRS fom Ben Soper
Ironically, whilst I could spot, I wasn’t able to make any telephony contacts on 17m. Maybe I was asking too much of my QRP setup and compromise antenna. I have made phone contacts on it before, but HF conditions vary and maybe that was the reason why. Propergation on 17M was very come-and-go today, but ranging all over Europe on 10W, I wasnt complaining
17M – FT8
I spent the first set of data communictions on FT8, and there was very much a steady stream of contacts coming in. The whip antenna, tuner and radials where doing a great job, as least as good as my mag loop, but I’d say it was far more portable and easier to setup.
17M – FT4
Looking at the waterfall on the IC705 I could see some activity on the FT4 section of the band, switching to FT4 SDR-Mobile is very easy, just a quick click, the tuner put the SWR down to <1.5:1 and I was off. It was a very steady flow of QSO’s !
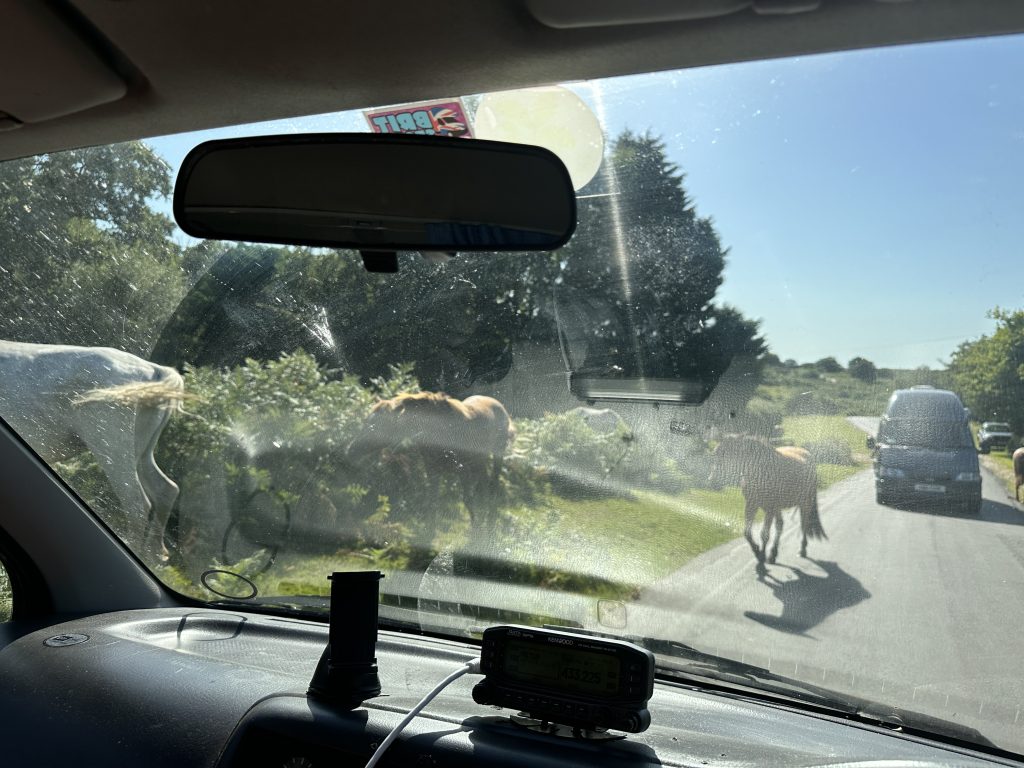
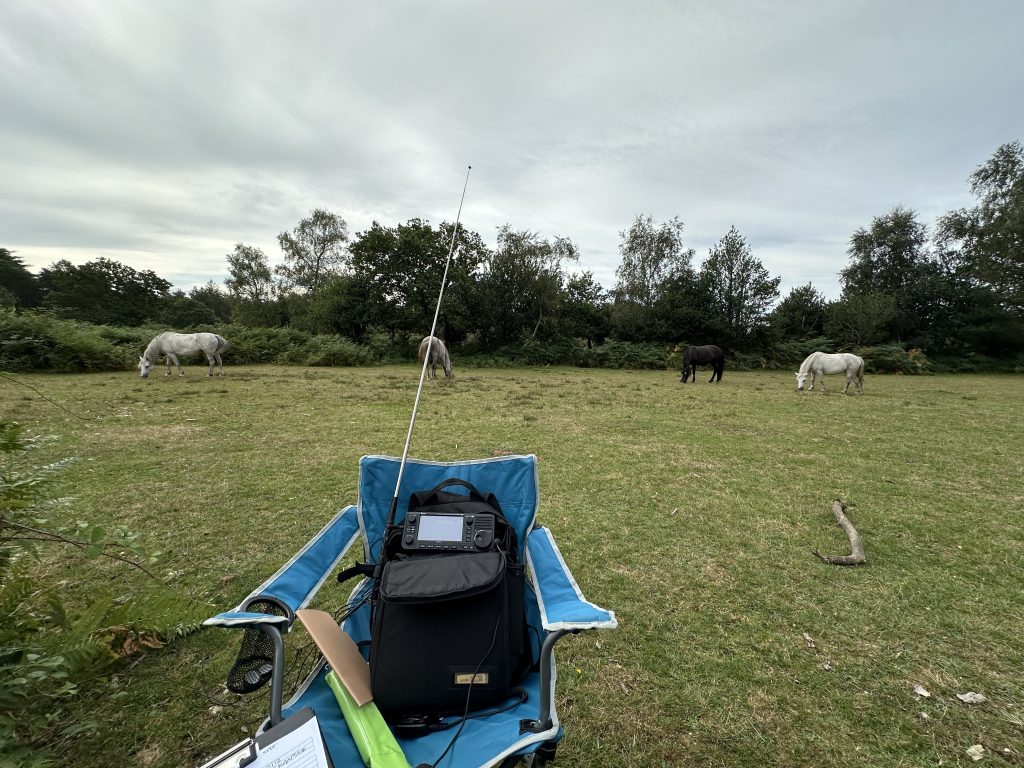
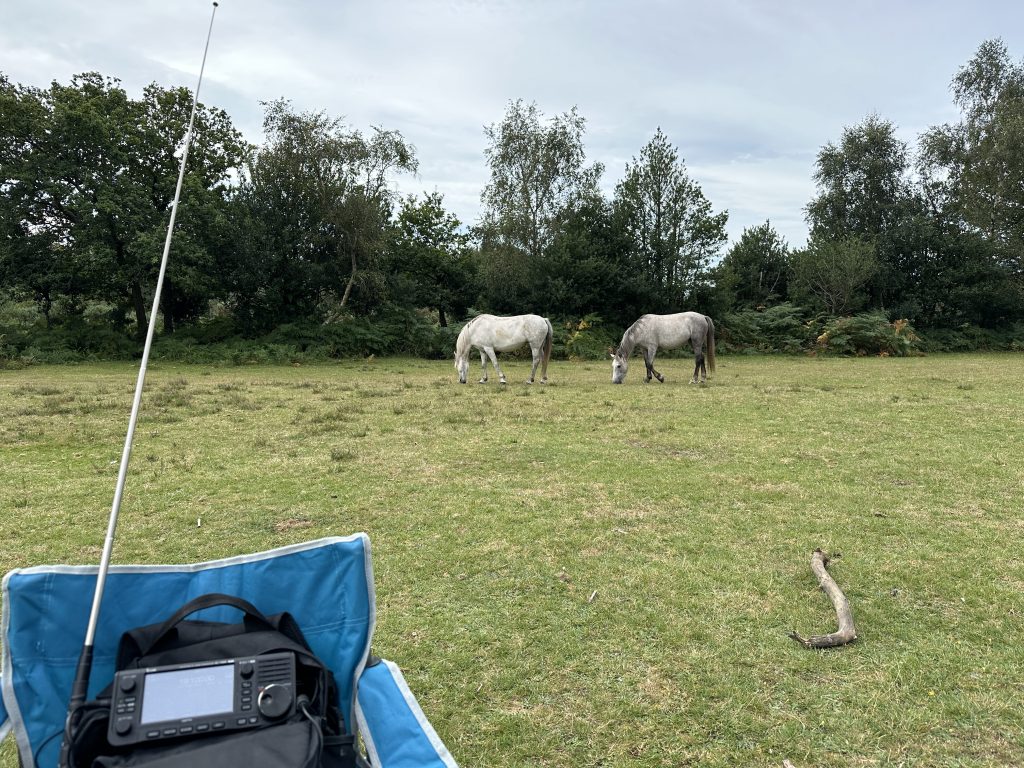
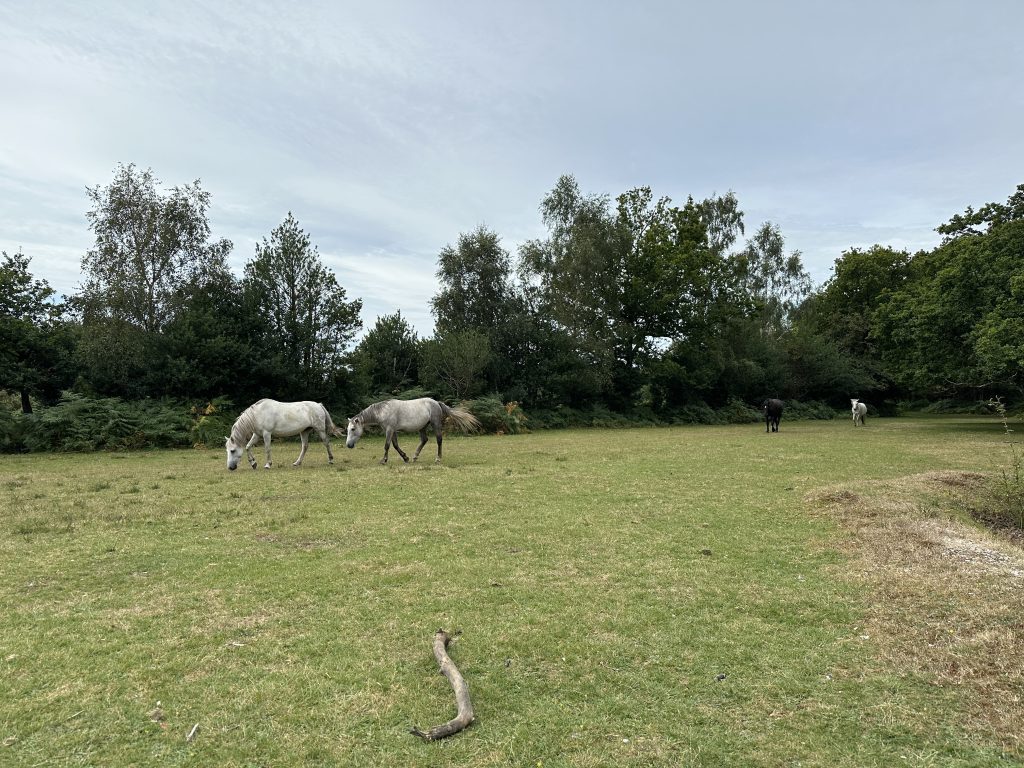
Wild horsesEnjoying the grassand not the radials
It was lovely to meet people out walking their dogs, with a great conversation with a TV Repairman about the old days of broadcast transmission and interference from France. Its great to show people where I have reached with my radio, they are amazed with how far it has gone, also I really liked their little badger-dog who was playing fetch with a ball 🙂 The amount of horses in the new forest is lovely, there is a real mix of animals, this time of the year we see horses and cows roaming around the roads – much care is needed as the youngsters are just starting to get used to the roads, but its amazing to see the parents have such protective instincts for their young. In the Autumn I look forward to seeing the little red pigs which are usually seen around Burley 🙂
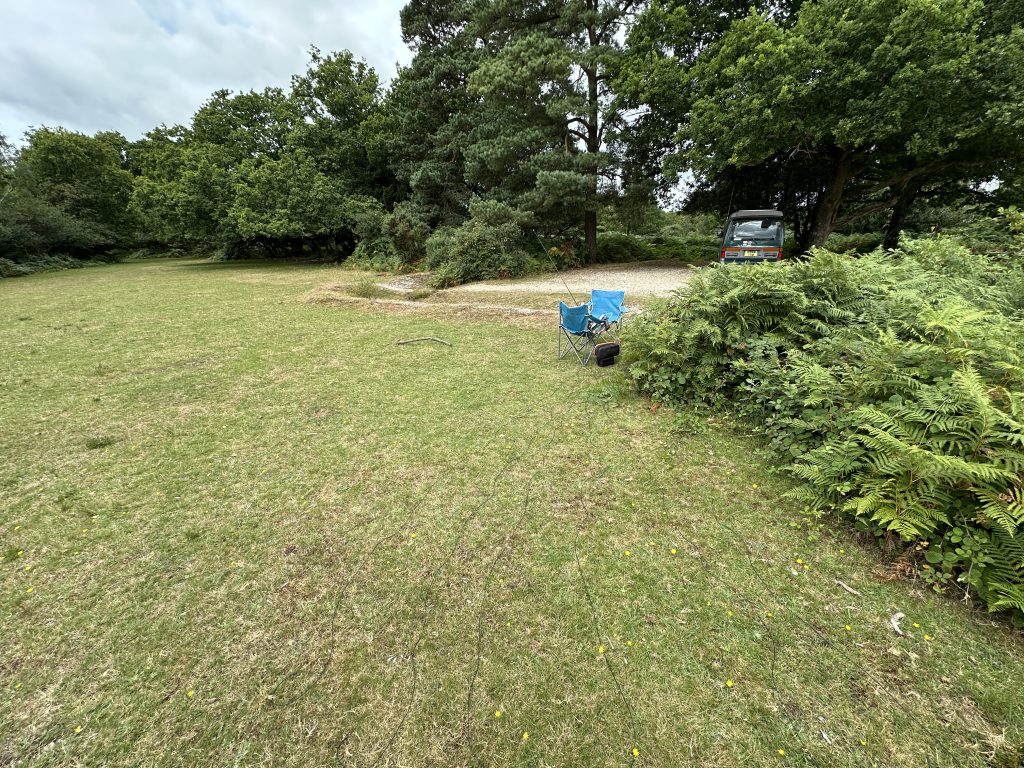
Setup todaycomfortable and easyThe lovely bongo
It was one of those days that I really appreciated living near this beautiful location and also having my Mazda Bongo, it has more lives than a cat, but I seem to keep it on the road each year, days like today it makes it all worth it being able to drive out with my equipment, set it. up easily then get back home without issue. Having the 2M/70cm Kenwood transceiver with APRS in the Bongo is great for tracking and now with the ability to self-spot, its really useful!
Kenwood with APRS+GPSso many views like this in the New Forest
Having made a personal best of 32 Data mode contacts, I tried telephony on 17 and 20 meters, but to no avail, but I was far from disappointed, I really felt like I had an excellent time out today doing PoTA, and I cant thank the people that pull out my signal from the noise to make and complete a QSO! See if you spot your call sign in the credits 🙂
POTA GB-0112 New Forest
Really looking forward to the next time I can get out and get on the air 🙂
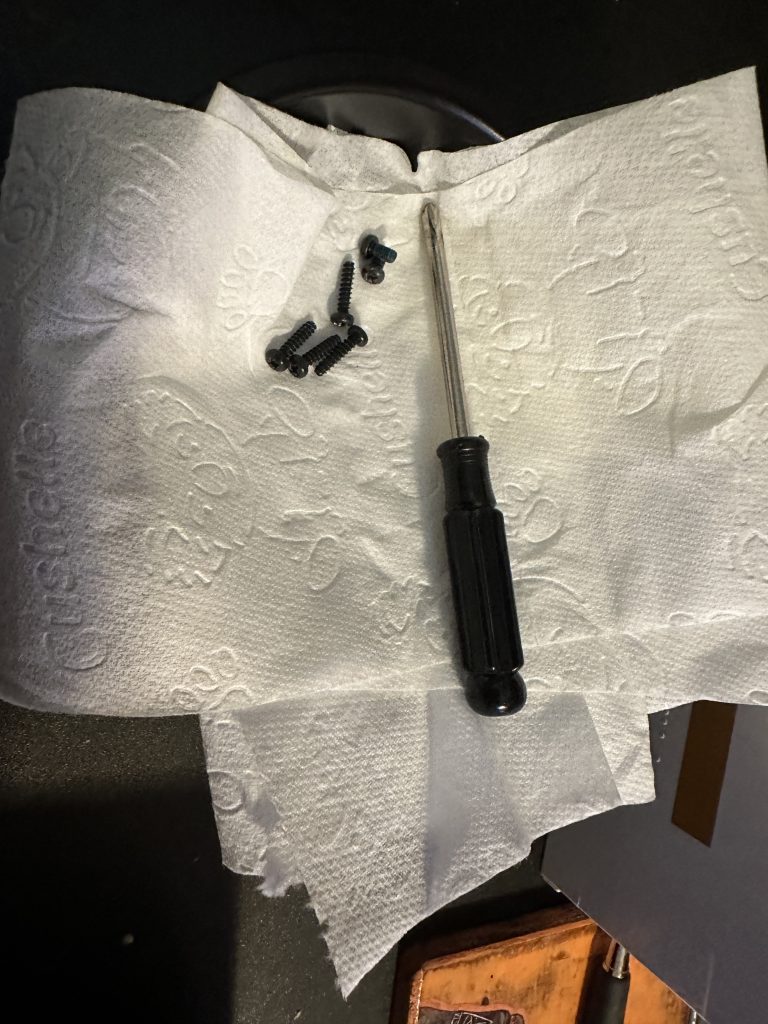
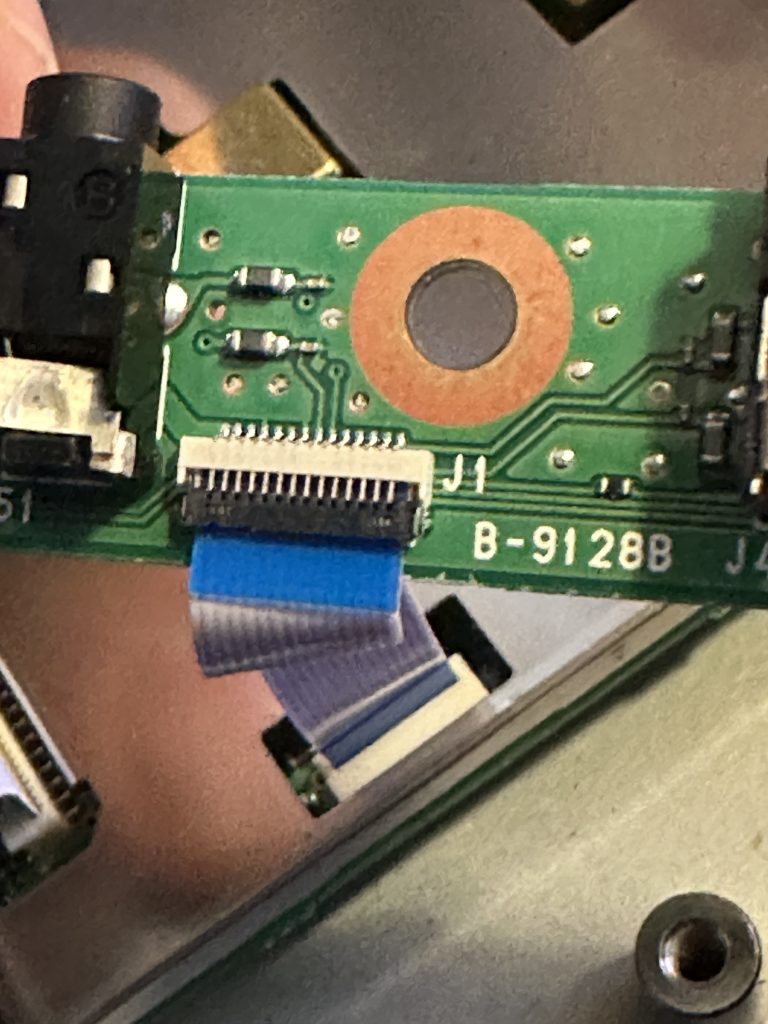
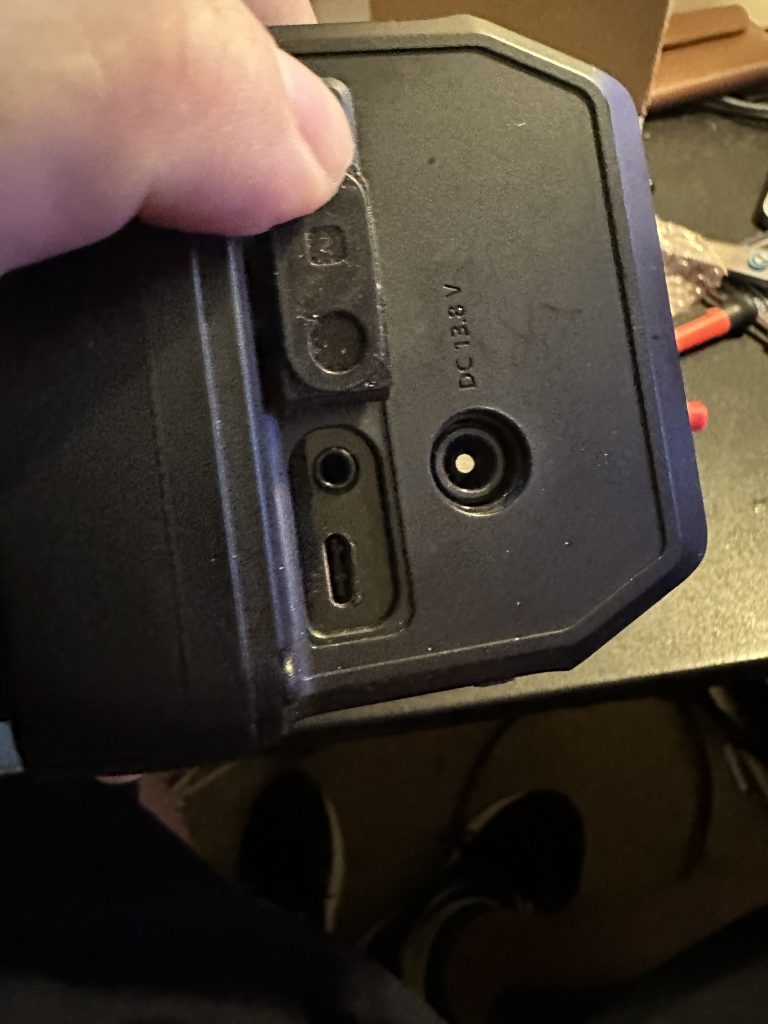
Having ordered the replacement USB C board from the US of A it arrived in no time at all via FED-EX and folllowing the video it was pretty straight forward.
replace USB board on IC705
Getting the screws out from the IC-705 was pretty straight forward. I took care with the screen handling and used enough pressure but no more to get the long body screws out.
Body screws removedcareful with that 705 Eugene!
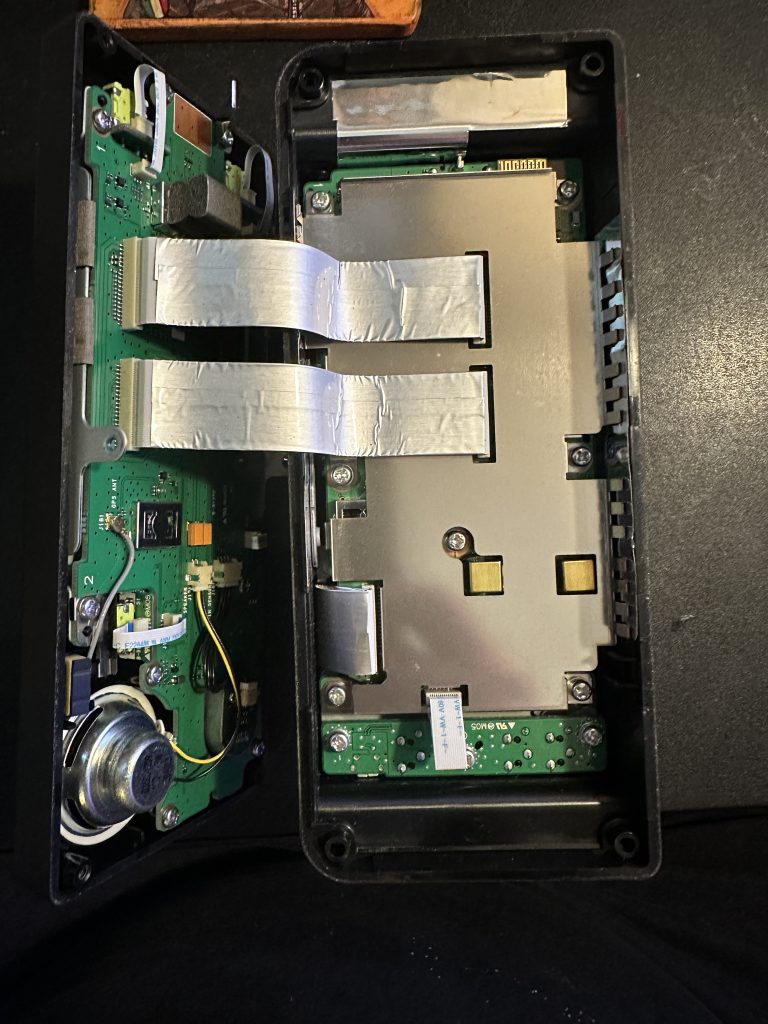
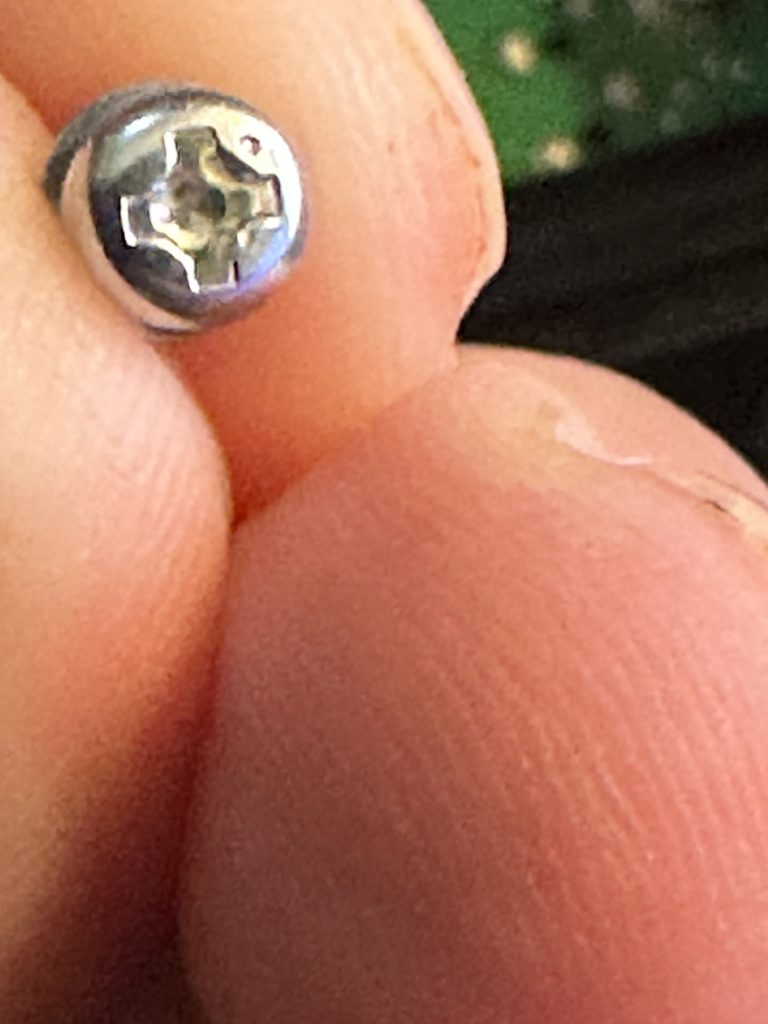
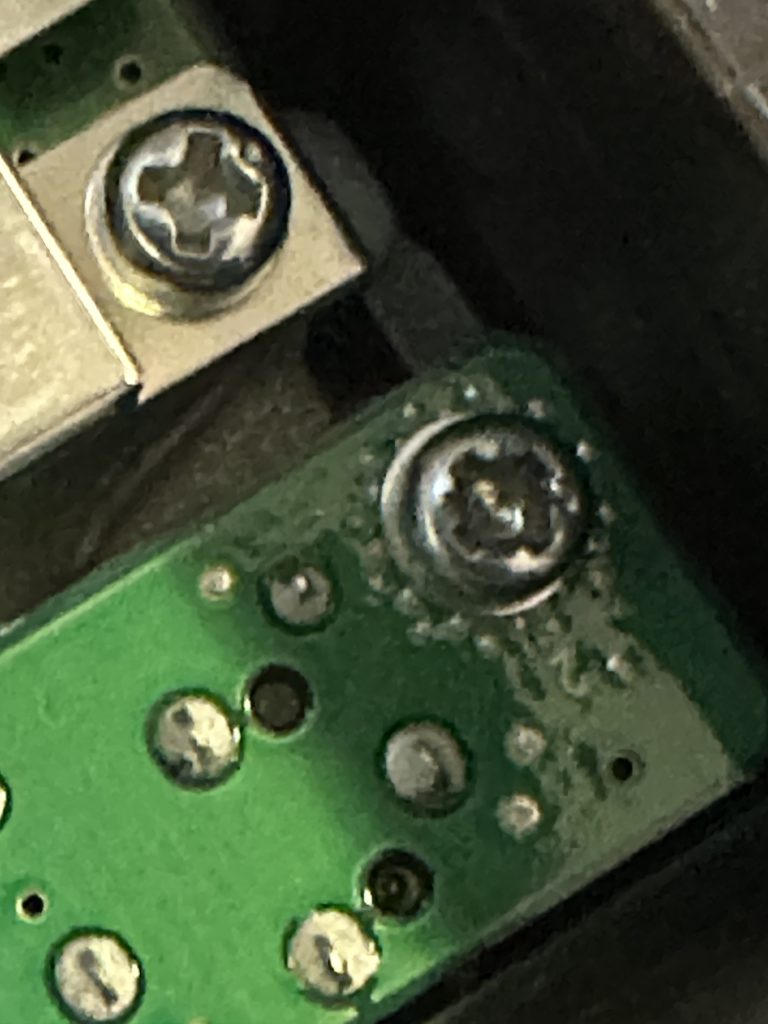
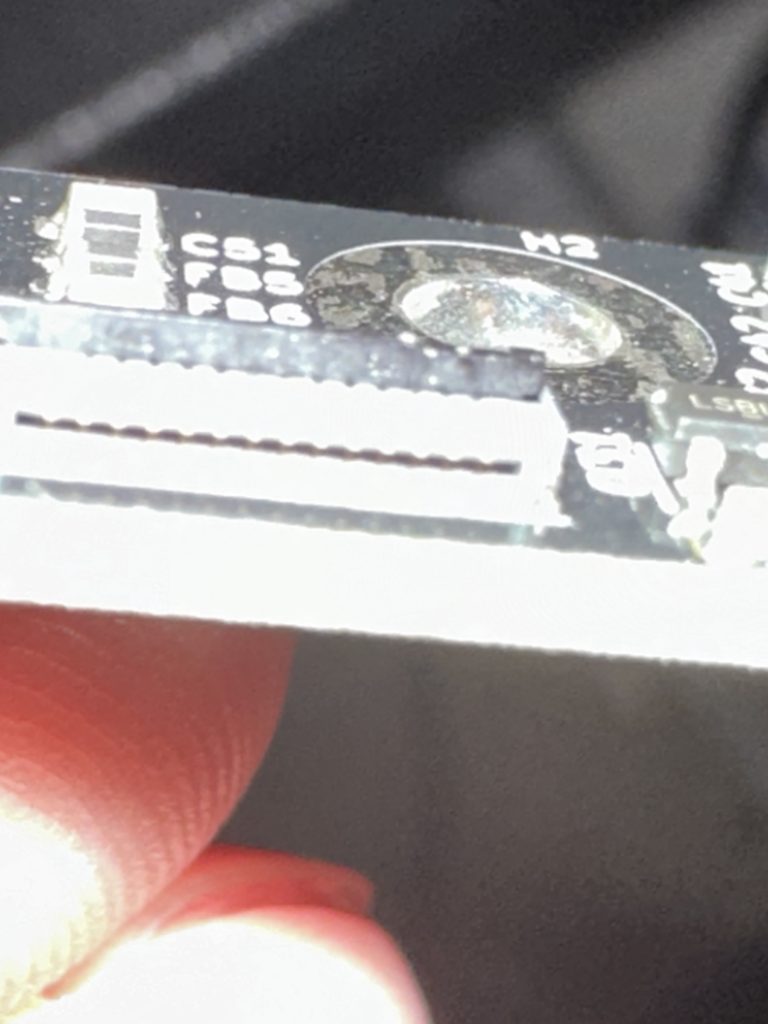
The next step was to remove the original IC-705 USB board. These screws where *very* tight and gave a distinct *lock-tite* screw thread lock when pressure was applied. So much so one of the screws was very stubbon to remove. Using a mixture of a torx screw head and flat-bladed with a couple of hard knocks budged the obstant screw!
easy to get outnot the top one tho
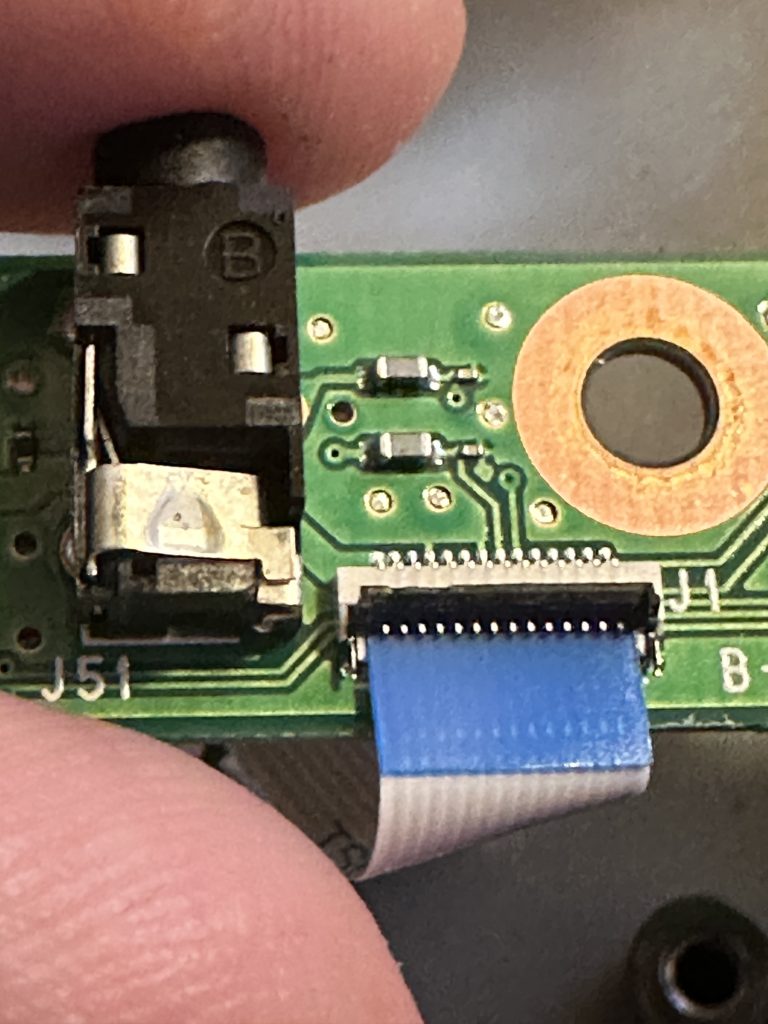
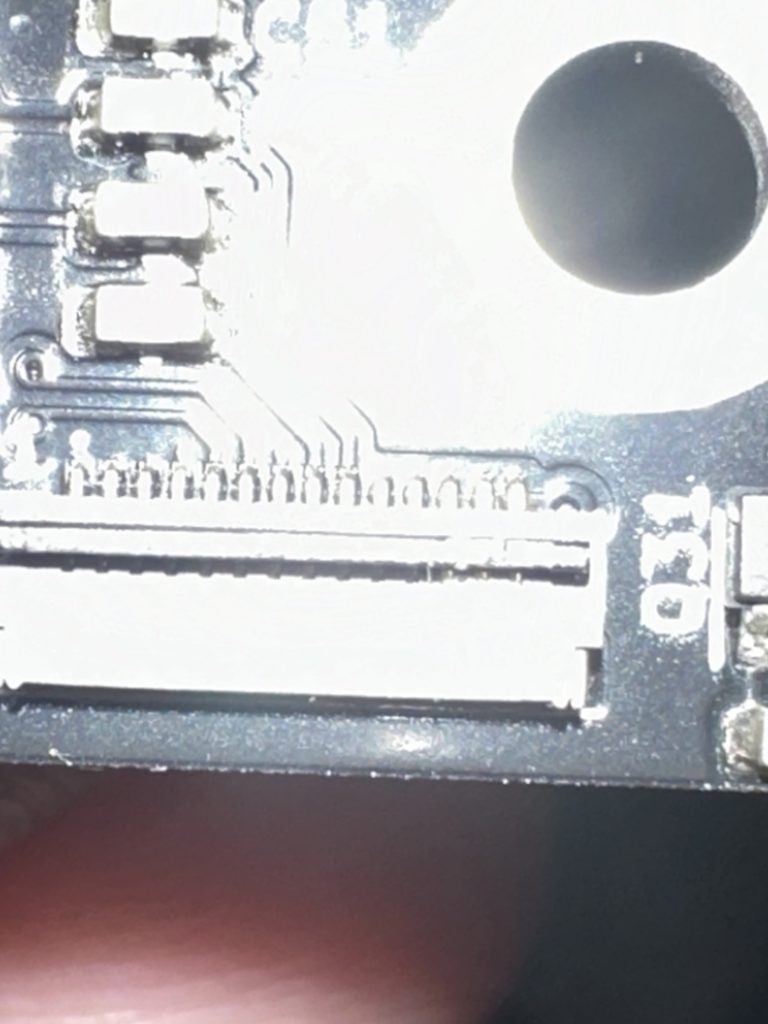
With the board free it was time to flip off the micro connector, i used my finger nail which worked pretty well.
flip up the black locktake care when removinghow it looks out the ic705
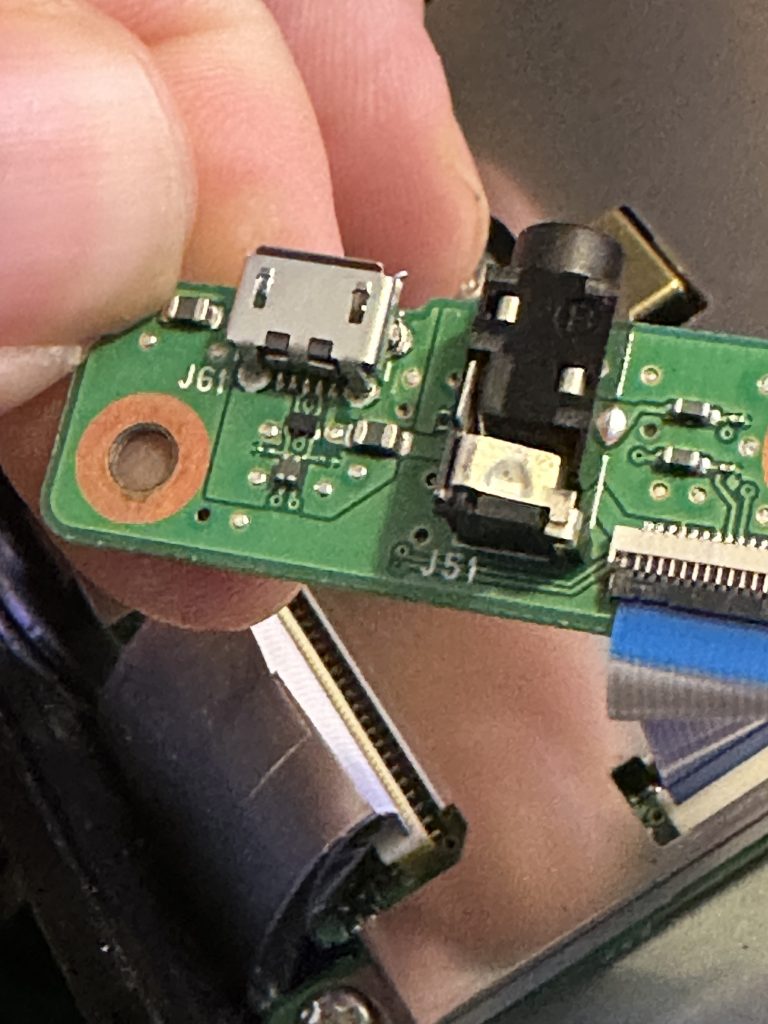
Withthe original D-Type IC705 USB board free, it was time to fit the replacement. Making sure to get the aligment of the board in relation to the sockets correct, it was easy enough, but again taking care with the lock, to fit.
USB C !a simple flip
I setup WSJTX and ‘borrowed’ the WSPR 6btv antenna for some testing. All was good ! With plenty of reports and 2 contacts, i was happy the board worked perfectly and could head out to go PoTA !
Working great on 40mUSB C is *so* much nicer
A P***ED OFF POTA
On a glorious sunny day down here in Dorset, I headed to the new forest. I setup my Alexloop and Macbook for FT8, but was getting loads of noise. As ever these thigns always happen out in the field ! Not to be detered I went back to the iphone app just to see if i could get some POTA hits. I did learn a nice feature of chaning the DX code so it can be CQ POTA from the iphone app. After 20 minutes of calling I had not a single response ! I checked with PSK Reporter and for sure I was getting out and the RBN on POTA page, i was there, but no contacts !
By this stage I was getting hot, bothered and felt like I was wasting my time. I decided to pack up and I’m going to re-think my POTA strategy. I need a better way of getting more contacts and on the air. I think I’m going to drop anything to do with computers/phones, only for use with the self spot on the POTA app. I think there is even a way with APRS to POTA Self Spot.. Anyhow, i packed up and headed home, then had a fantastic afternoon out with XYL 🙂 POTA can be tried another time !
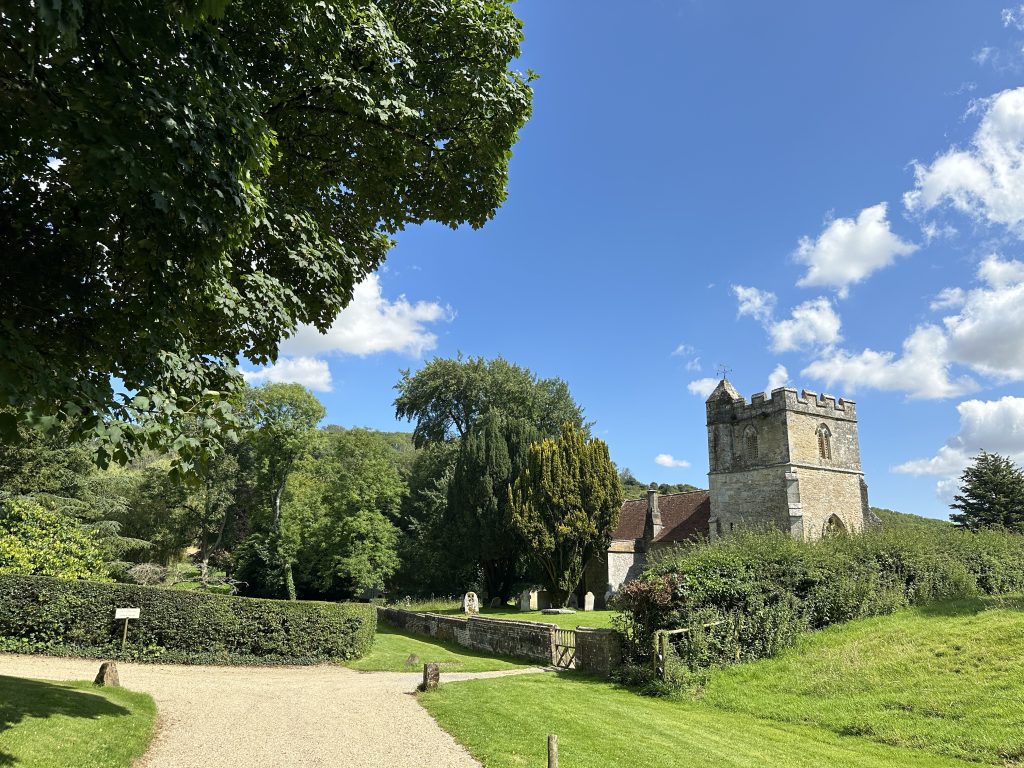
Melcombe Horsey was so much more relaxing than POTA…….