So its been a little while since I made a ham radio blog posting – so before I get any busier, thought it best to make a post.
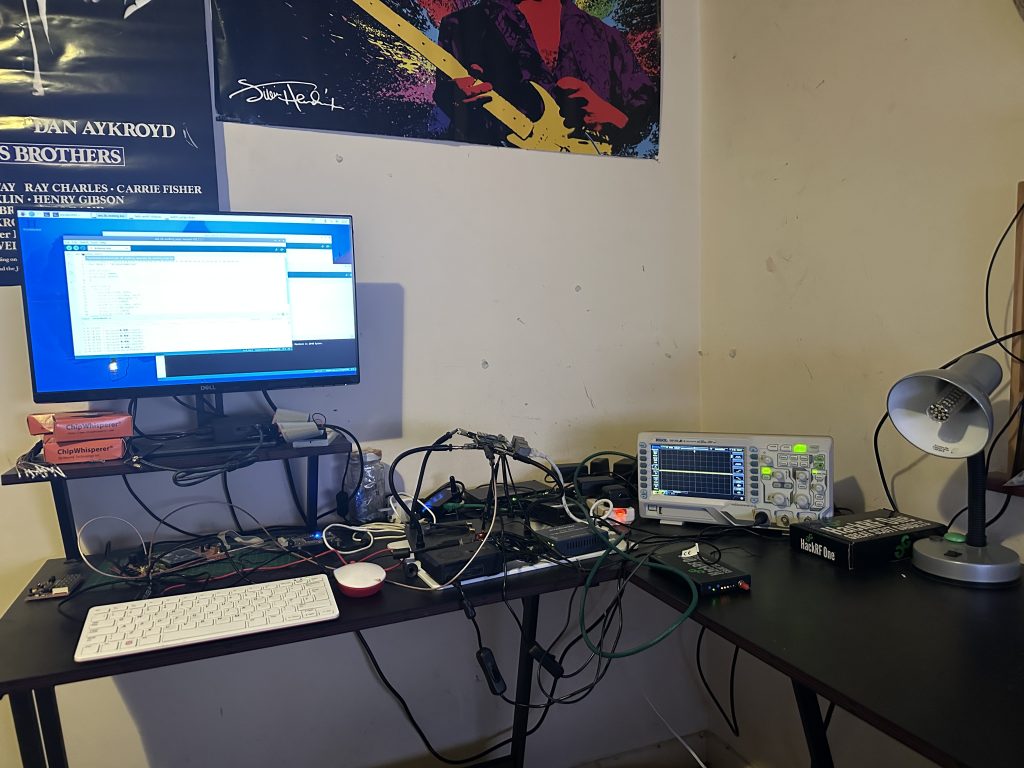
My testlab, where i aquire the data from various devices for the cryptanalysis lab has grown, so much so the IC7300 and IC9700 moved to the guest room.
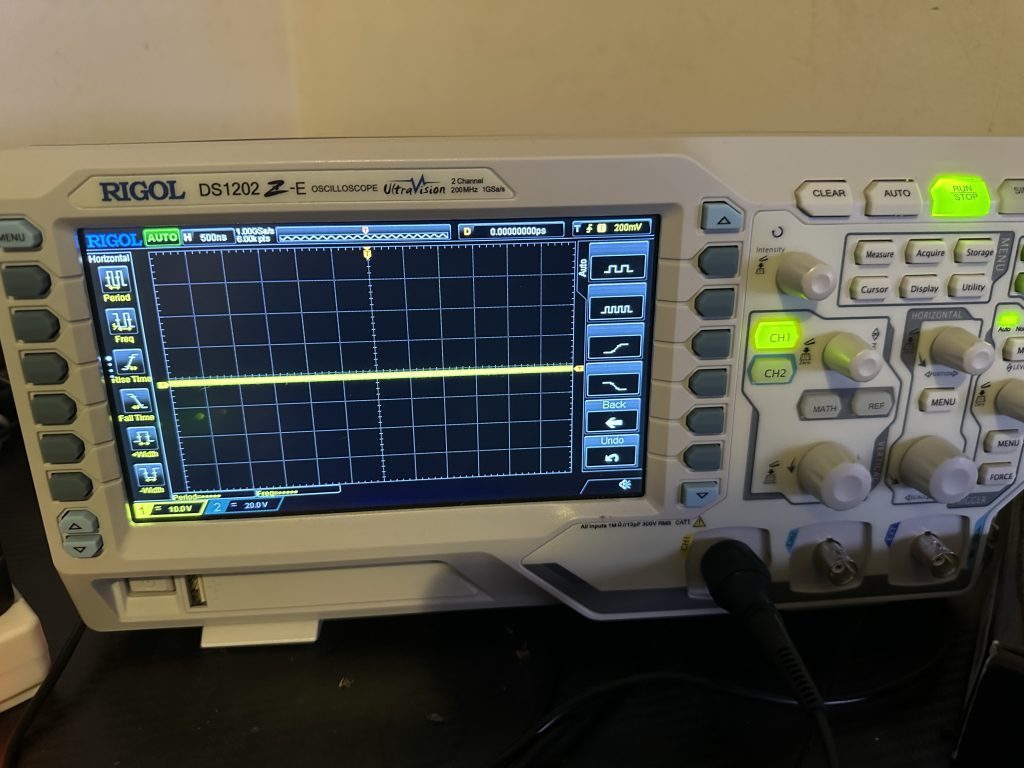
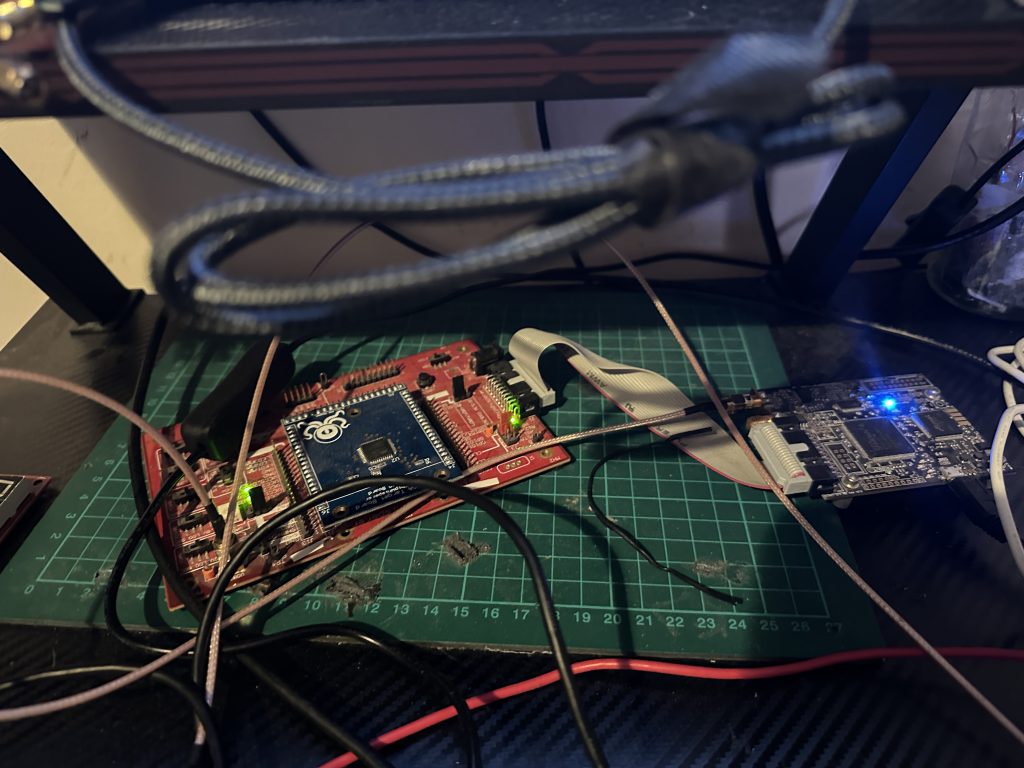
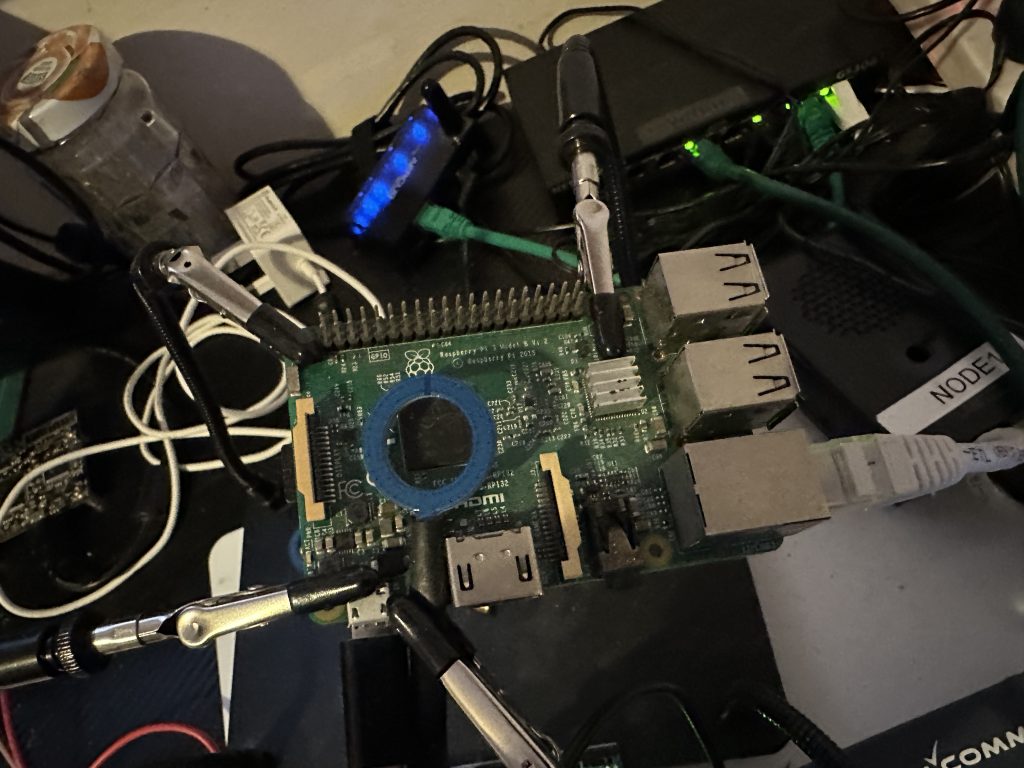
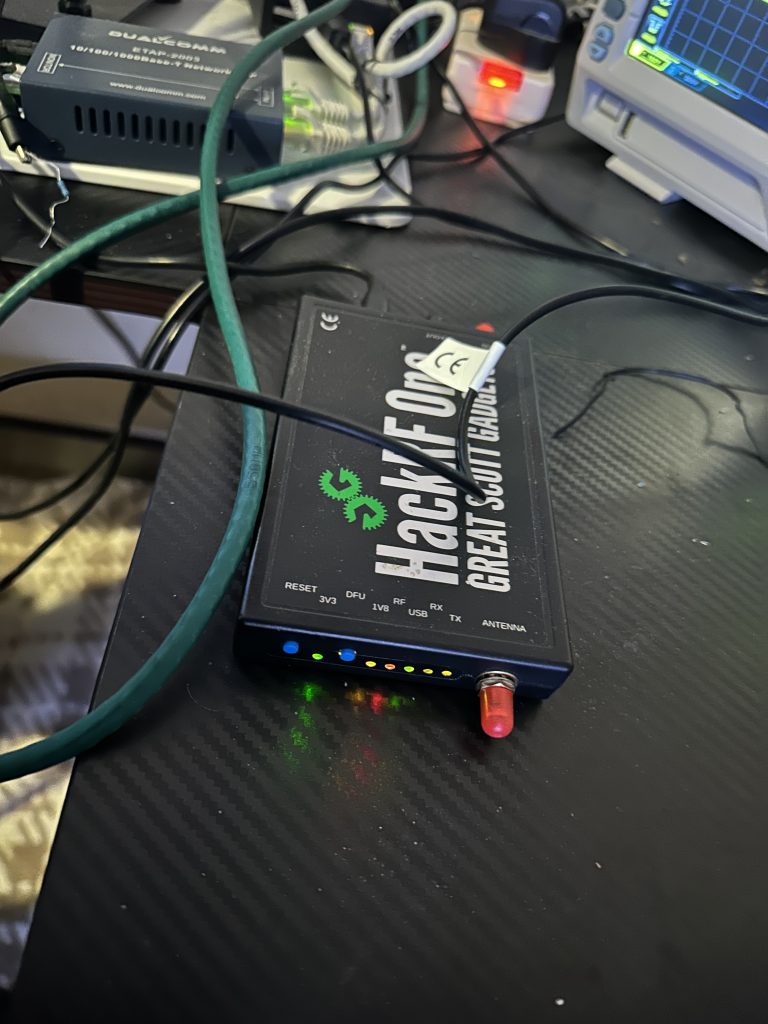
Rigol scopeChipwhispherer and UFO boardRPI 3b and antennaHack RFTestlab data capture
As you can see in the gallery my test lab capture is from various devices, to make it reliable and workable it needs to be setup well – changes in the environment can often lead to detrimental changes in the captures for use in Cryptanalysis. As you can see I use a mixture of RF via SDR’s, DPA/SCA via Chipwhispherer and also raw DPA via the oscilliscope.
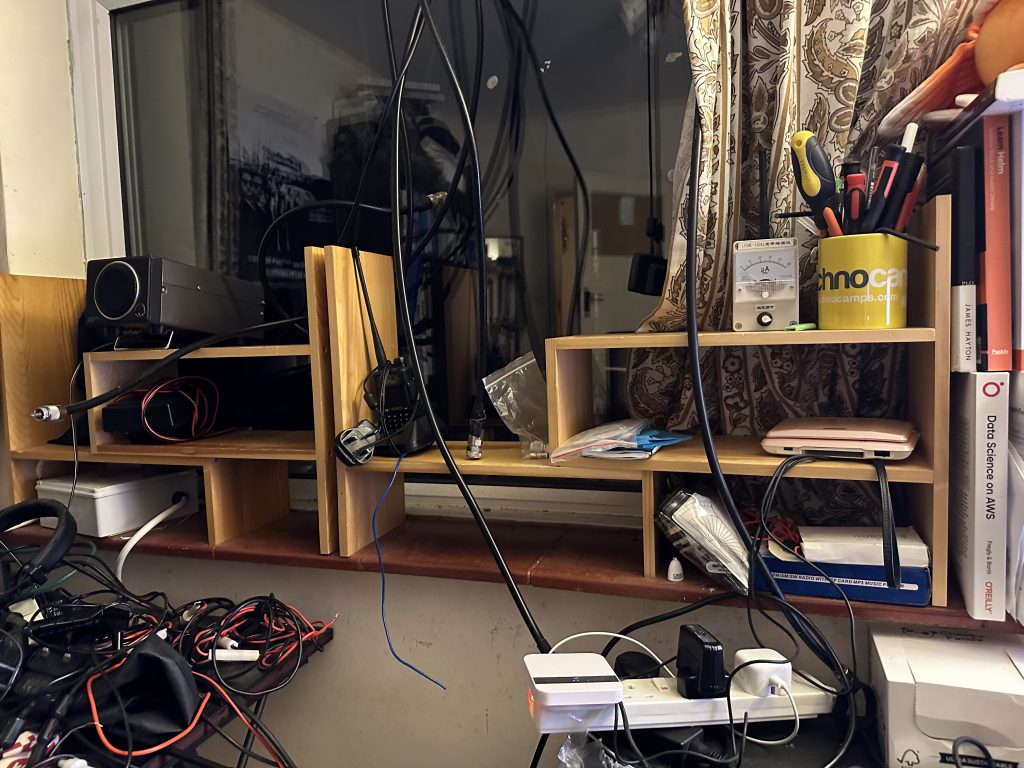
My IC7300 and IC9700 where getting less and less use, which was a real shame, whilst I could RDP into the Windows station for both radios, I still wasnt getting the use out of them, so I decided it was time to reduce my radios and focus on using the IC705 as and when I could from both the QTH and Portable for POTA.
I’ve been able to setup the IC-705 into the same EFHW and the 10W produced by the IC-705 is still more than enough for data modes from the QTH, and i dare say if I get time, will work well for telephony as well.
I’m hoping to setup a SSTV repeater on 2M using one of the many handhelds I have , I will probably use the Kenwood TH-D7 as its a really fine radio with plenty of ways to configure the PTT required for connectivity into the SSTV app. Naturally I’ll be providing updates on that as time allows.
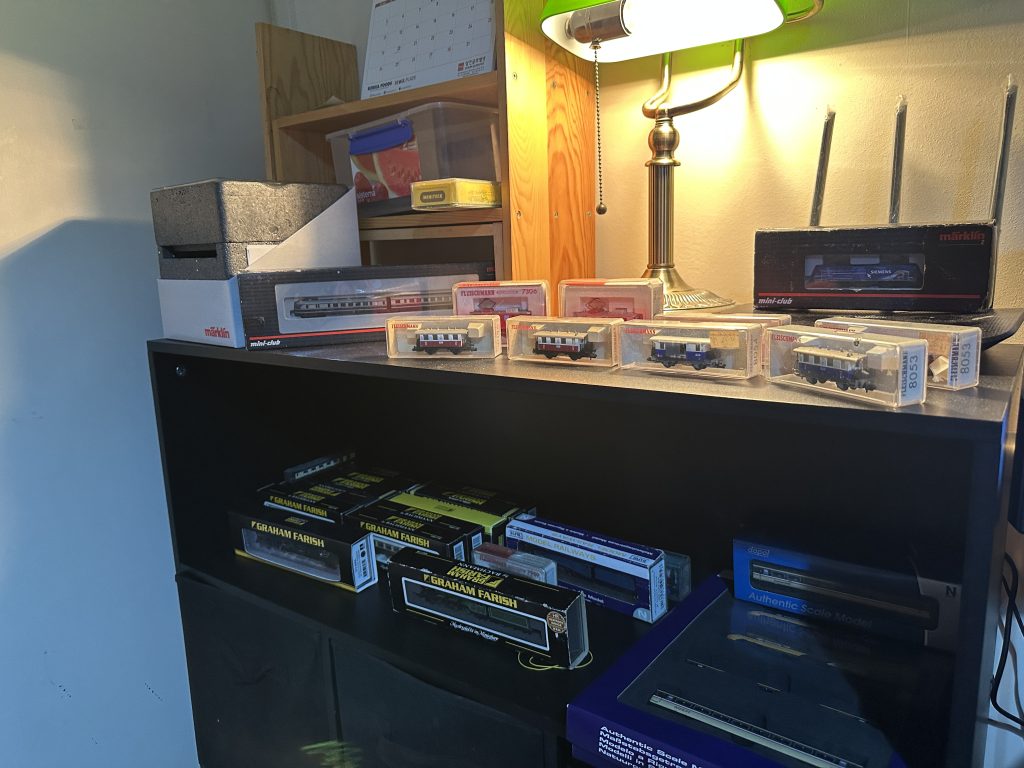
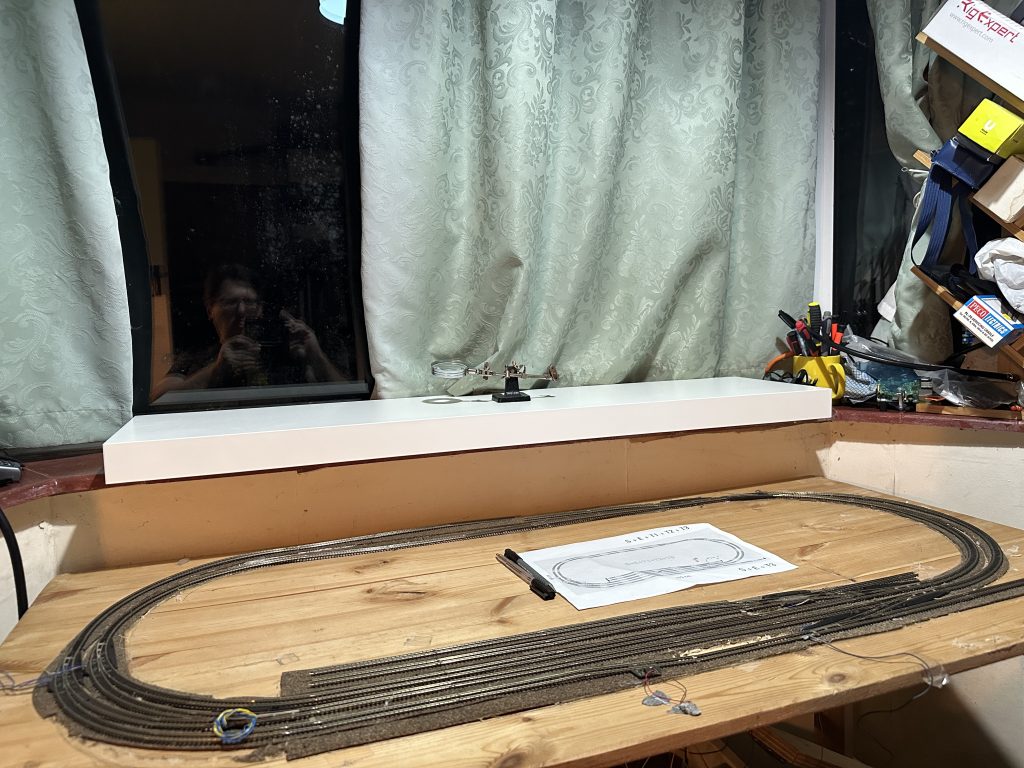
train collectionN Shelf and Z layout
Its nice to have the trains out on display and I’ve started to bring the Z gauge layout to life, and got a shelf to make a simple end-to-end N guage layout for the rack rail locos.
So my research restarts formally at the end of January 2025, so finding time for radios, trains will become less, but to avoid burn out and to relax where I can I will still return to radio and my trains as and when time allows !
Until then, enjoy your hobbies, what ever they may be and thank you for reading my blog.
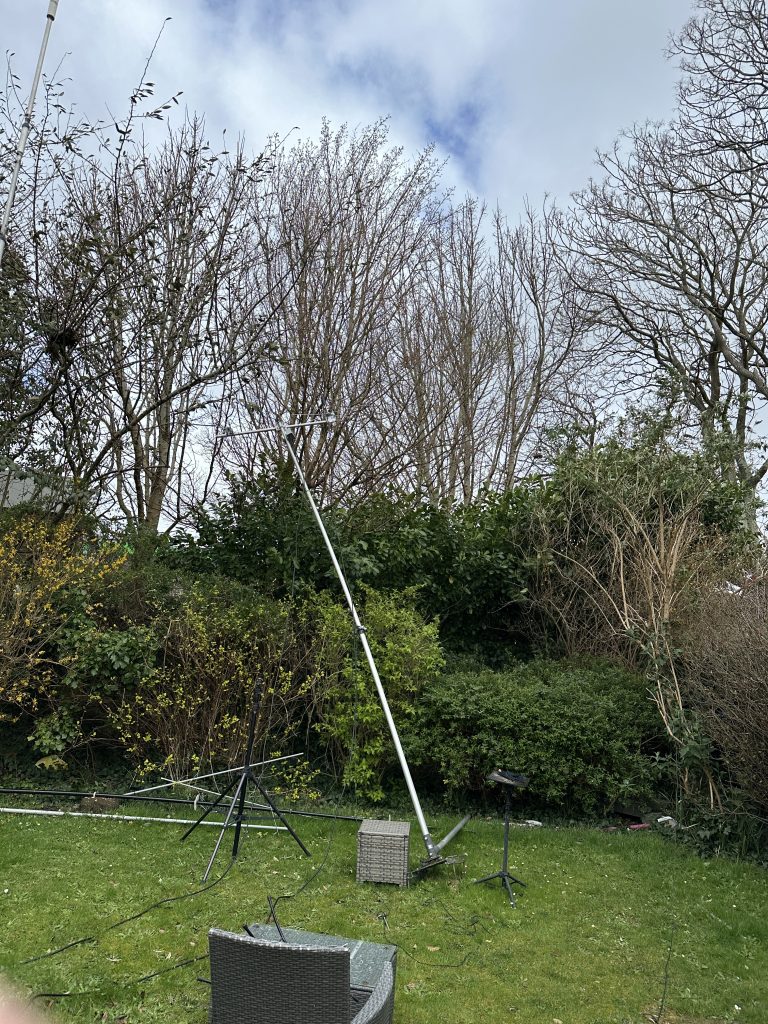
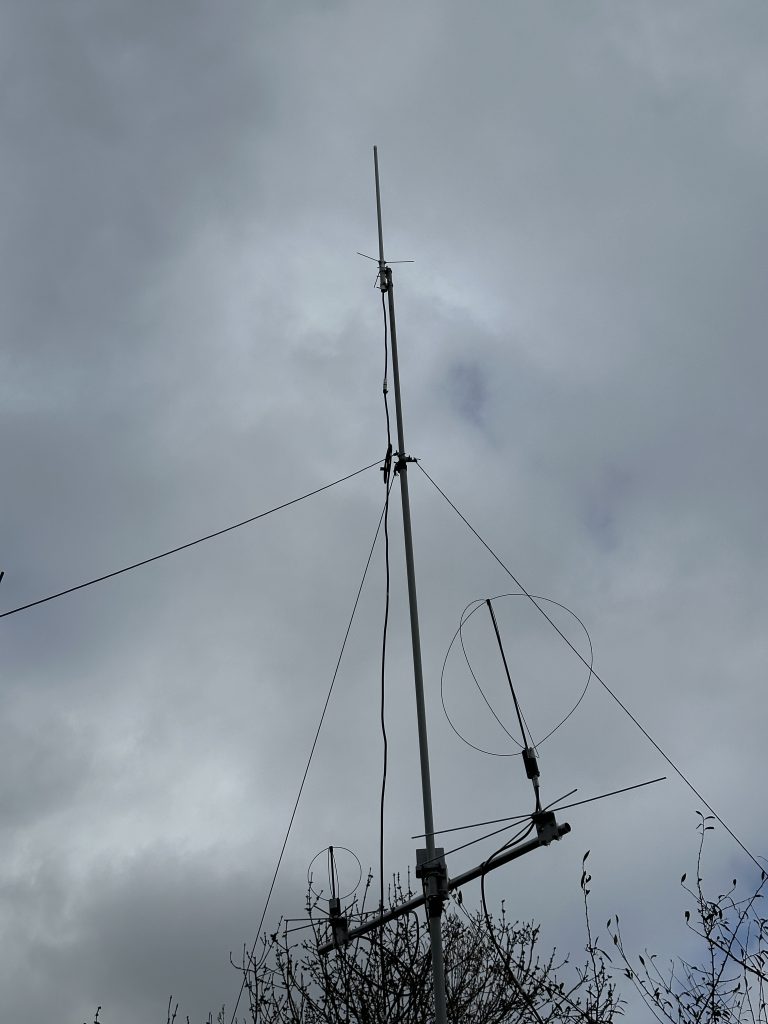
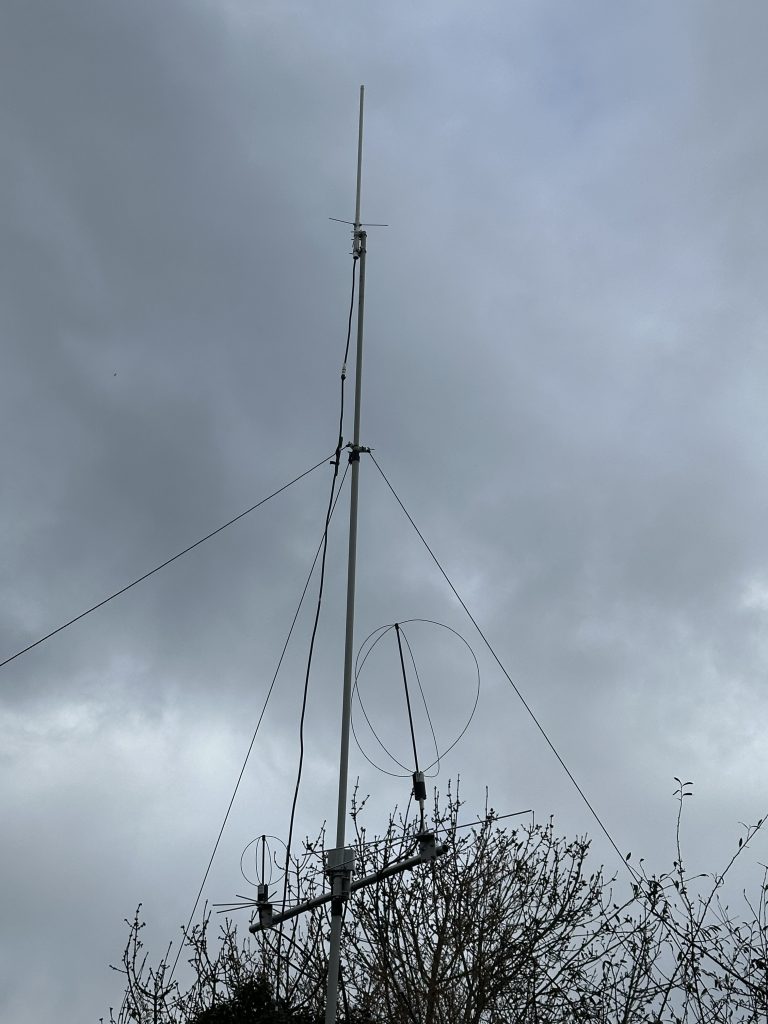
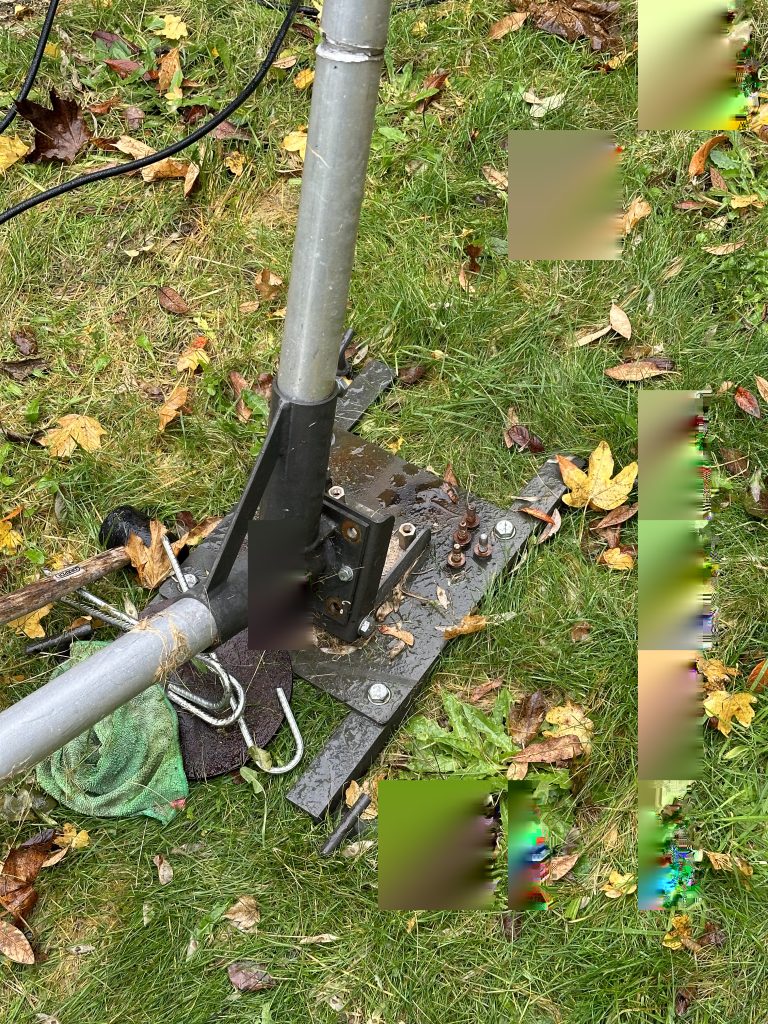
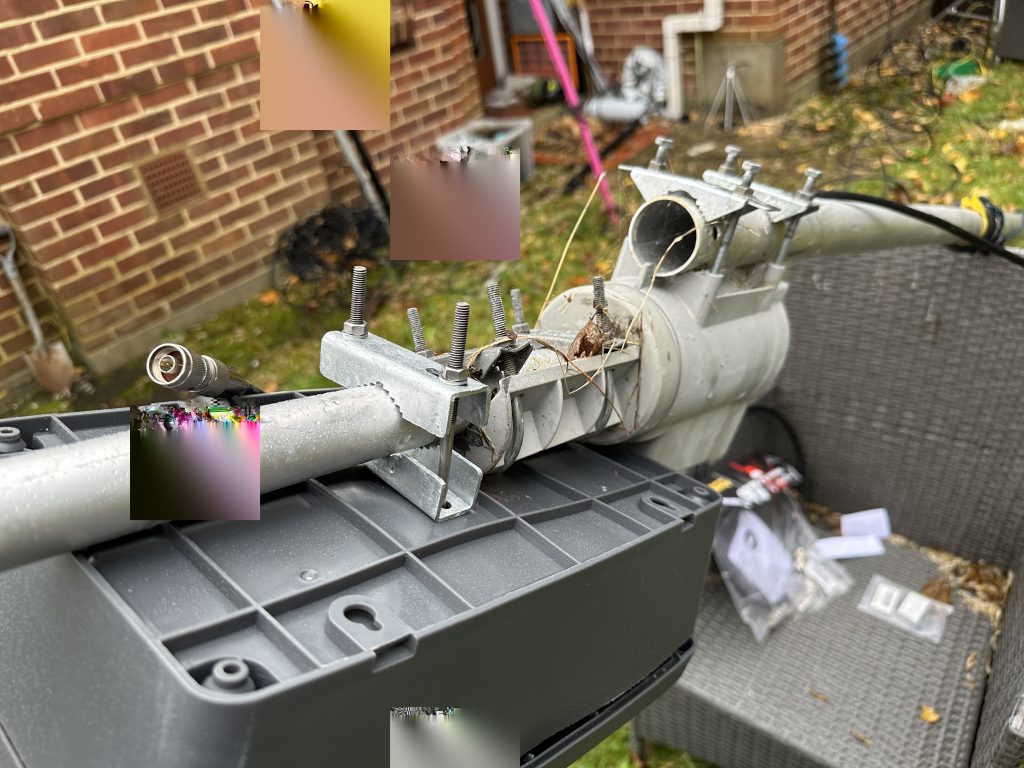
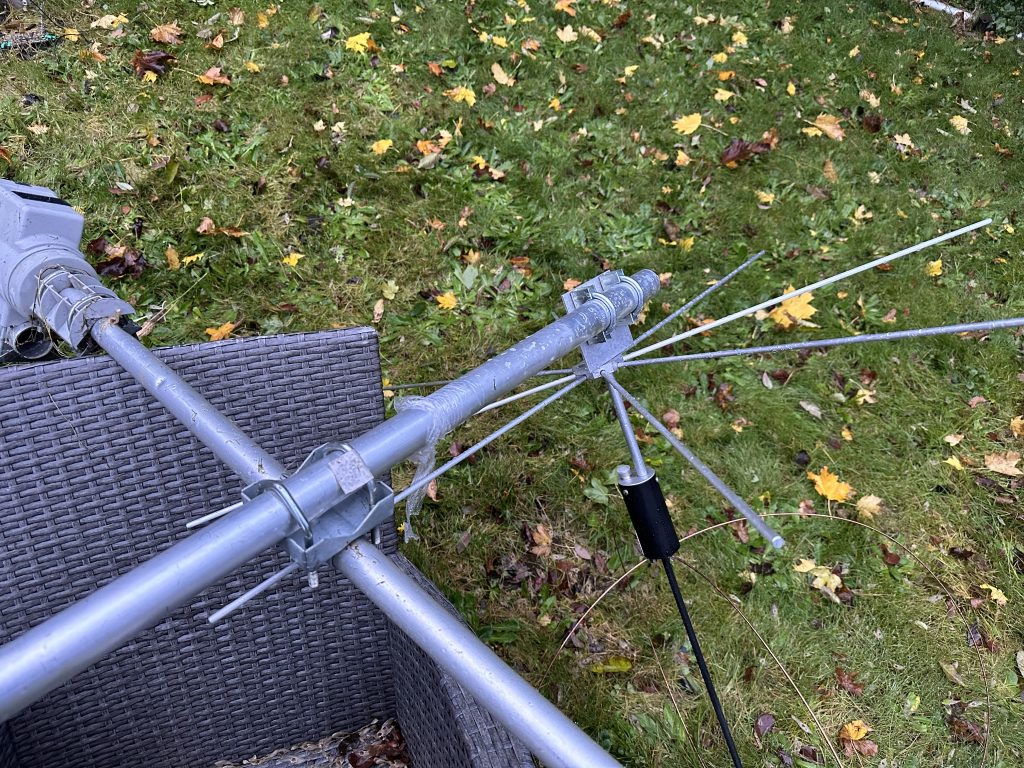
The end of march saw a long weekend and the opputnity to do some work around the QTH. I wanted to make some progress on getting things a bit tider and also migrating the eggbeaters from the current trying/temporary location to up on the main mast. This would take quite a bit of physical effort, so was best done in stages and over a couple of days that the east bank holiday gave me.
first thing first, get the antennas out the trees !
The high levels of rainfall and wind combined to see that the egg-beaters fell victim to high winds, even with heafty guying stake pins and the tilt base, the soft ground wasnt able to hold the egg beaters. Thankfully no damage done and I was soon securing and lowering the eggbeaters to take them off their ‘temporary’ home.
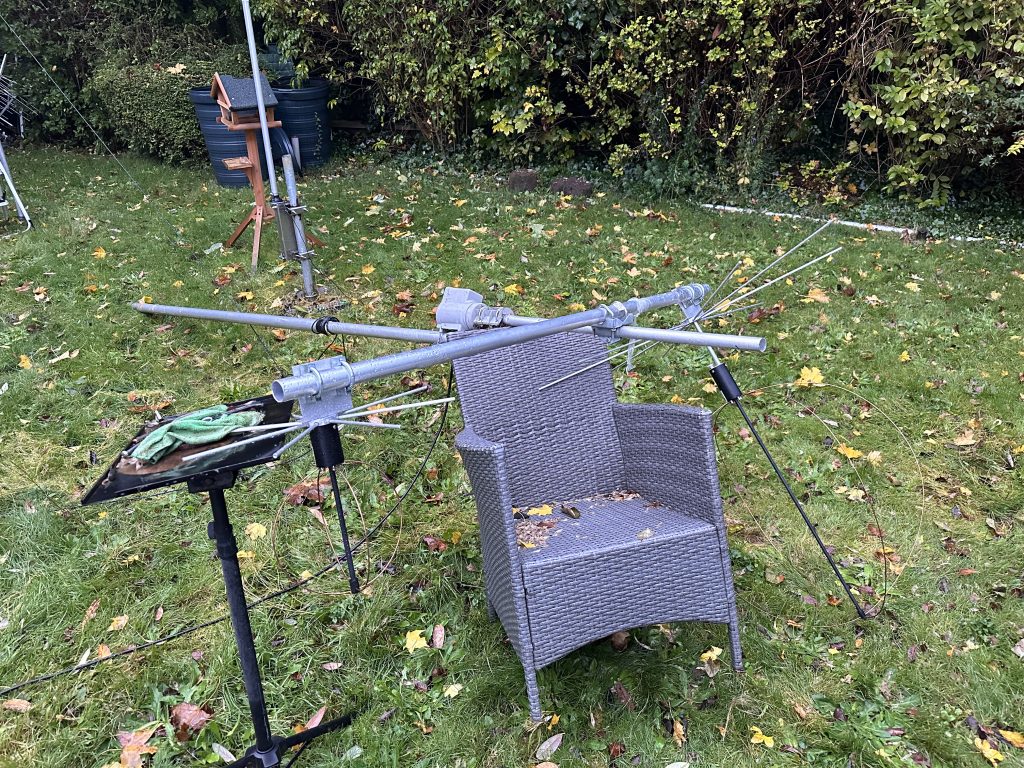
end of the first days work, main mast and egg beaters ready for putting up
I had breaks and a nice time out in the sunshine, quite unusual for a English bank holiday weekend, but it was nice to get out and about locally, we didnt venture too far as to avoid the masses travellign miles to get to Bourenmouth. By the end of the day I had main mast down, and the egg beaters ready to put up. I was planning to put a mast-head preamp for the vertical, but high SWR meant I had to leave it out this time, I will be investigating and probably sending back to the vendor for repair.
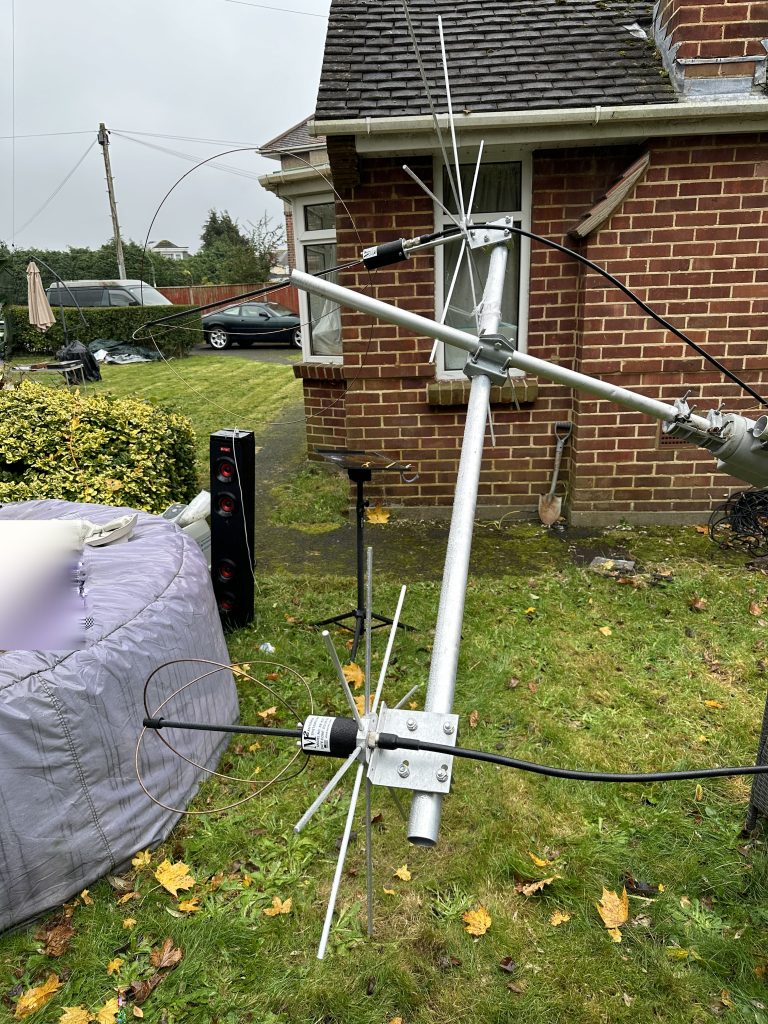
Day Two
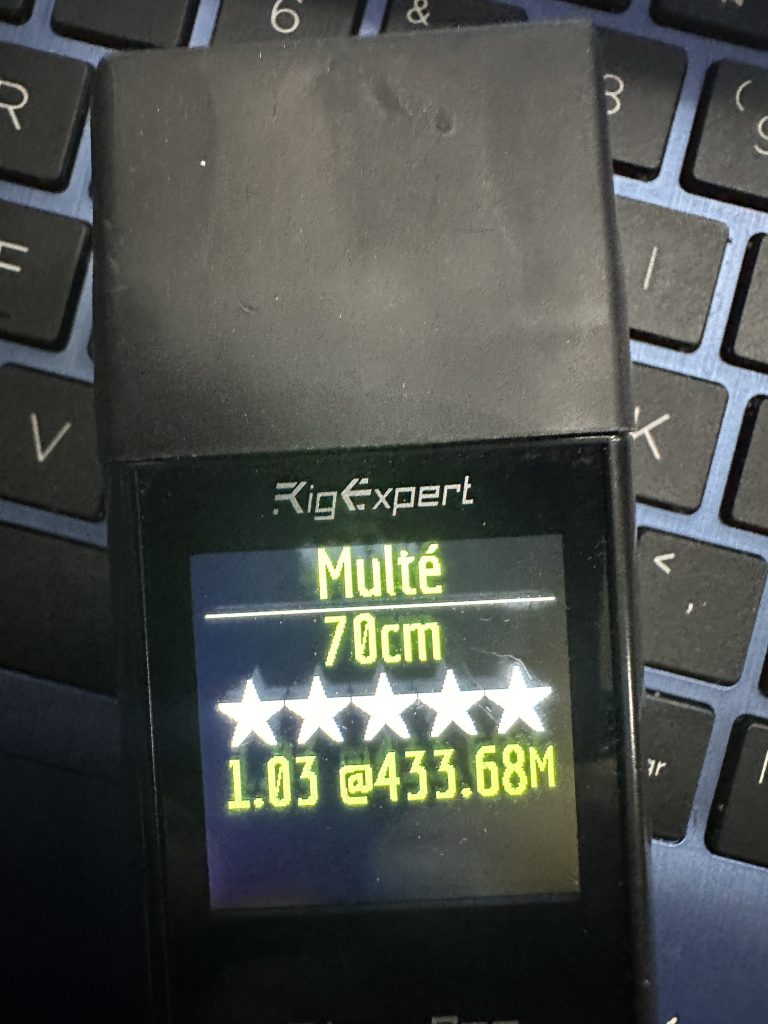
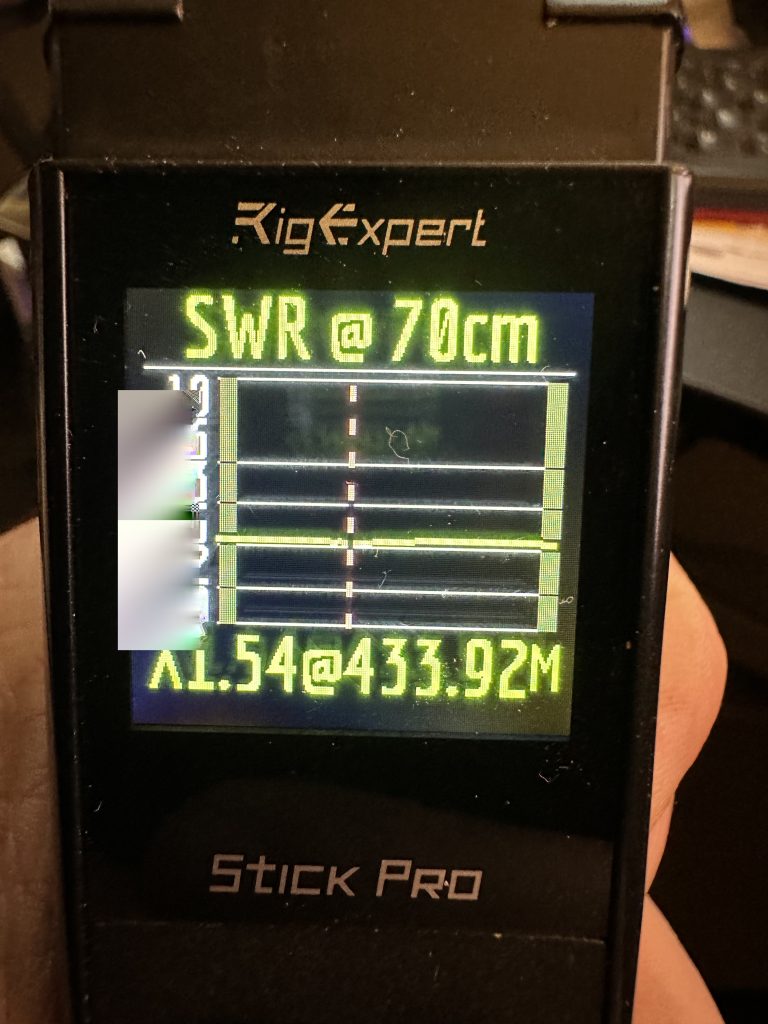
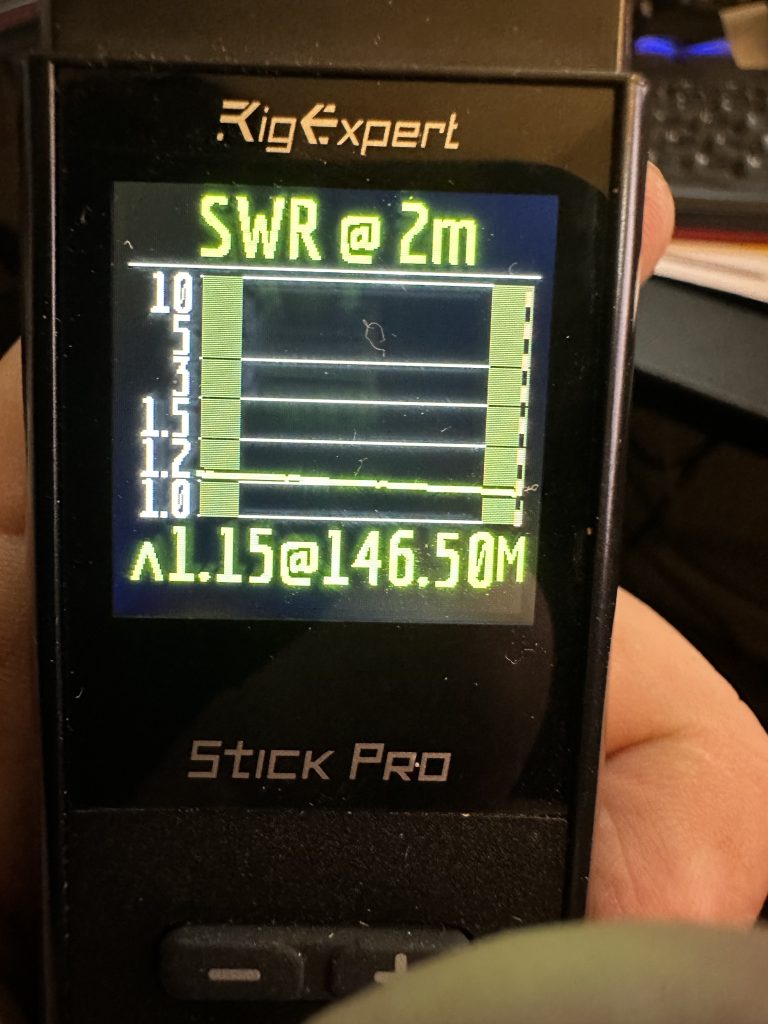
very good SWR70cm2m
Day Two I got the Diamond X-30 on the very top of the mast, its is considerbly lighter than the X-7000 and even at half height I was able to get into my favourite 2m and 70cm gateway/repeaters (poole & southampton). I then set about putting the eggbeaters onto the mast.
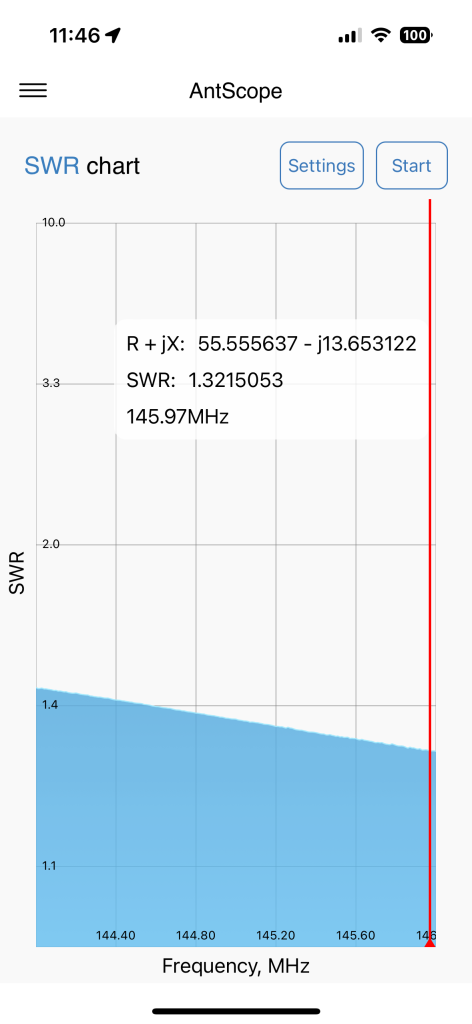
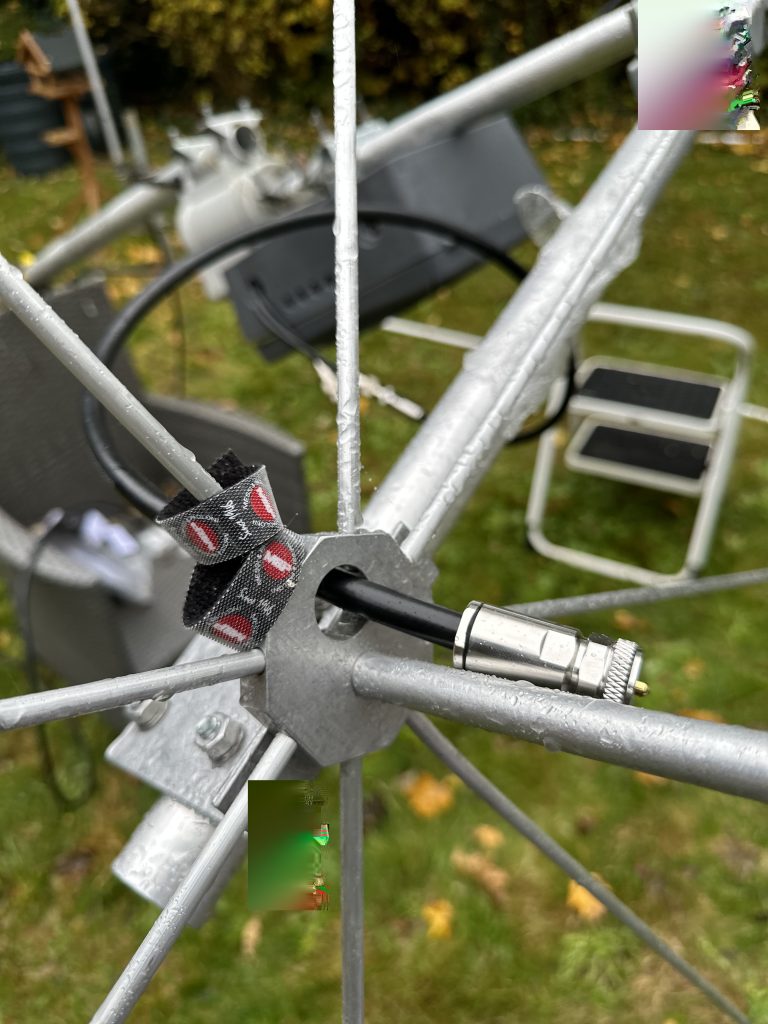
Initially I put them on a lower (4th section of mast ) but found this too low, so I re-attached the egg beaters to the 3rd section. With plenty of prep I was able to get the egg beaters on and the use of the ratchet spanners really helped in securing the egg beaters both times to the mast. When your a meter up on a thin walking gantry, keping organized is essential and having things to hand ! Sure enough I was soon able to get the eggbeaters and the 70cm mast head up all setup. I put the new LMR400 on the antenna and tested from the base, then extended to the shack, the SWR results where satisifactory at around 2-3 meters off the ground.
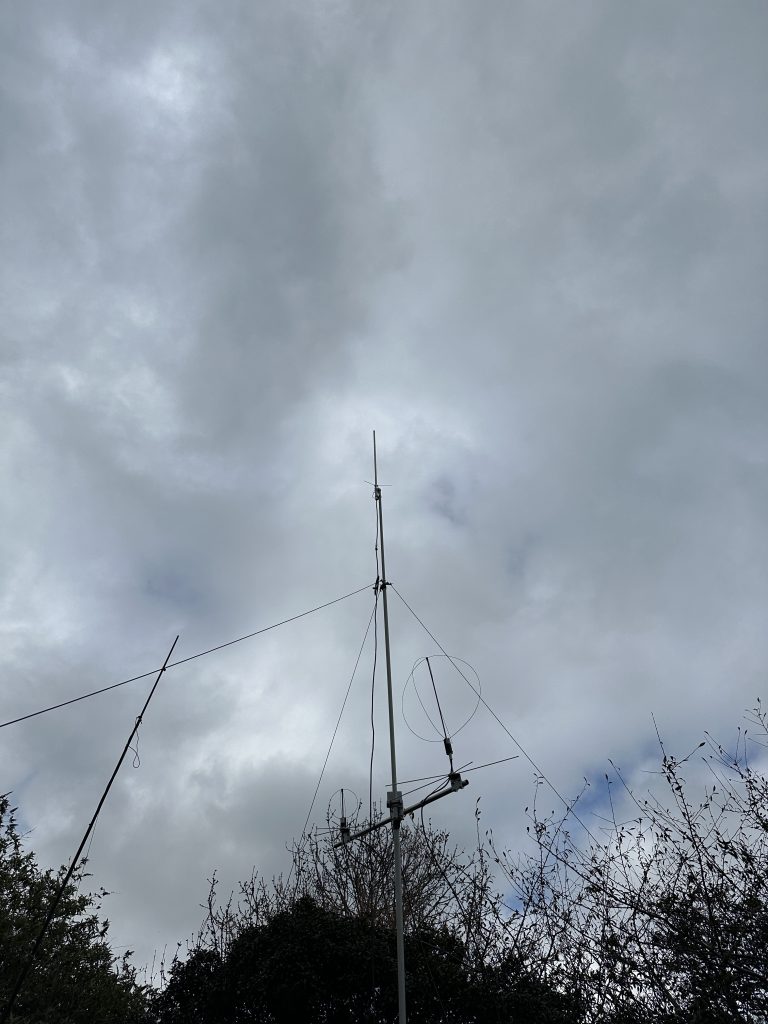
view from the gardenthis can go higher stillegg beaters above tree level
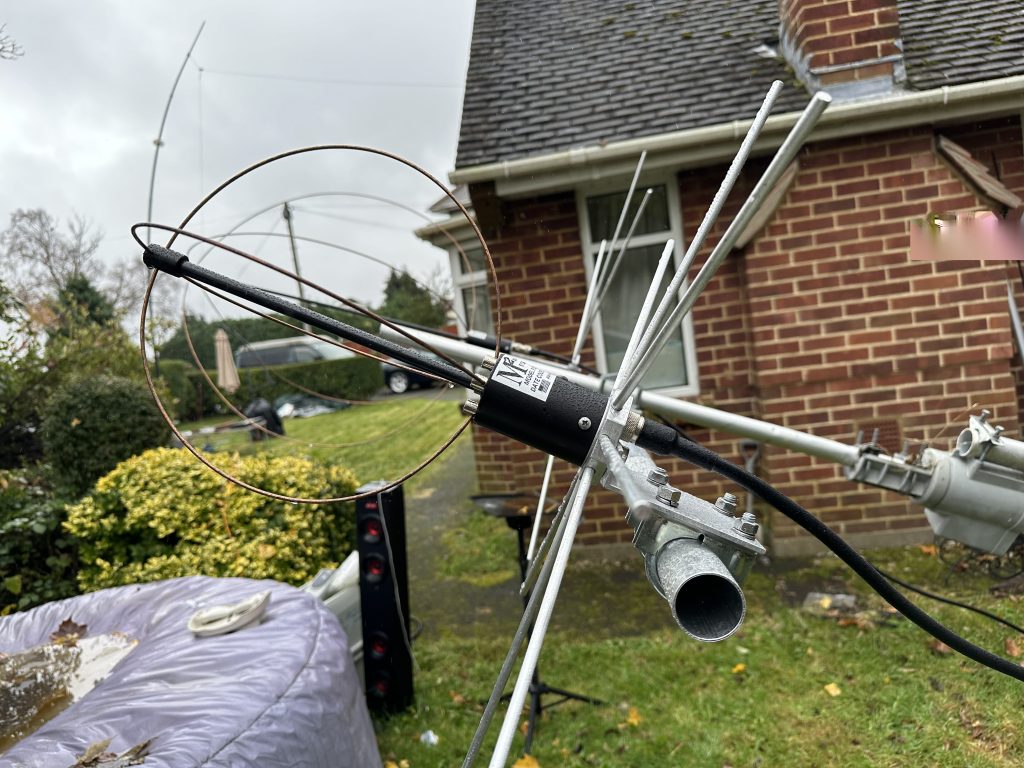
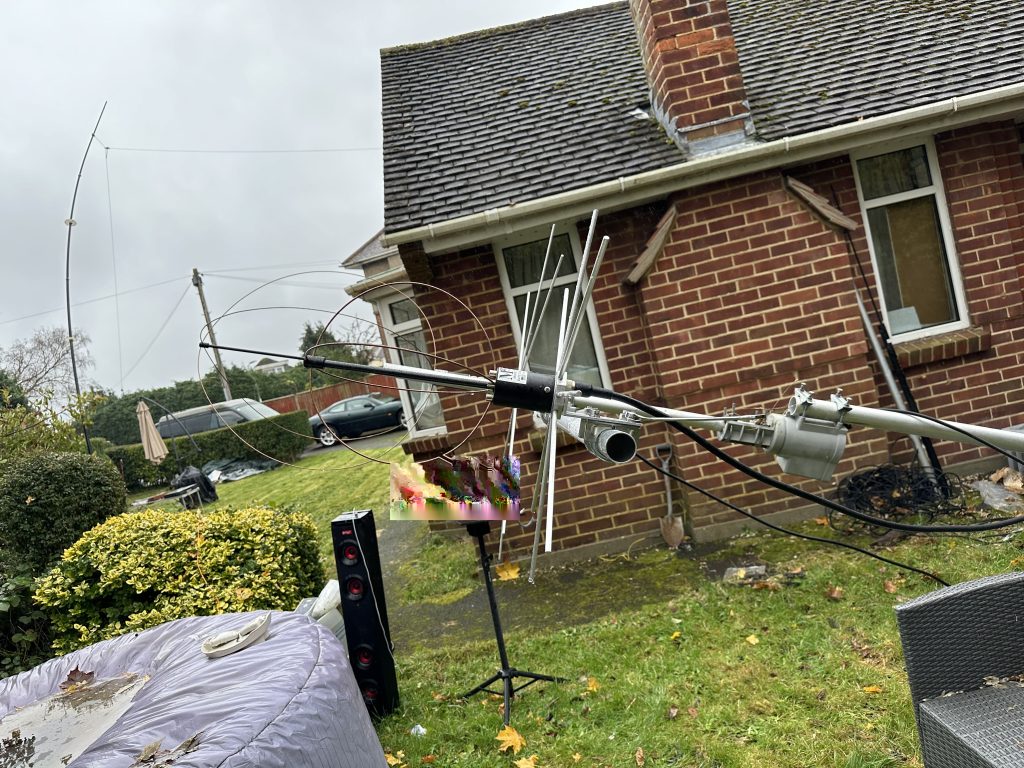
Day 3 (Easter Monday)
Having tired myself out the previous day, it was now time to get the antennas up as high as I was comfortable with to start with. This mast will go up to 40ft in the the air, currently I have it at about 33ft (minus one section) – I saw a previous video where I had just the X50 on the mast and fully extended to 40ft, so know I can rig the mat to get higher, but for today I was pushing up to 33ft and seeing how the antenna done. I was higher than in the corner on the temporary mast and had a much clearer line of sight in most directions. The additon of better quality LMR400 probably helped with less signal loss back into the shack and into the antennas as well.
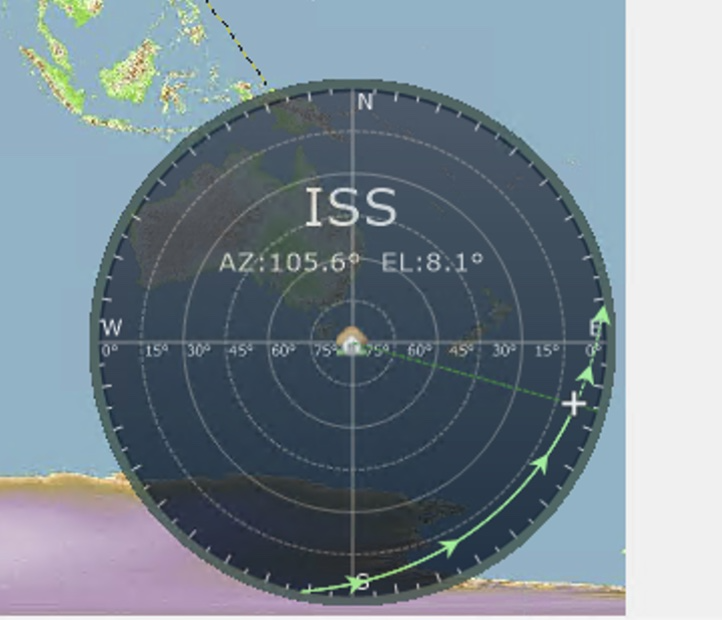
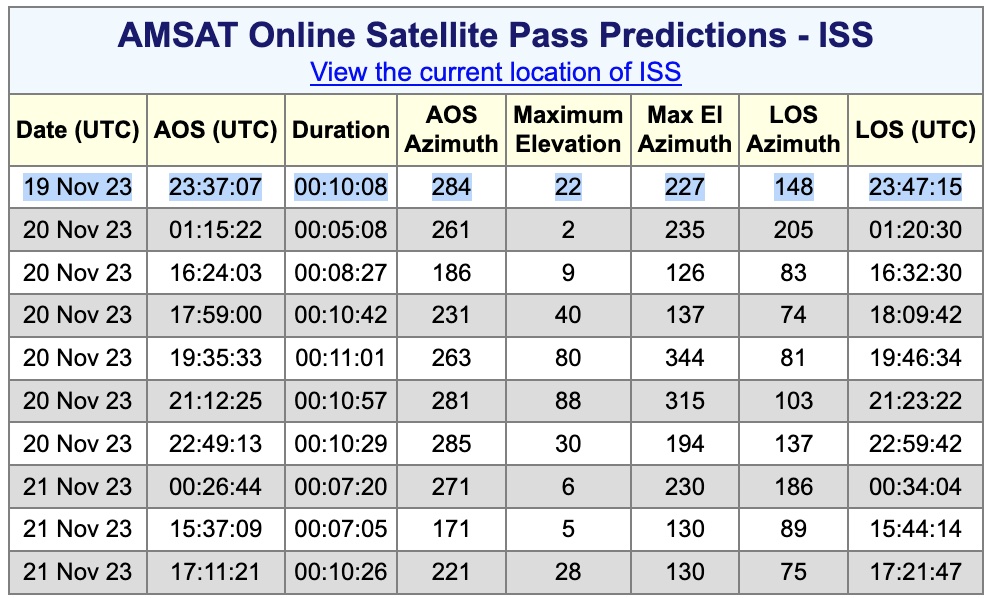
I started out by playing with HRD and the Sat Mode, the UI is really simple and easy to use for HRD and I like the graphics of the sat passes and the real time pass graphics.
HRD Sat module – Tracking the ISS low pass
The trouble i had with HRD is that its very intrusive to the IC9700, it near enough ‘locks’ the radio, even with the ‘manual’ frequency change selected, it would drop / loose the connection to the radio. I imagine the CAT signals between HRD + IC9700 are causing some conflict. Also I found that whilst eaiser to program, it wasnt perfect. THe doppler was good and alot of sats worked perfectly, but the linear sats, where a spectrum of frequncys are used during a pass, seemd more difficult to use. I would get up from my chair to tune the radio manually and then I was able to track the QSO’s, which was very exciting just to hear new and strong signals coming in.
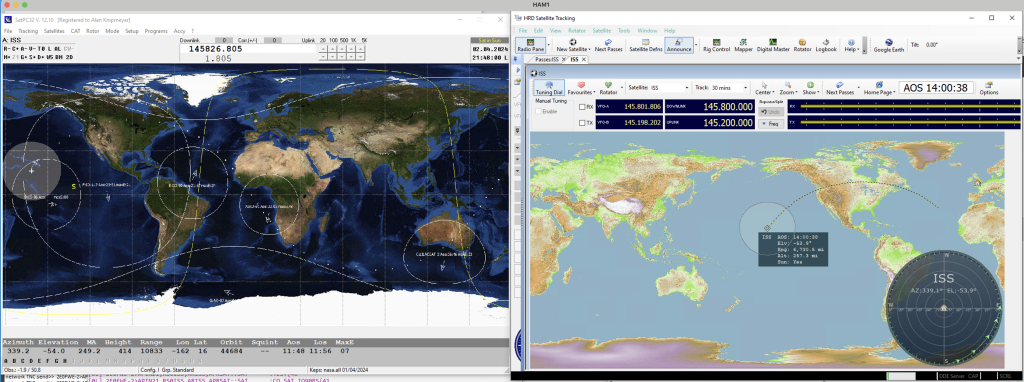
I then tried to track/use LILACSAT-2, the satellite passed near enough right over, so should of been very clear to hear, and others on the satelitte tracking pass had heard it that day. This got me wonder if the tracking/frequencies was good for all satelllites. I turned my attention to SatPC32 – its UI is no means as ‘friendly’ or ‘good looking’ as HRD, but once the technical learning is done, it really does to work much better.
SATPC32 for CAT + HRD for Visual
With some time editing the DOPPLER.SQF and SUB_TONE.SQF I done CAT control via SatPC32 and visuals via HRD. This for me a a nice setup, as i could visually see the future passes and also have the right modes / doppler from SatPC32.
Day – Back to work and in the Shack
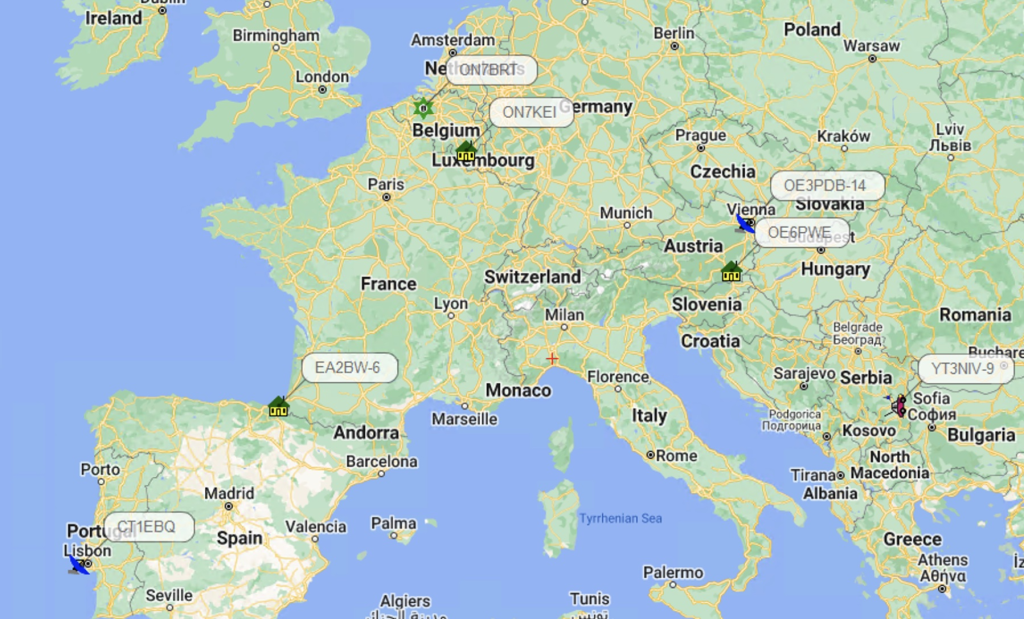
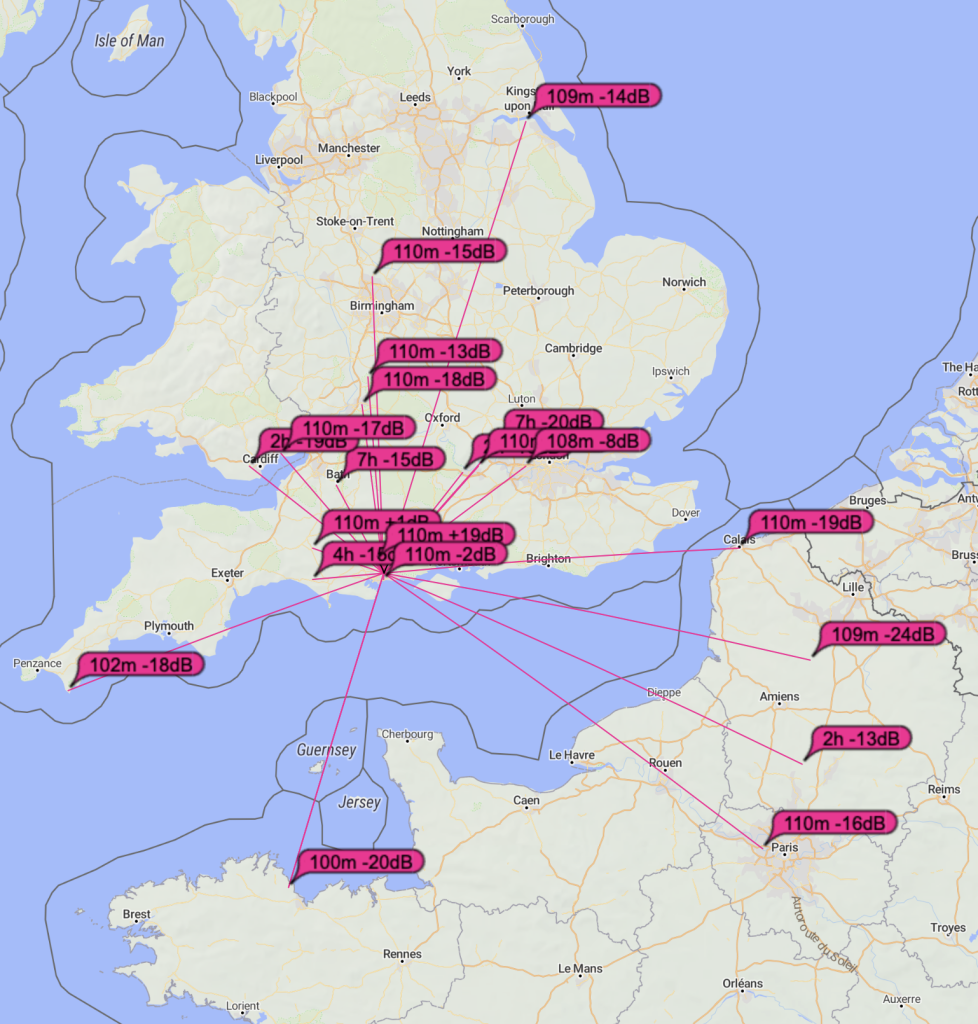
I wanted to try something that I was unable to do due to the weak signals from the previous location, so the APRS digipeater on the ISS was a good target. The iSS Crossband repeater gets VERY busy, but I reall enjoy listening to it, but I actually wanted to try out using the ISS from my egg beaters. This wasnt possible before as the APRS packets would be corrupted/too weak to decode.
I was very happy that once I had tuned into 145.825 FM-D I was able to receive APRS packets as clear as day, and unusually the ISS had several passes today, making the chance of actually working the ISS digipeater quite reasonable.
To start with I didnt do any special config for Direwolf, just a standrd 1200BPS and listen / send on the correct audio devices. This saw alot of packets correctly decoded. As I had used APRS before, my favourite, and free/donations is Pinpoint APRS software. I downloaded this and connected it to Direwolf. Sure enough the packets being decoded appeard on the map all across Europe in real time ! It was really amazing to see how well the egg beaters in their new postion was doing, and even on 2m where no mast-head amp was in place.
Pinpoint APRS decoding packets from ISS pass
As I continued to work thru the day, I enjoyed how each pass of the iSS brought in so many contacts on 2M via the APRS digipeater. I was really eager to try and get into the digi peater myself, and there was one more very low pass coming thru in the evening !
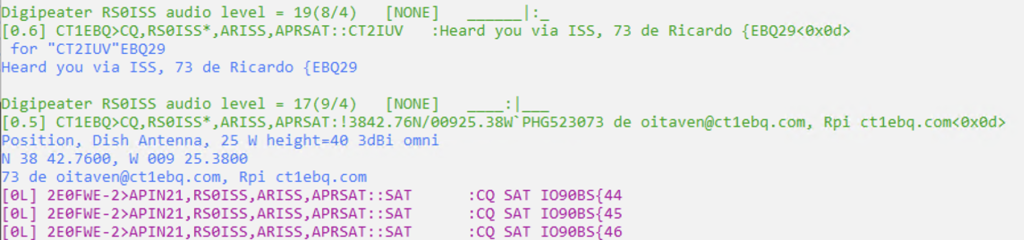
I searched the internet on how to setup for APRS via the ISS, the most important thing is to update the PATH, usually this is somethign like WIDE-1, WIDE-2 so other digipeaters will repeat the packets, but fo the ISS DIgipeater, this needs to be RS0ISS. I saw others also using ARISS so I put both in my path to make sure my packets would be repeated by the ISS Packet station.
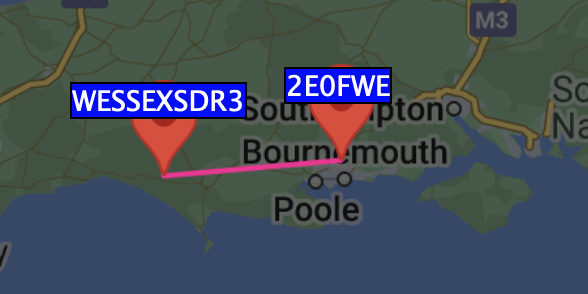
Direwolf receivng messages at a very low was (9 degrees above horizon) and me transmittingl.
I transmitted a few times, I didnt receive my own signal back but was really please to see that on the ARISS webpage by packets had been received and re-tranmistted by the ISS !
No location, but I was heard !
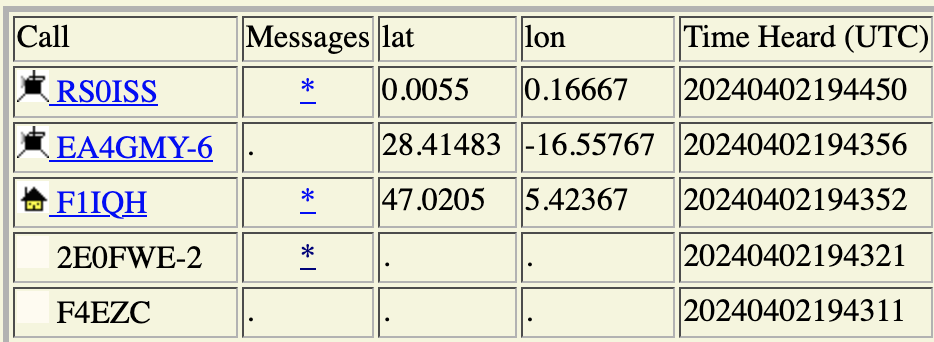
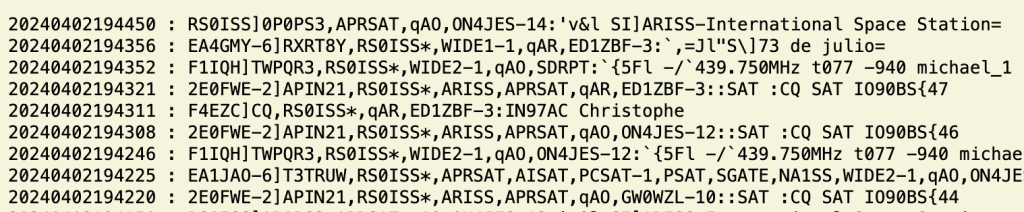
The raw data lower in the page confirmed my message was processed by the ISS APRS digipeater and am really excited for future passes that I should be able to have a QSO, several of which I had seen other operators do and request logging via LoTW which does Satellitle logging.
Raw data from APRS Digipeater on ISS
So whilst it has been hard work and its still early days with room for futher improvements, it seems all the hard work has really paid off. Heres to more ‘working the birds’ and looking forward to making a QSO.
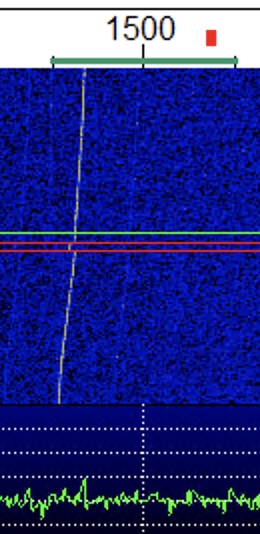
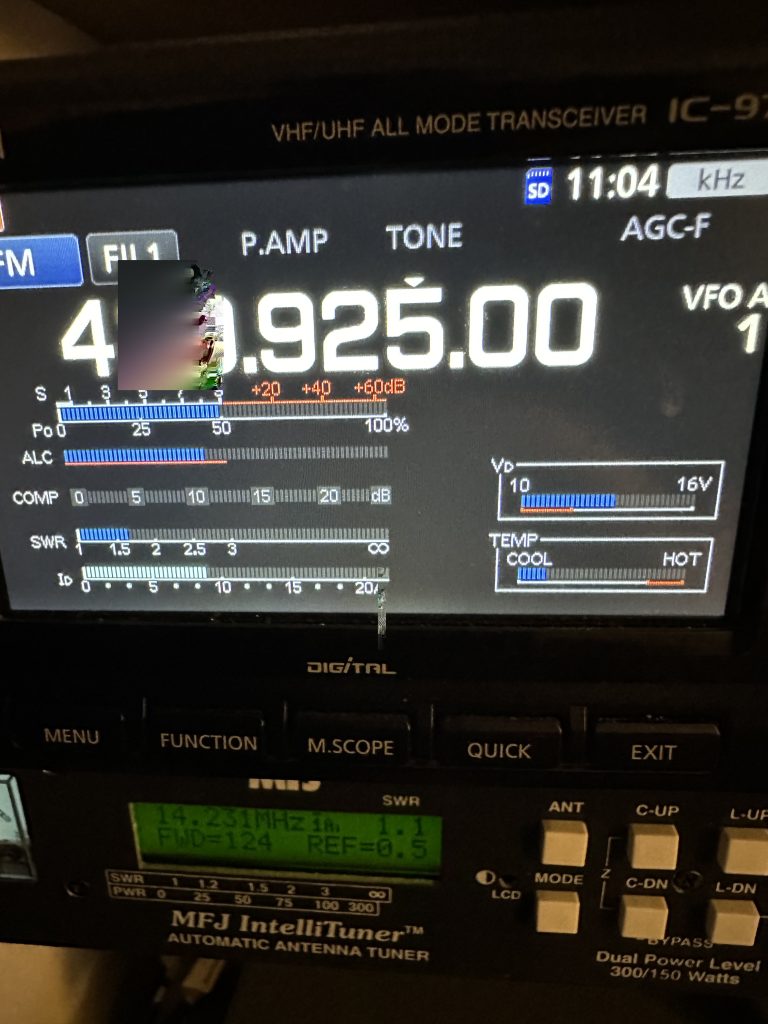
Having being able to do more work on the 9700 and its antennas recently, the ‘drift’ on frequency was getting more apparent, especially so with digital modes with the classic WSPR drift. As I want to do digital modes on the ‘birds’ having a stable frequency would seem like a good prerequisits to fix the drift issue.
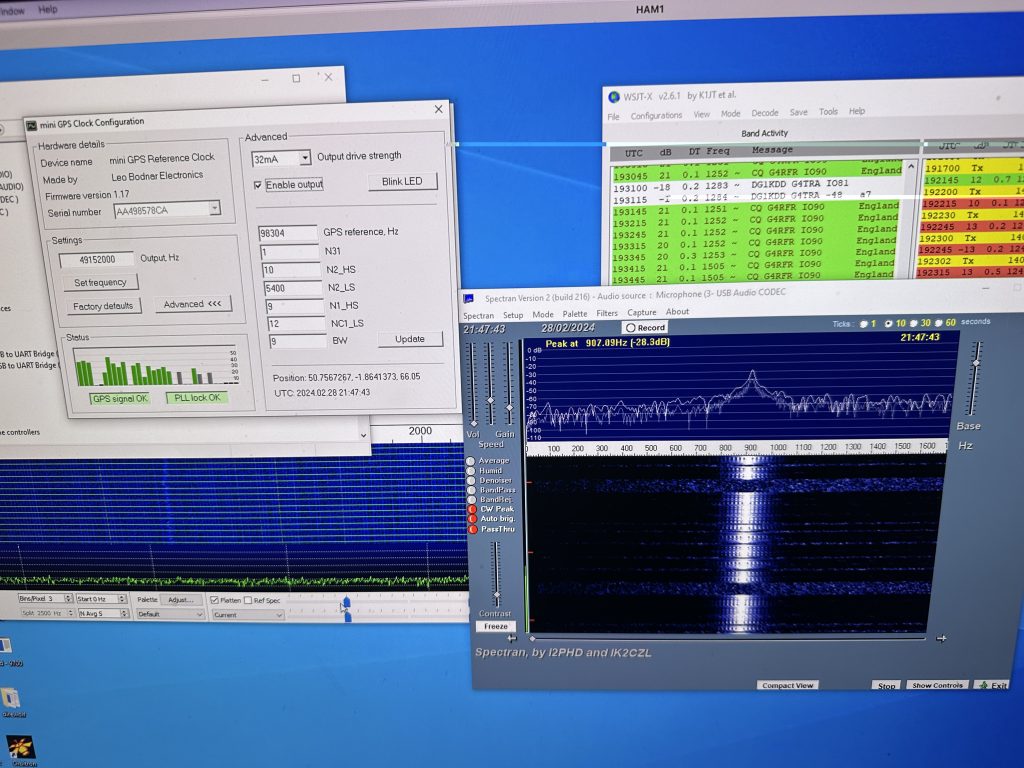
WSPR Drift in WSJT-X from the IC9700
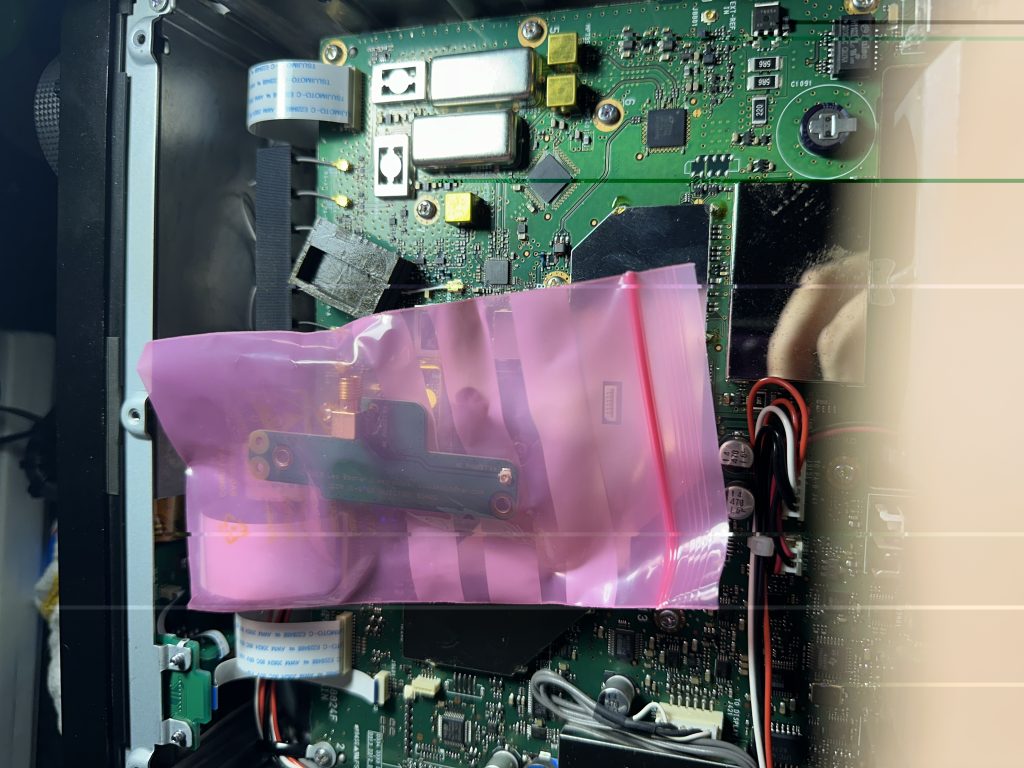
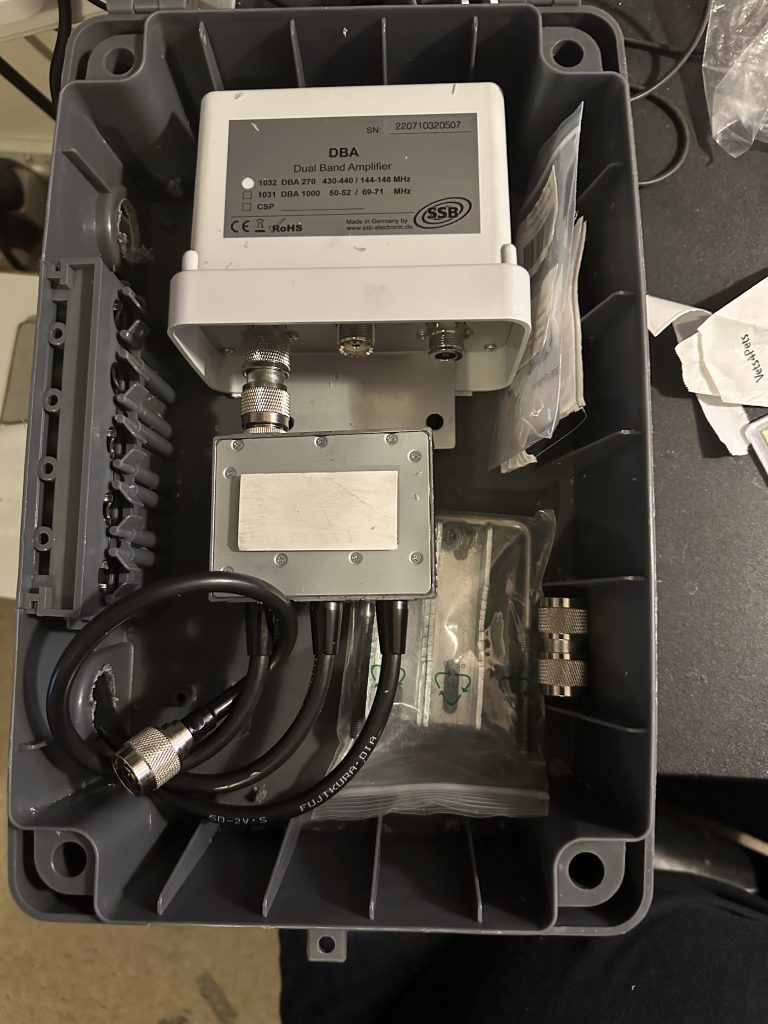
I’ve had the injection board for some time, but just never had the desire to open the 9700 until it was really necessary. I have to say that the idea of opening a radio with the price tag the 9700 has to fix an issue does seem somewhat bizzare, but equally I’m glad that leo bodnar solution requires no soldering but stil requires a good amount of care and attention.
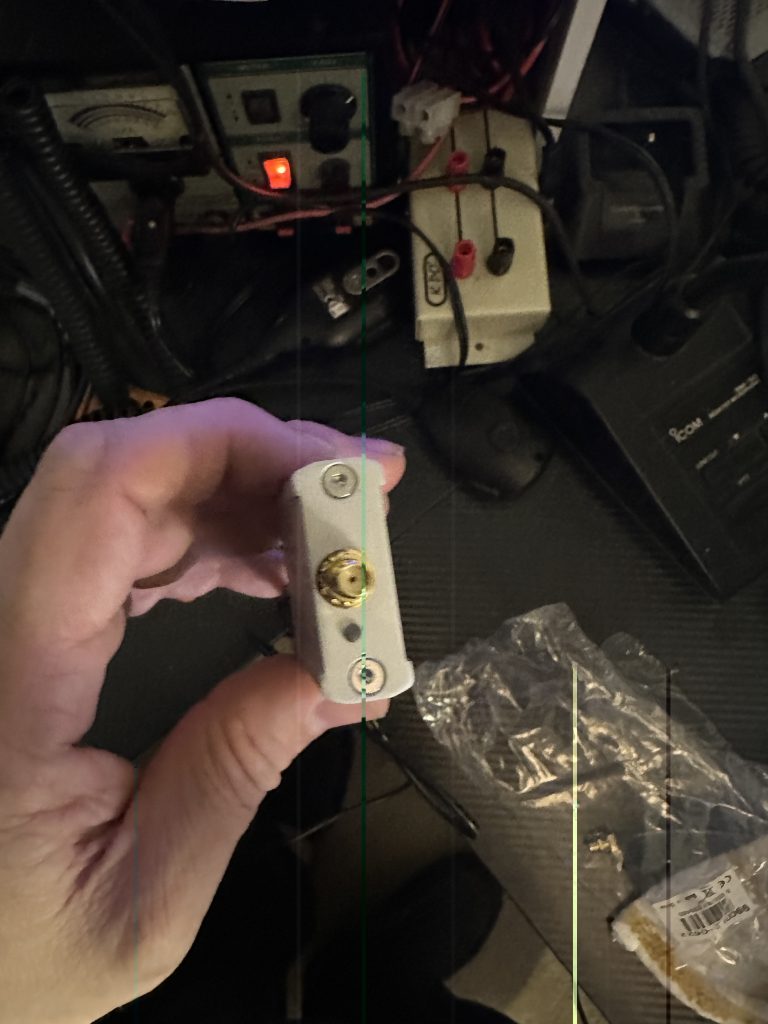
I ordered the mini GPS clock and was pleased to see that it included a GPS Antenna and USB cable, its worth noting that you will need a SMA Cable for going between the GPS clock and the radio itself, thankfully I had several good length ones here in the shack thanks to my work on the chipwhispherer capture board.
My reference video, which is also linked from the Leo Bodnar site, is the ‘gps lock you icom ic-9700’, I watched this several times before even opening the radio.
The most excellent how-to video on fitting and tuning the GPS lock on the ic-9700
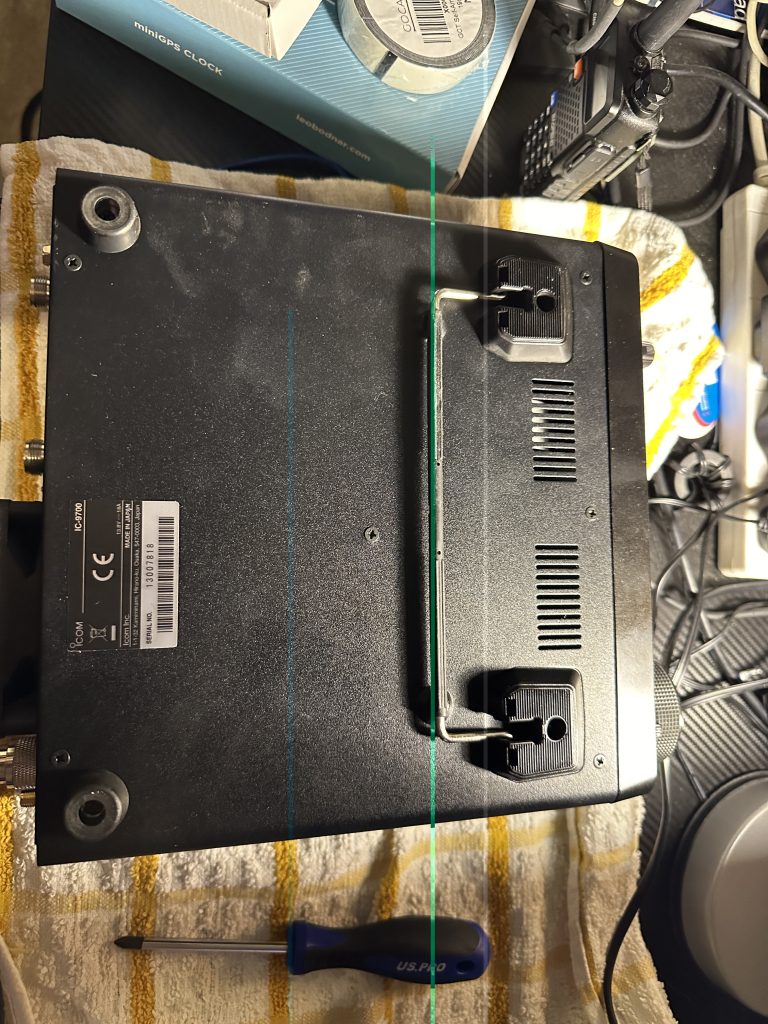
Having watched the video one last time, I set about opening the 9700.
use a towel to protect radioscrews removed and ready for fitting
I waited an extra day before opening the radio as I dont have any JIS screwdrivers and didnt want to wreck the screws on the 9700. I found a nice set for £12 on Amazon that done the job nicely, tho some screws may of been ‘locked’ in, a good strong ‘tap’ of the screwdriver ensured the screws came out easily.
JIS2 screwdriver for exterior screws on IC9700 base
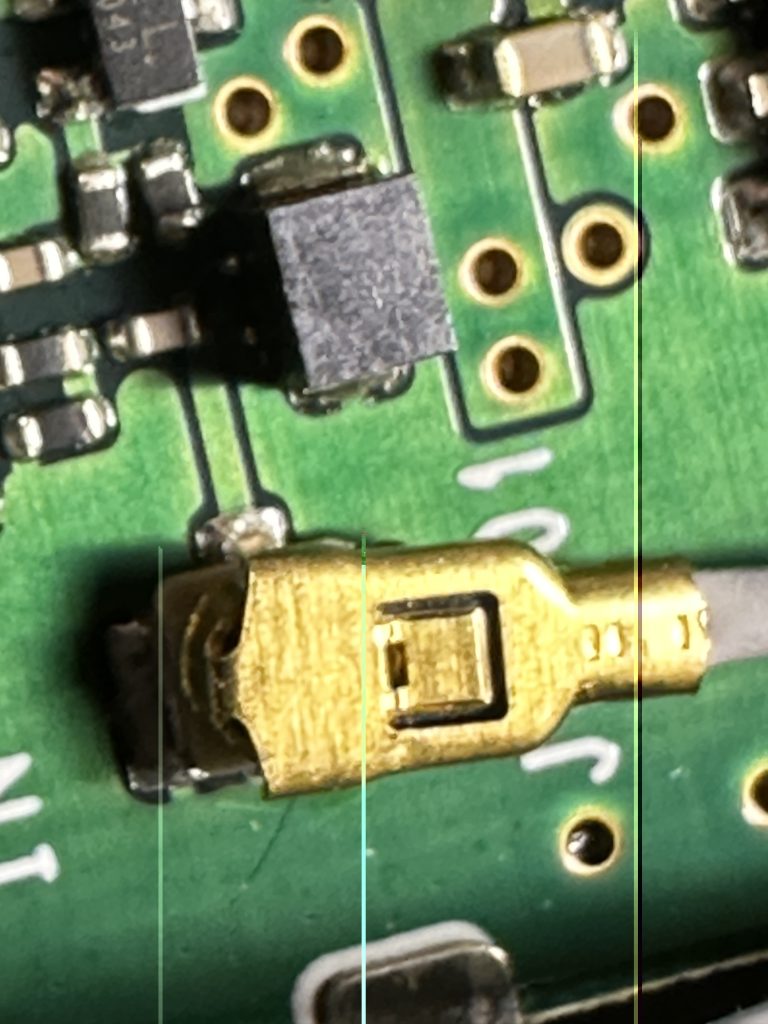
Having got the case open, i then set about removing the thermal protector and existing wire. I was trepidatious about removing the connector, its very small with alot of components around it, with a little ‘wiggle’ it was removed. I used a bike-kit socket set to remove the connector from the chassis and stored in the board box.
fiddlylight glue held this on
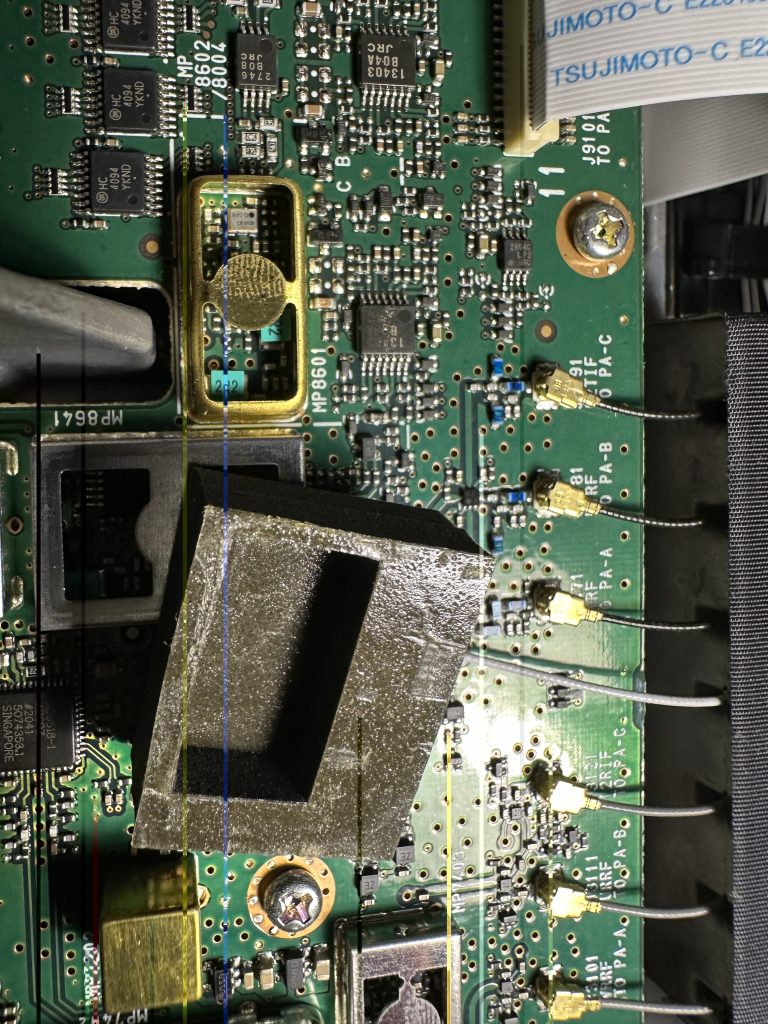
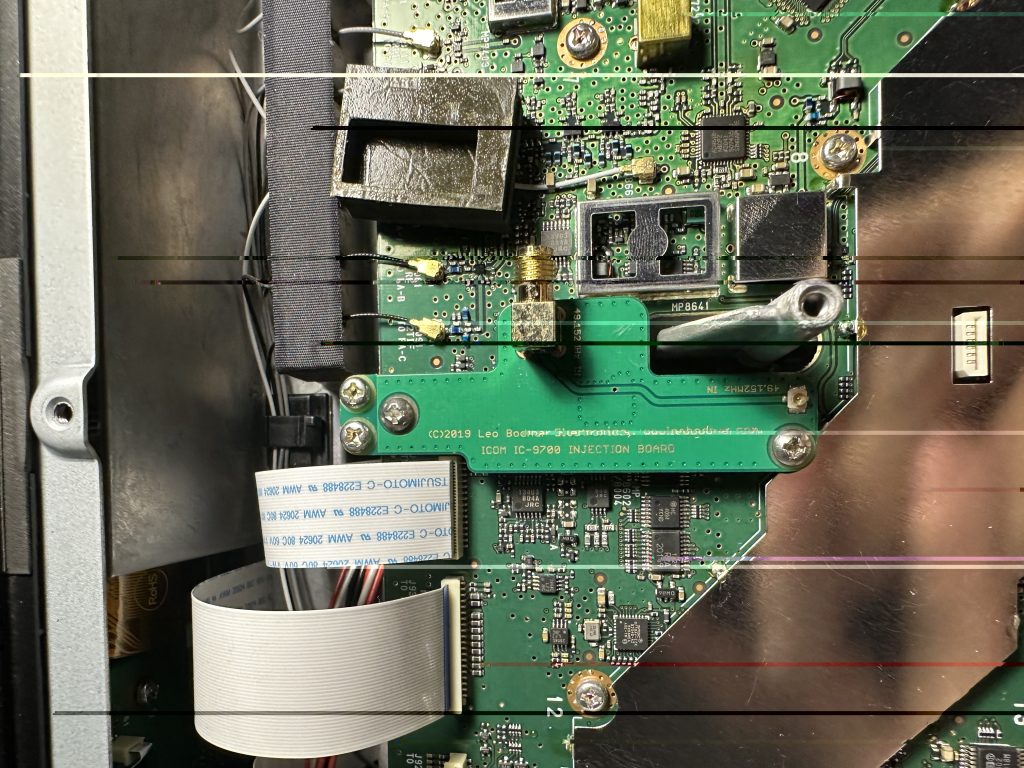
I then went about fitting the board, i first sized up exactly where it would go and what screws to use, there are two pairs in the box, I went with the longers set which done the job well of holding the injection board to existing screw holes. I made a visual inspection with my phone to make sure the board was fitted correctly and should work correctly.
making sure of placementlonger screws used for fittingvisual placement looks good
Once I had fitted the board, I put the power back and turned on just to ensure nothing had shorted/issues, then put the bottom case back on. I found getting the power connector on and off the 9700 really fiddly ! hopefully I wont have to remove it again ! 🙂
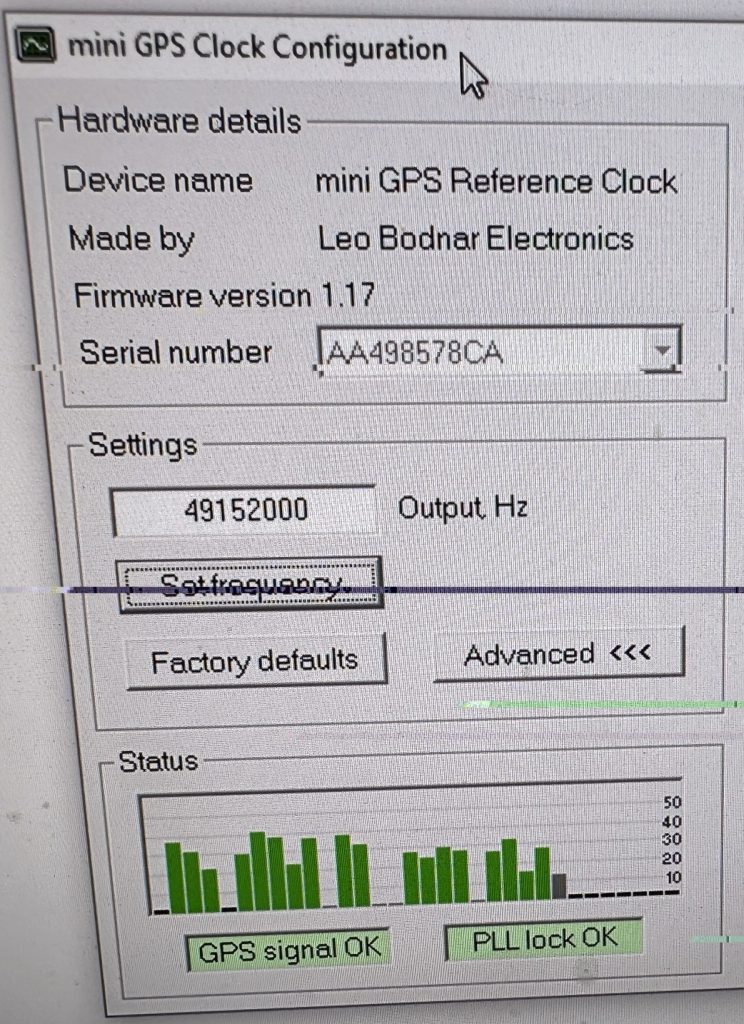
I then installed the software on the computer I use for the ic9700 that has PCSAT32 and HRD installed on it. I didnt see any Linux software for doing this, so was at advantage running Windows in this instance. I liked the GPS Clock had a blinking LED on it as well. I hooked up the external antenna and was soon picking up the GPS signal without issue.
GPS reception is great !LED is a good feature
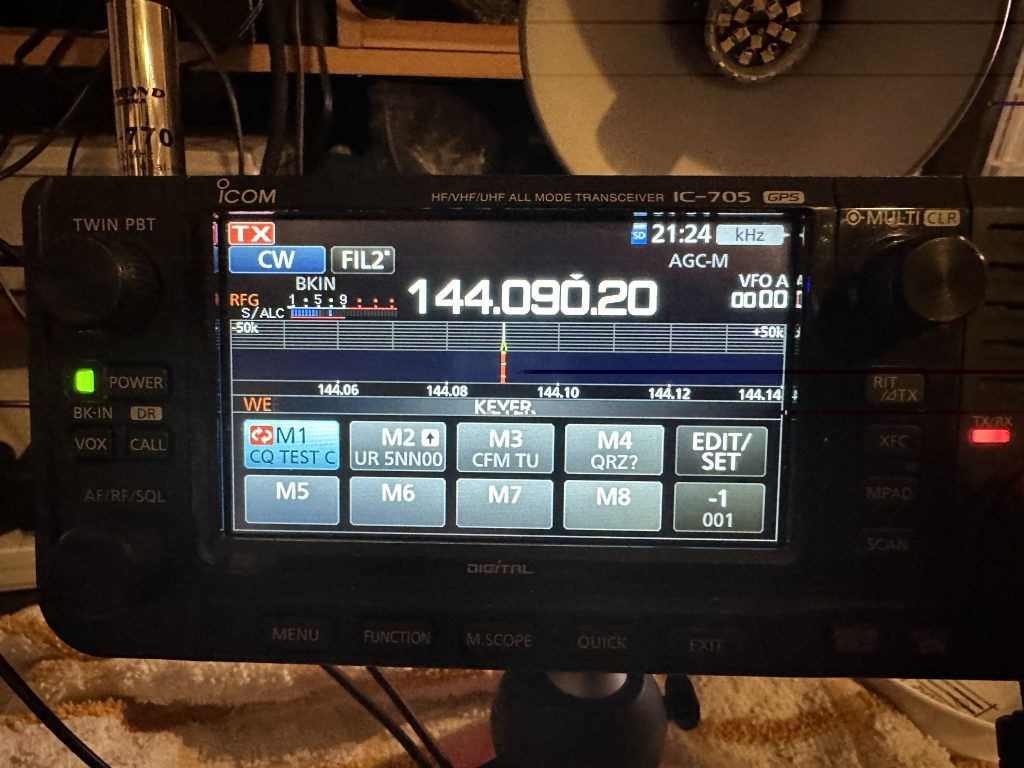
For signal generation I setup my IC-705 with a 2m/70cm whip antenna, and set the power output to 0, i was able to use the morse mode to generate a repeated CQ TEST 2E0FWE as my frequency marker, I could then use this to ensure the injection board was working correctly.
I was really impressed of how well the frequency locked and the stability of it. It only took me a couple of hours tops to watch the videos and fit everything to have a radio which will work well on digital modes.
Hopefully you will see more videos of me using the digital modes on the ‘birds’ soon, but am glad the radio is up and running !
When I’m working during the day, I’m using WSPR to test the antenna and even tho its an eggbeater its doing great with WSPR.
Firstly Merry Christmas ! Its a relaxing day here and not the usual busyness for a Monday! Having an extra two days for the weekend has been really nice, I’ve done loads of other stuff and also playing with IC-9700 with the satellities, or attempting to, would be more accurate 🙂
So far I’ve heard zilch, as in nothing, not a tweet from a ‘bird’ I looked up Amsat’s tracking of sats other had heard, so would be confident that I should be able to hear them too, alas to no avail. I then tried FT8 on 2M, I was getting out just fine with the eggbeaters, but not hearing a thing, I did notice some very high peaks of QRM on the WSJT-X ‘scope’, so my first step was to move the antennas further from the house and a better line of sight of the sky to the horizion, which accomplished, well, nothing.
I then tried SSTV via a my hand held units into the IC9700 and MMSTV, this worked fine, so the 2M antenna was at least receiving and transmitting. I went to 70cm and found a clear frequncy and gave the same SSTV test, this worked fine… so what was going on ? Ok simple test, lets swap antennas between the Diamon X3000 which goes into the Kenwood, put that onto the 9700. Again,
WSJTX FT8 2M
No problem getting out with FT8 and no problem on SSTV. I tried WSPR with 5 watts on all three antennas, the egg beater 2M worked fine.
WSPR on 2M
I then checked thru the IC9700 settings, all good there and used the manual ATT/P.AMP switch on the front of the radio it self, what I noticed was that the internal preamp did increase the signal, but with the external pre-amp there seemed no increase in performance.
What I suspect is happening is that my mast-head pre-amp is designed for a single feed of coax into it, then into a single verticle antenna, where as I have splitters each end for taking the coax and seperating out the 2M and 70cm bands. By the reckoning I can hear local 2m fine (including MB7IPD) on the egg beater, I suspect that the 70cm RX is doing nothing, although the antennas resonent for TX, I think the multiplexer and multiband masthead are not working together correctly.
As its getting dark now, and have the luxury of another day off tomorrow, I will research which sat’s are most common and which band the RX is the most common, then I will setup a single feed for that antenna into the mast-head amp, and run two feeds from the egg beaters, then I should be able to find out if its the egg-beaters/coax/multiplexer causing the lack of ‘ears’.
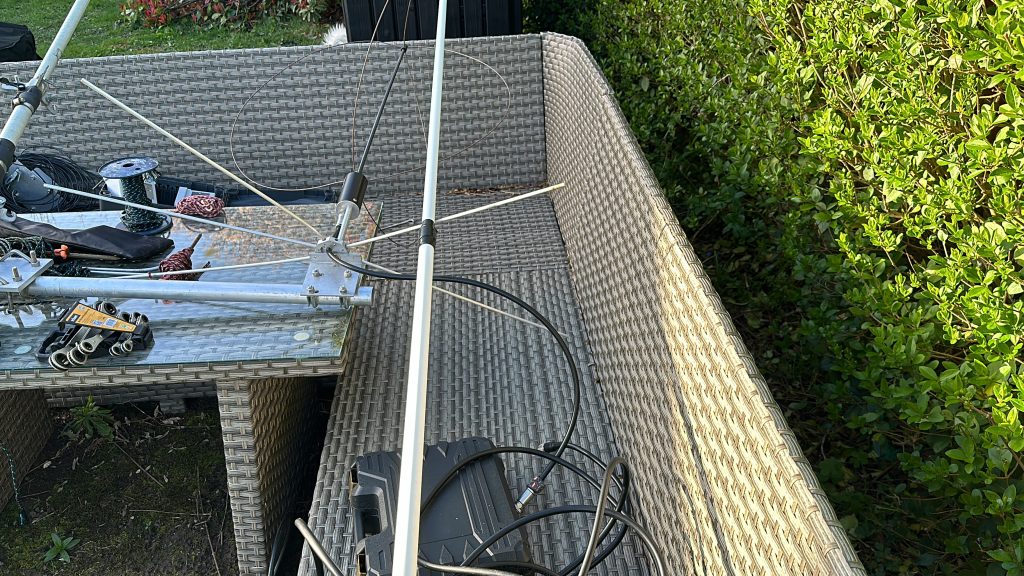
With no rain and getting the other radios on the air, it was time to tackle the errant SWR on the eggbeater antennas. I lowered the antenna on the tiltbase and with the rigexpert started going thru each connection on the antennas – there are quite a few with the single feedline solution going into the mast head amp, so there is plenty of possiblity for them not to be perfectly coupled/screwed together.
I started with directly connected to the 2m and 70cm eggbeaters, no issue there, SWR was spot on both, almost 1:1 on 2m and around 1.4 on 70cm. I then connected the mast-head triplexer and read the readouts from there, whilst this took some ‘wiggling’ it resulted in getting like-for-like direct readings. I then connected triplexer into the amp and read the output of the amp, the SWR here was higher, but not what i had seen previously, regardless, I re-tighetented all the connectors, this brought the output from the mast head down to the same results as from the output of the triplexer. I then reconnected the feedline from the transceiver back into the amplifier and measured from the far end, again good results. So the issue here was either a single or multiple loose connections. I suspect the the connection between the triplexer and the amp which is a double-barrel male N connector.
I put the title base back up and screwed all the bolts back into the base, feeling my age I was keen to get back into the warmth of the shack !
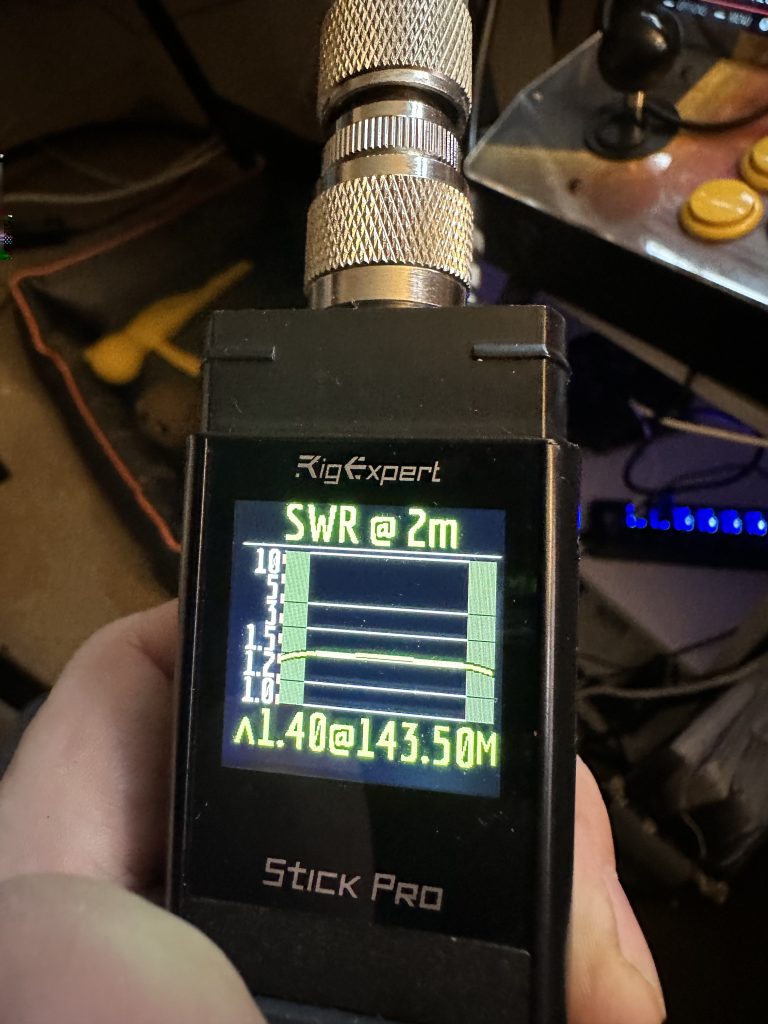
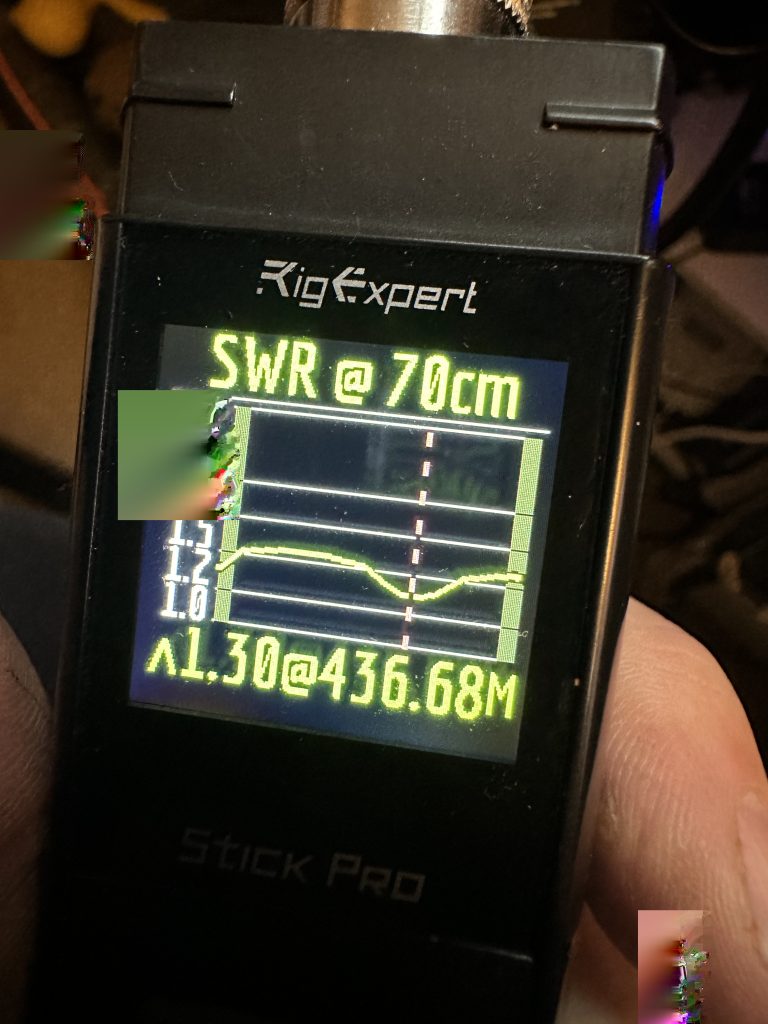
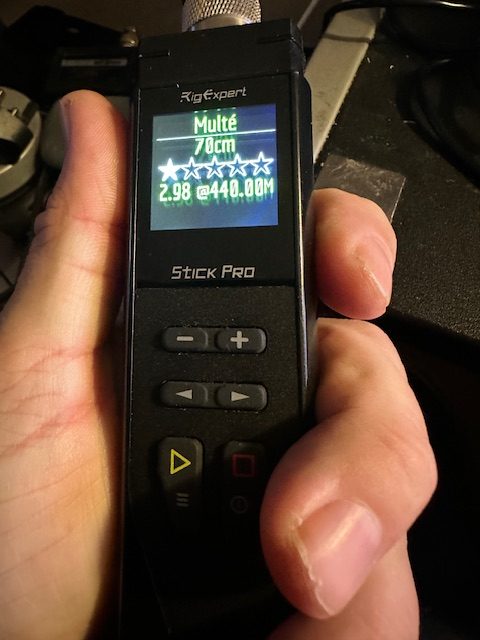
70cm2m
I measured the SWR from the feedline back into the rigexpert, again good results, so I went ahead and connected another triplexer to split the frequencies out into the 9700 2m and 70cm inputs.
triplexer with feedline2m with triplexer70cm with triplexer
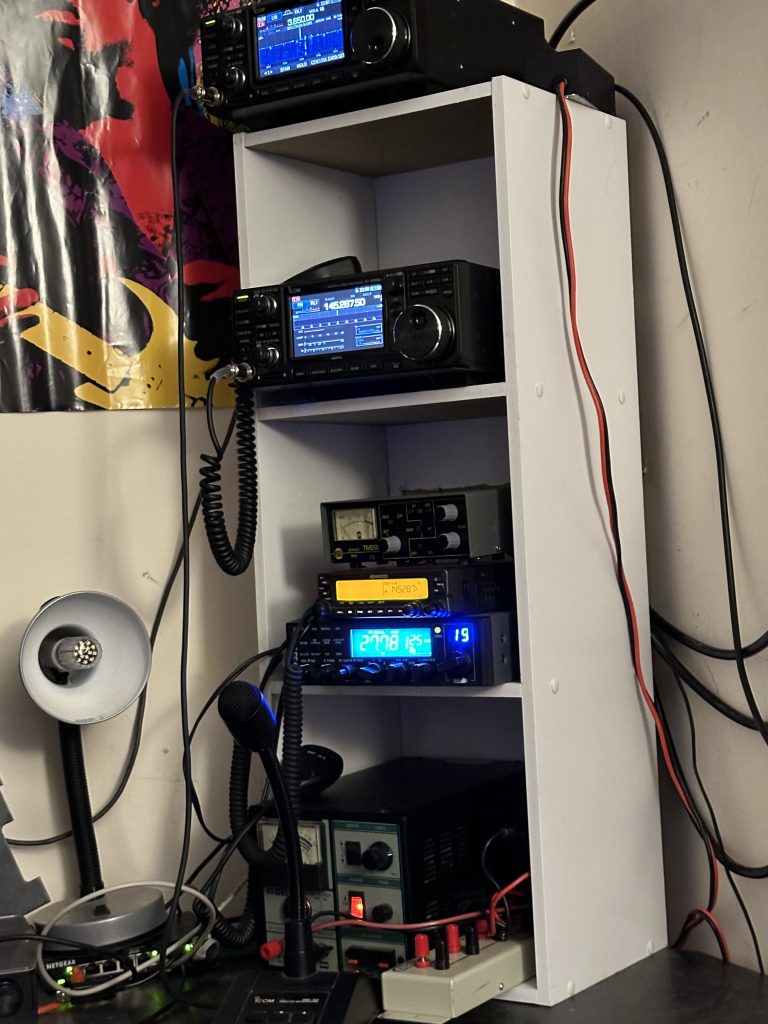
With the results coming from the triplexer looking good i went about reconnecting to the IC-9700. The book-shelf rack proving useful again in getting the coax into the radio easily just by rotating the whole bookcase.
2m SWR Test70cm SWR Test
Both 2m and 70cm transmissions from the IC-9700 are looking spot-on – next I will try out getting the amp configured from the 9700 and start testing with some satellities !
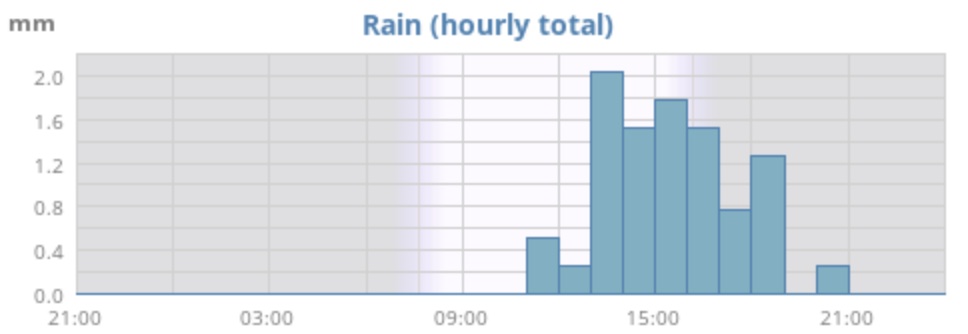
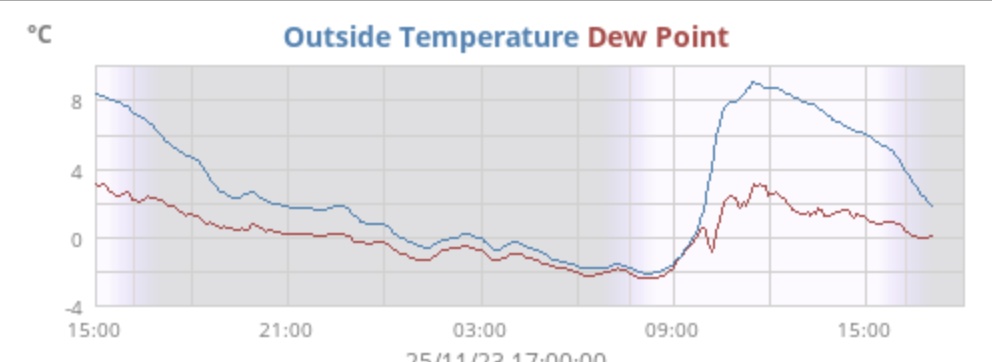
The splendid sunny day of yesterday could of been a whole season away – the weather today (26/11/23), bleak. Drizzle, a slight bit of wind so any gaps in clothing easily penetrated, it was not a good day to be outside, but I wanted to progress the mast head amplifier !
The weather station proving useful – preceptation whilst not heavy, was irritating..
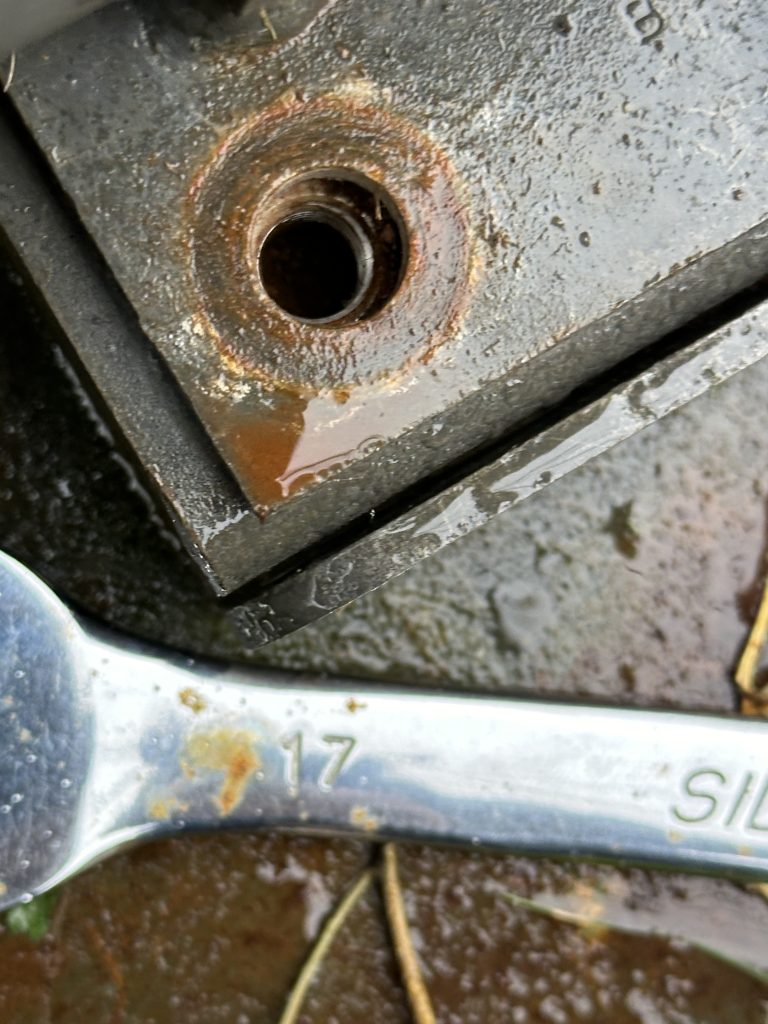
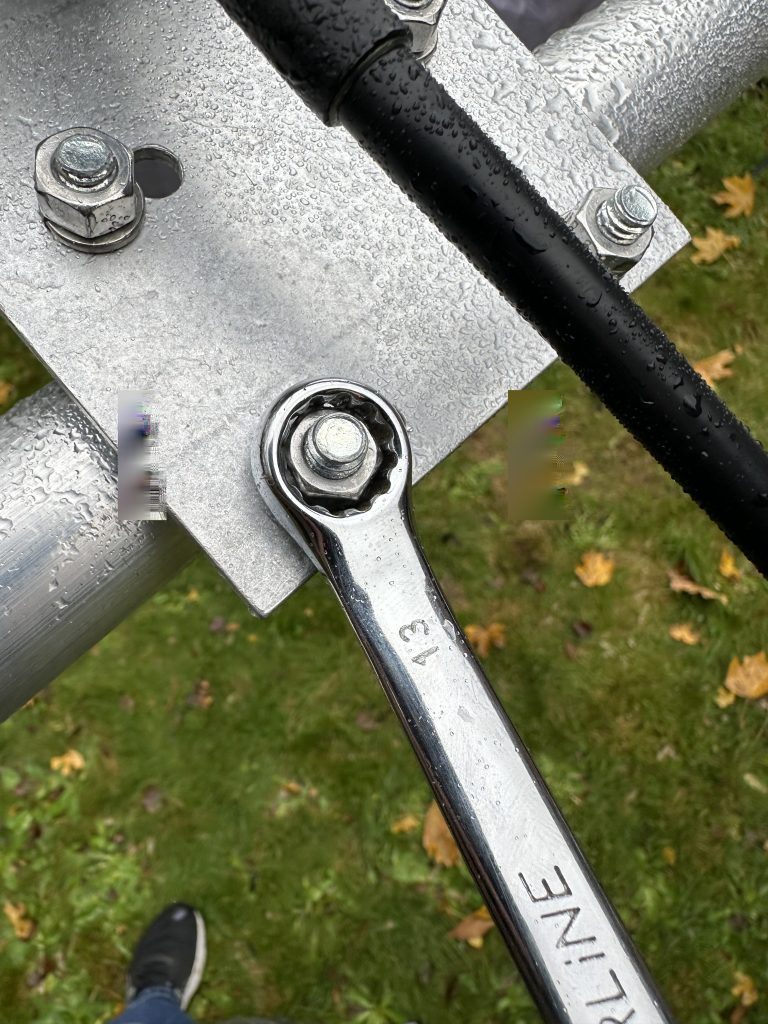
First step was to get the mast down, thankfully the barinco tilt base makes this really easy – having help to raise it first time was ace as getting it into the tilt base is great, but once in its easy enough to do on my own, although my aged bones do struggle with bending over and taking the nuts off. This time out I made note of the different spanner sizes required for each bolt which will be useful in the future.
1713fiddly bolts
Having got the antennas down, it was time for some ‘fettling’ on the egg beaters – they was slightly off perfect vertical with the mast, so first thing was to straight them up with the rest of the mast. I also moved the 2m antenna further away from the mast so the radials didnt come into contact with the mast.
rotating and moving the eggbeatersbetter alignmentlooking good
With the pre-amplifier installation work completed, I then set about attaching the amplifer to the mast head. I let gravity help here and attached the amp in a way i wasnt fighting it trying to drop off all the time – this worked pretty well. I had some issues with routing the cables internally, but otherwise got the feedline in nicely.
attaching the amp boxrequires some attentionM&P connector…
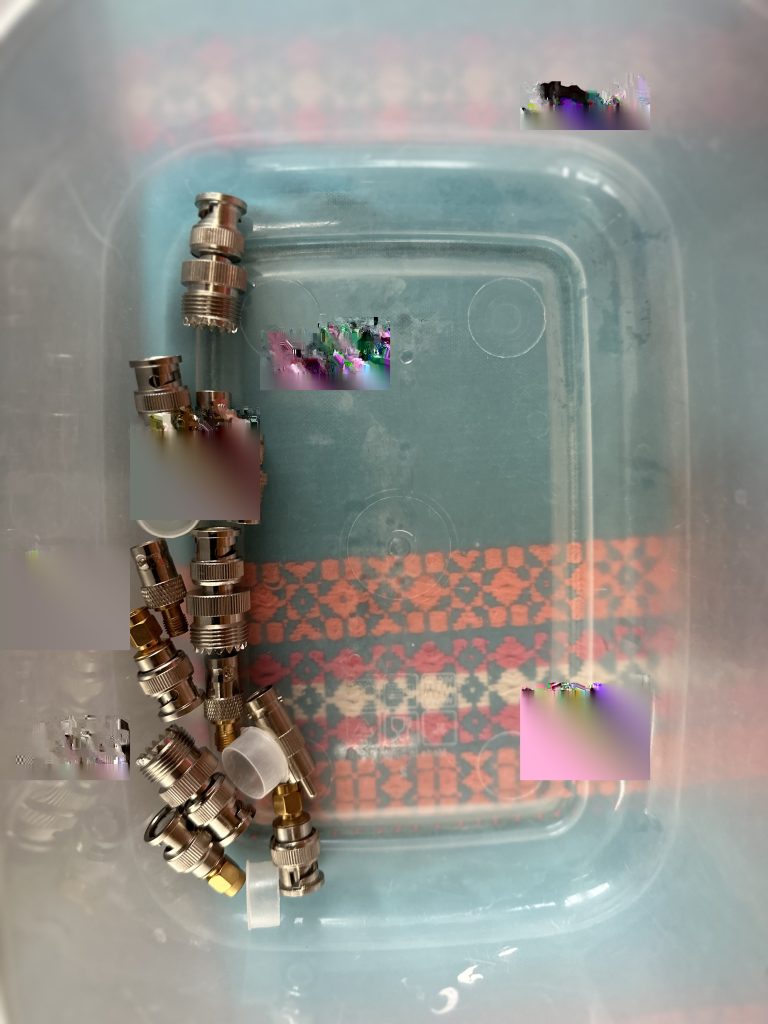
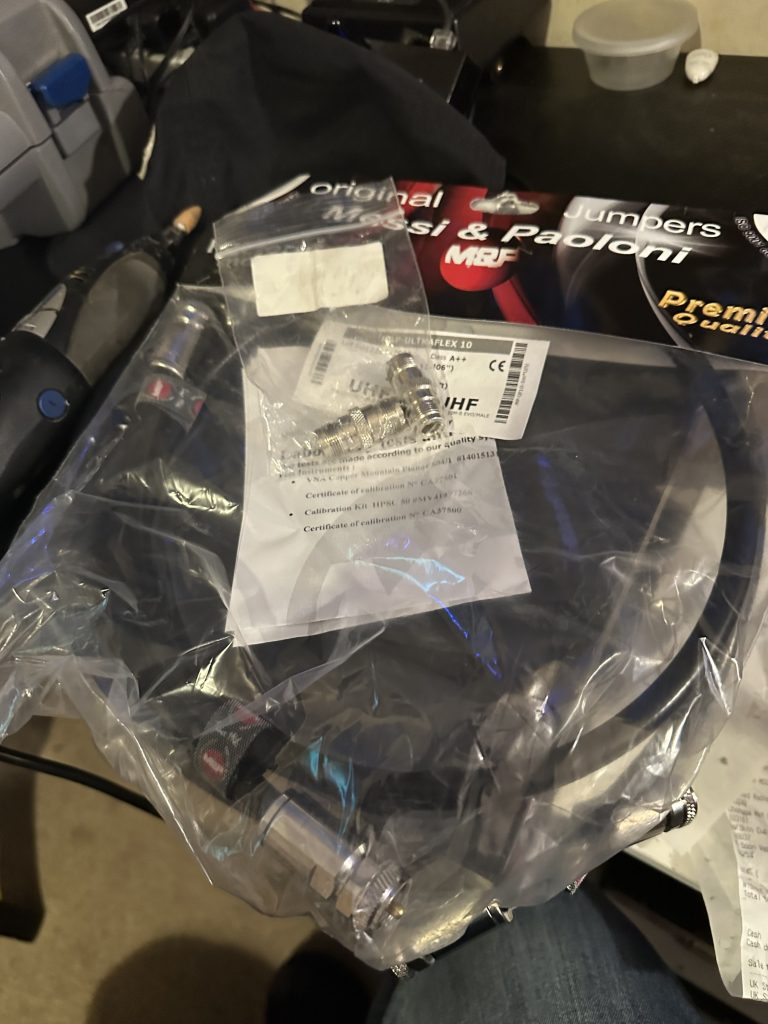
The Ultraflex 10 coax from M&P really looked the business, but it took some ‘convincing’ to go thru the egg beater base. Nothing too aggresive, just a firm push into the radial support, but it did go thru thankfully ! I then had to connect all the relevant ends up, I had pre-ordered some of the connectors I know I would needed but also had plenty to choose from in the shack.
connectors – lots ofi even tidied these awayin the field
After putting everything together and getting the egg beaters vertical it was time to beat a hasty retreat to the warth and a cup of tea in the shack. The rain wasn’t helping me today !
Once back in the shack I tested the SWR on the Rigexpert sitck, which does the majority of bands, alas today wasn’t to be my day as the SWR reports were not looking good.
yikes, thats not good !
With the WX not improving any time soon and a plethora of other things to do (XYL computer upgrades being one of them) I satisifed myself with at least getting the amp on the mast, I willl have to spend some time in investigating and correcting the connectors to find where the issue is !
Still, I’m exicted to be able to start using the egg beaters with an amp, the work will no doubt be worth the effort to pull out those weak signals.
It has been a splendid sunny day down here in Bournemouth, whilst the tempretures have been dropping, it was nethertheless a fine day. My original plan was to get essential bits-and-bobs done and out the way, so i could spend the afternoon working on the antennas outside, however the week had caught up with me and a much needed afternoon rest resulted in 2-3 hours lost, but at least I felt better 😀
overnight temps from the now working weather station
Having had a rest I started work on the mast head amplifier, collecting all the parts I had stored away and the dremel, ready for making some holes. I had left my 9700 on 145.500 and was very surprised to hear a call out for a radio check ! Funnily this would be my first ‘ground’ QSO via the egg beater antennas and a good way to check that everything was working as expected. I had a great QSO with M0ABI who was portable in Barton on Sea, given I was using an eggbeater antenna for satellitle comms I was very happy to make this contact, and Mike had alot of history/knowledge of Satellites as well, it was a great QSO and I got back to work on my mast head amp.
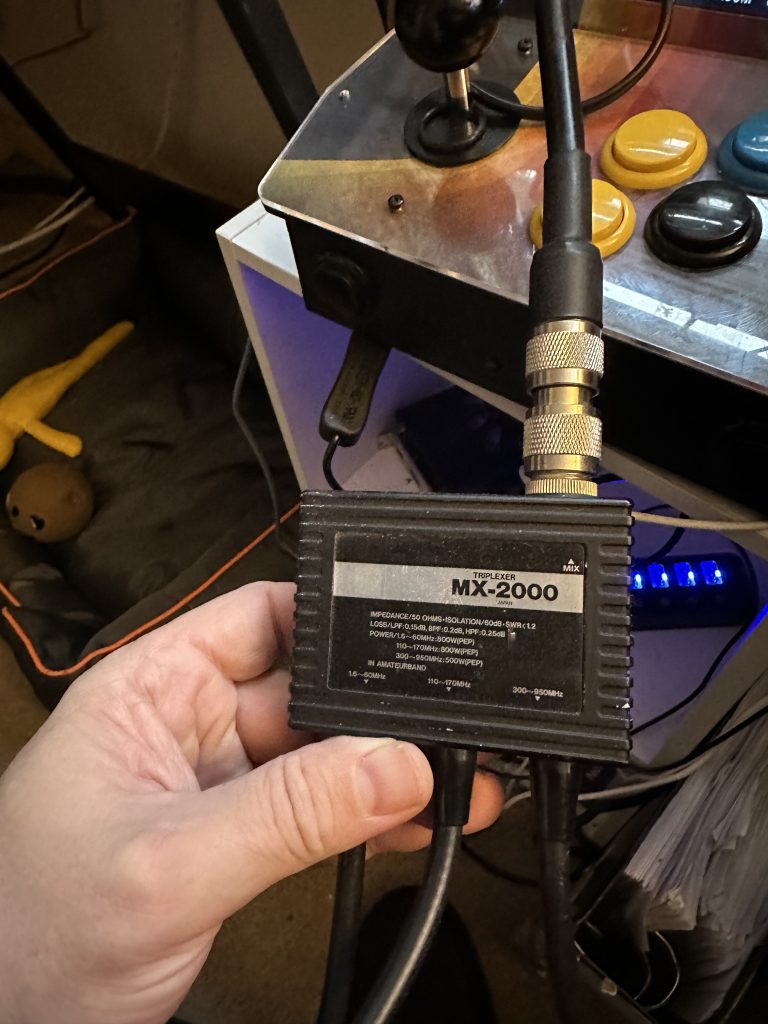
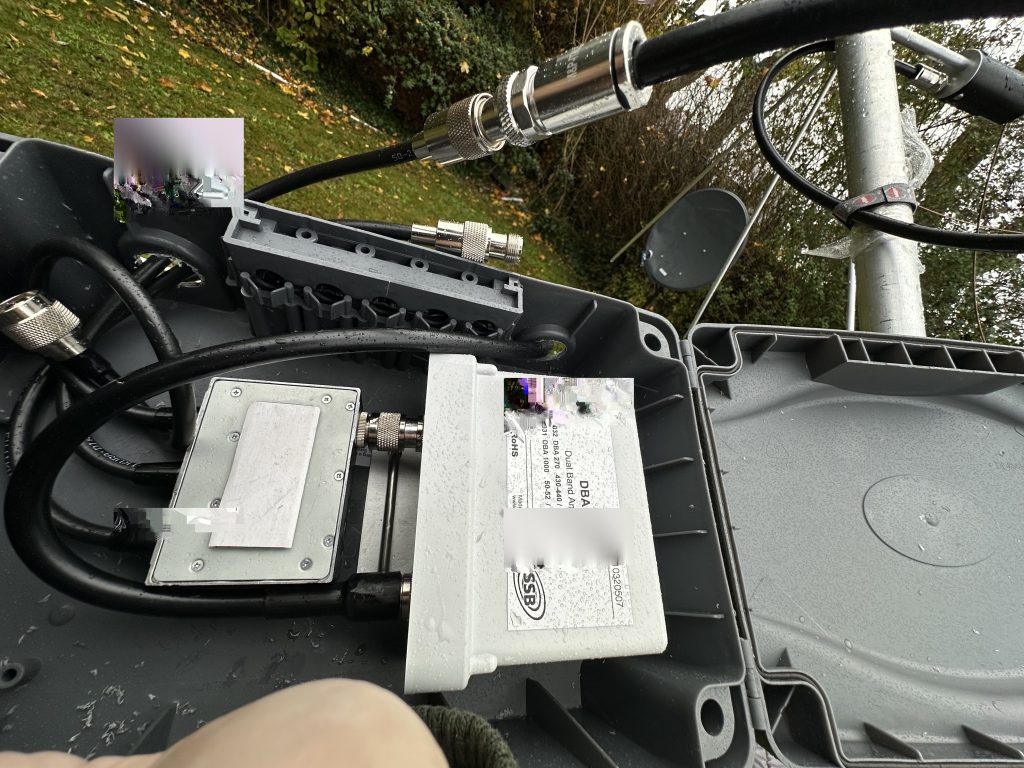
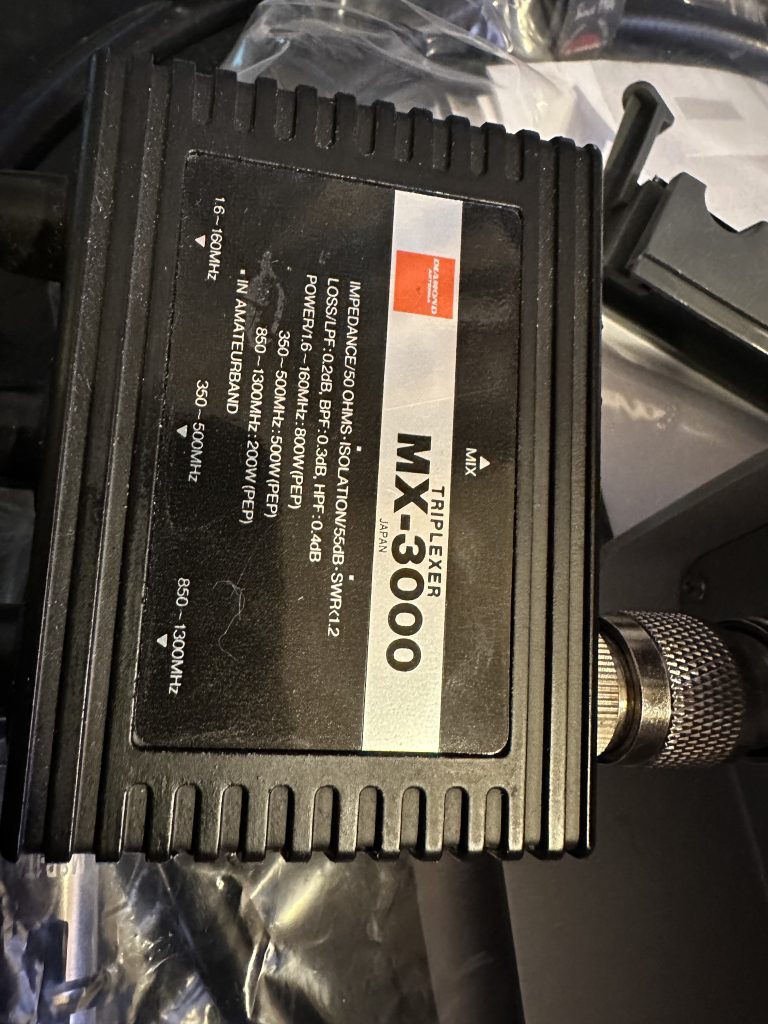
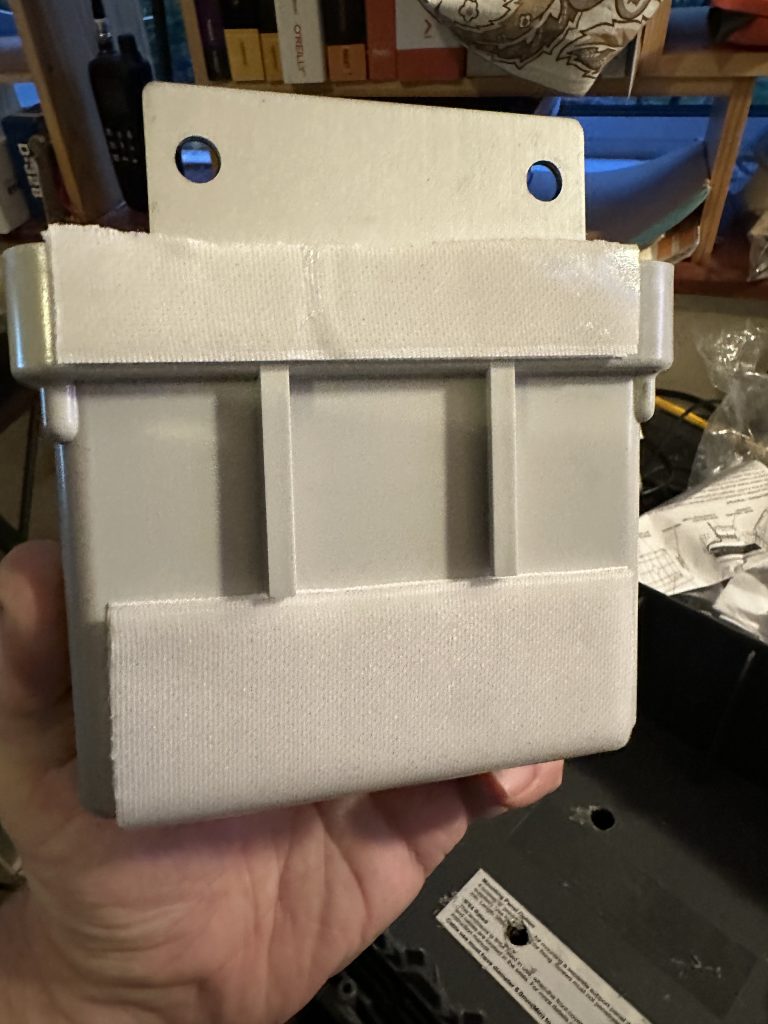
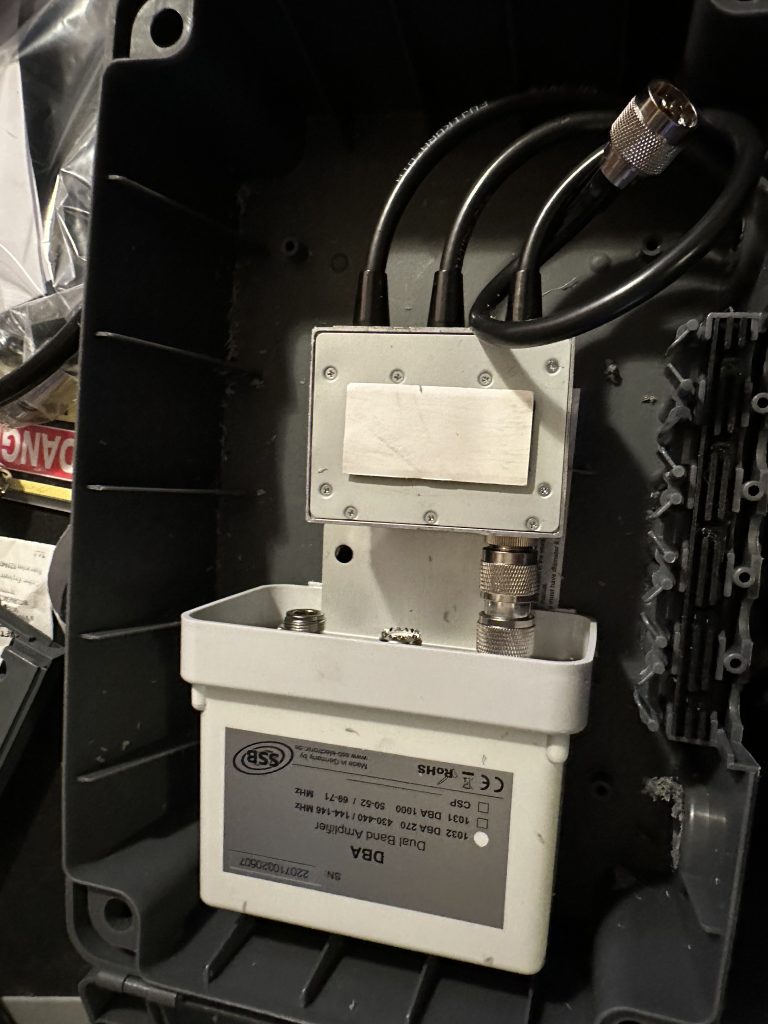
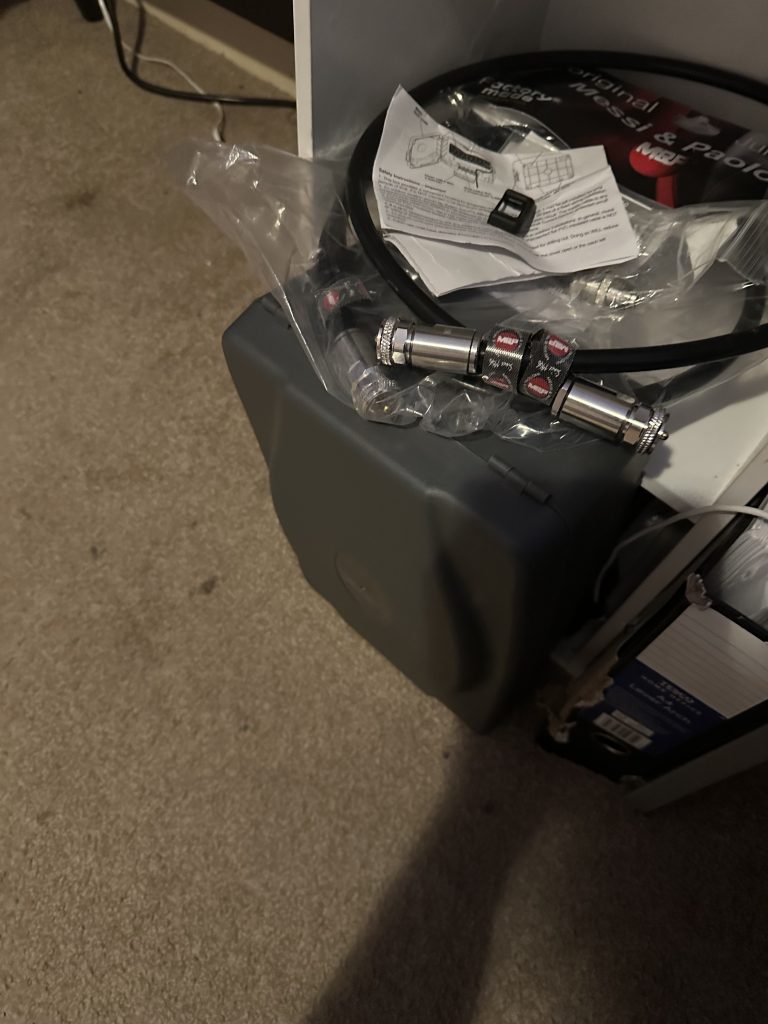
MX-3000 TriplexerElectrical box housingMast head amp velcro
Having place the mast-head amp in the ellectrial box housing and marking out where the bolts to attach it to the beam/scaffold would go, i then drilled two small holes with a dremel do it would line up nicely once in the box. I attached velcro supplied with the box to the back of the masthead amp. Its incredbly strong stuff and affixed the amp to the box nicely. I then screwed on the triplexer via a N-Type barrel connector.
triplexer and ampwiring loom internaltriplexer external
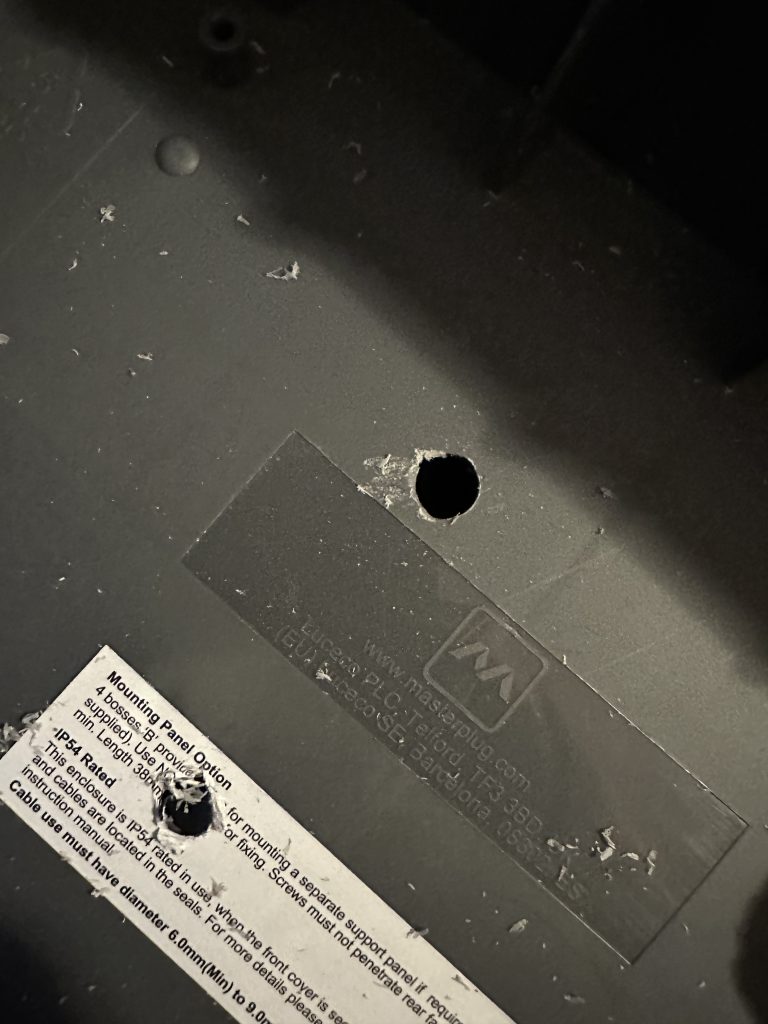
With the triplexer and amp connected, i dremelled out the side-holes for where the feed line from the radio will come and the outputs of the triplexer, I stowed the 23cm output and kept a N-Type barellel connector on the 70cm output of the triplexer, as these are all PL259, hopefully this will make attaching the correct antenna to the triplexer easier once outside.
WIPM&P Coaxready for tomorrow
I checked out the feedline holes and am quitely confident the LMR coax I have will fit in there quite nicely. I have M&P Ultraflex10 for the feedlines to the eggbeaters between the multiplexer, to minimize the loss as mch as possible. I’m hopng tomorrows weather is at least dry so I can get outside and get the amp on the mast, then see if I can hear those birds just a little bit better….
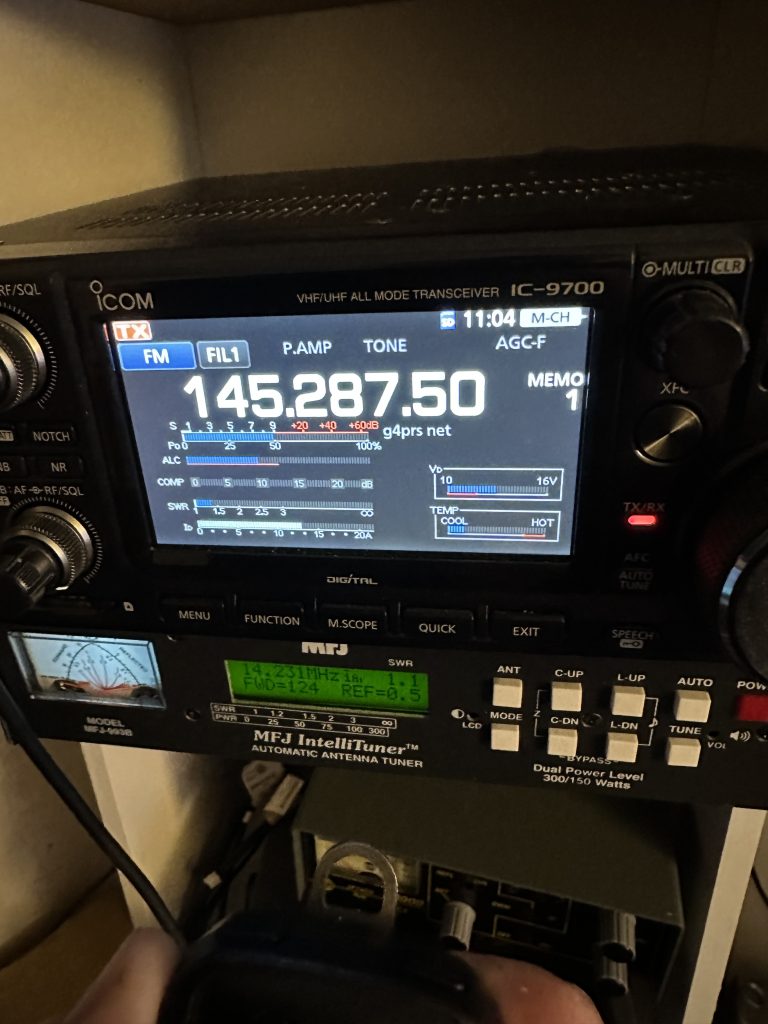
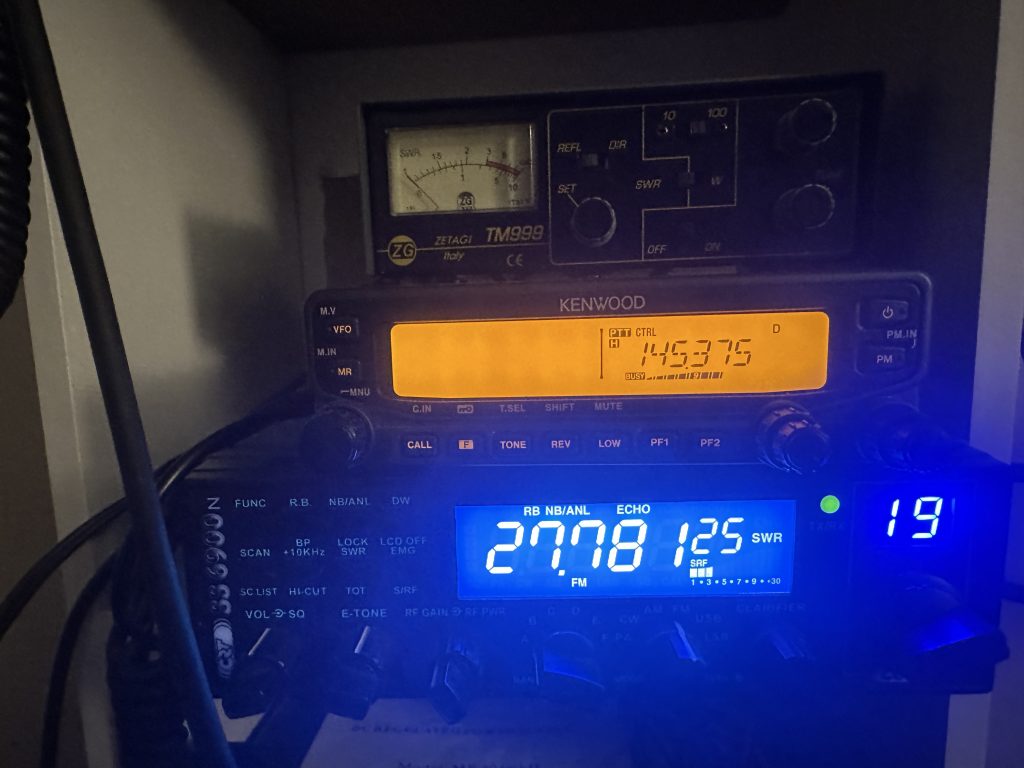
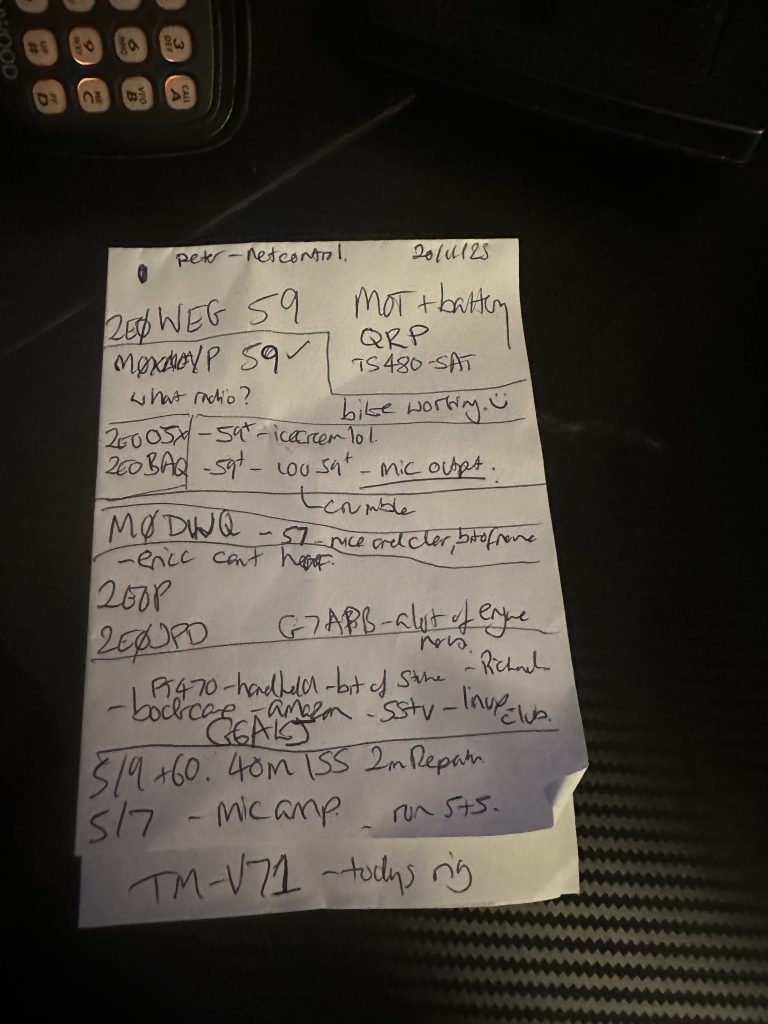
With the 9700 setup on the egg-beater antennas, it was time to test out the TM-V71 on 2M for some Telephony QSO’s using the Diamond X9000. The G4PRS net on Monday nights is on 2M, 145.375, and pulls in a good many callers from around the region, as my QTH is on the aft side of the ‘hump’ between Bournemouth and Poole hearing folk over Swanage and Weymouth way is very rare, but most contacts are very good to at least readable, with only a few which I couldnt make out.
TM-V71 in actionGreat display, great audioA very busy net !
I got in early on the list of callers, (3rd in line I think) and net control (Peter) as G4PRS done an excellent job in getting everyone in. As seen from my ‘scribblings’ there was alot of callers ! I was greatful for the constructive input on my audio and strength, 1st time out was to quote ‘blasting the doors off’ so I got a bit further back from the microphone a second time around, which seemed to help. I will check the manual if there is a in-built setting for microphone amplification to see if thats set, mostly I’ve been using this radio for APRS previously.
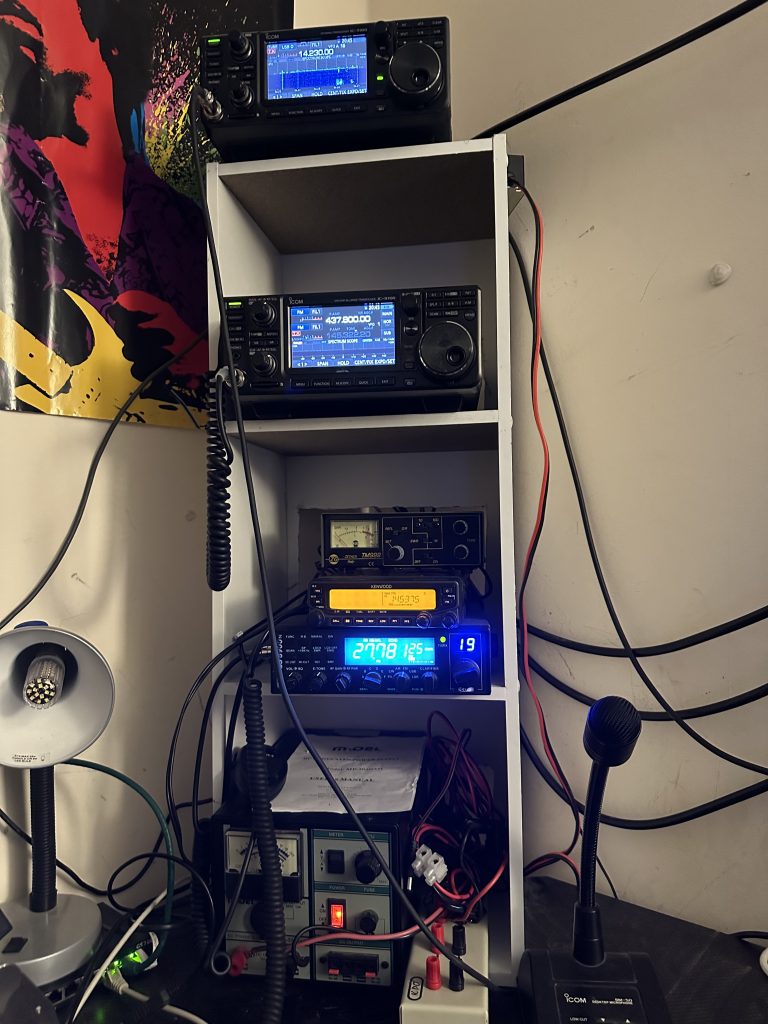
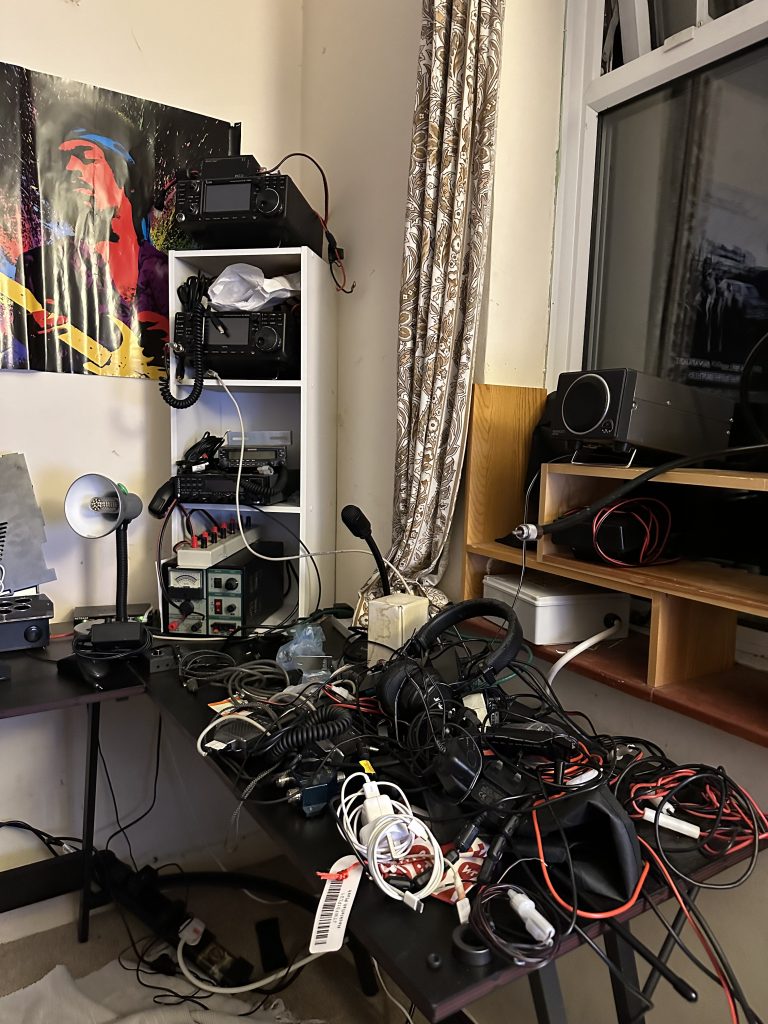
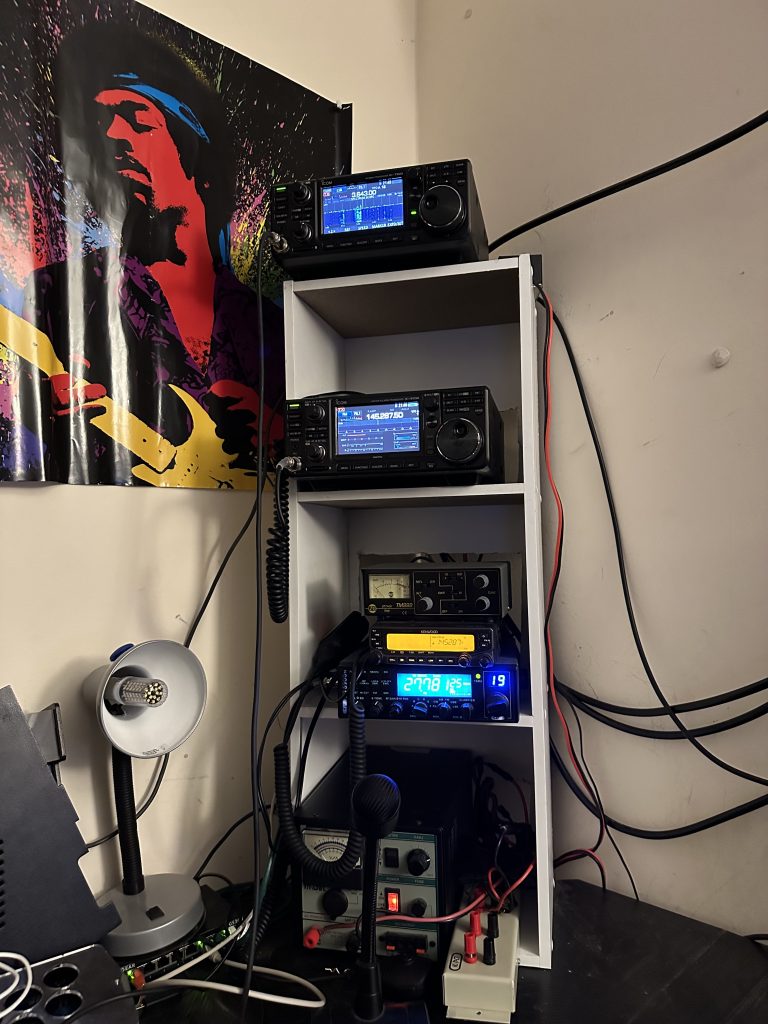
Sweety enjoying my companyHRD up and running againcomputers and radiosnice corner shack
It was nice that folk on the net remembered me being in POTA, which sadly I’ve not had much time for this year, but am hopeful in the new year I will be back out again, maybe even December, will see how things go. I’ve packed the 705 in its case for now, so it is a nice ‘go bag’ setup and I do enjoy radio/POTA. Also good feedback on the blog (thanks G6AKJ) and bookcase – its nice to hear that i get at least one reader of the blog ! 😀
I have HRD running on the micropc you can see just under the monitor, the larger PC is a linux box, which I might use for the 7300 to keep the 9700 and 7300 seperate as to avoid any mistaken PTTs,etc.
All in all, the effort to get the radios set back up in the book-shelf-shack has been really worth it, with HRD driving the 9700 and the egg beater setup, as well a nice 2M/70cm radio, I’m looking forward to having more QSO’s on UHF/VHF, as well as digital modes with the 7300, although 80m is very lively of late !
73’s for now and thanks for reading if you got this far 🙂 Hope to catch you on air !
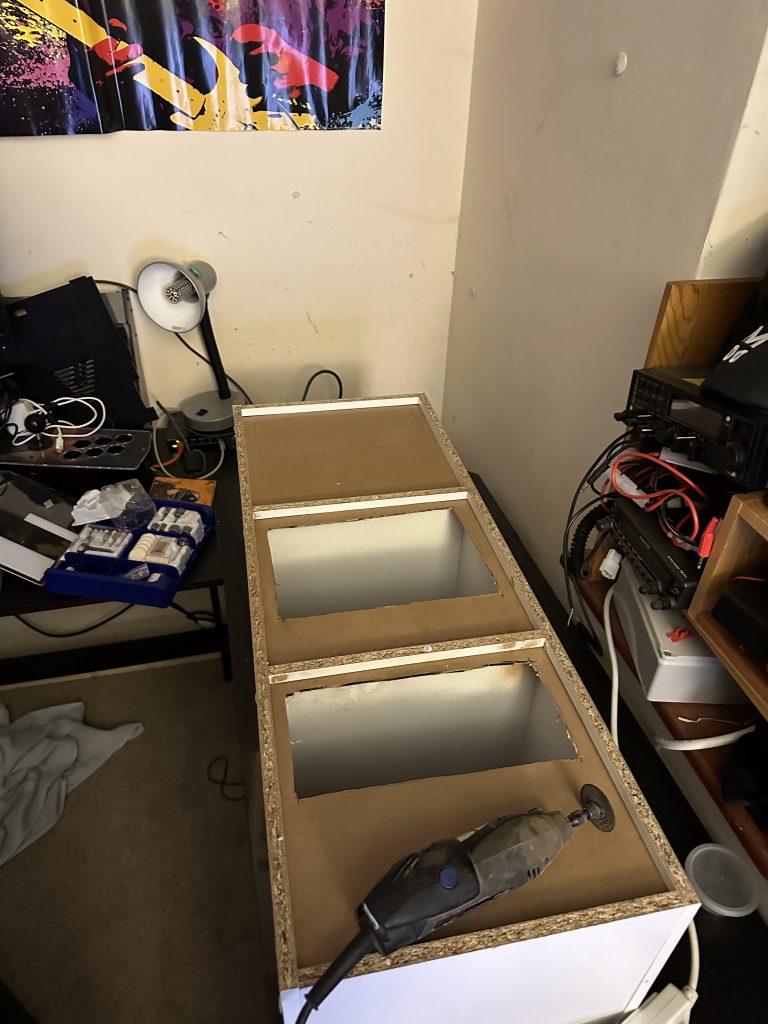
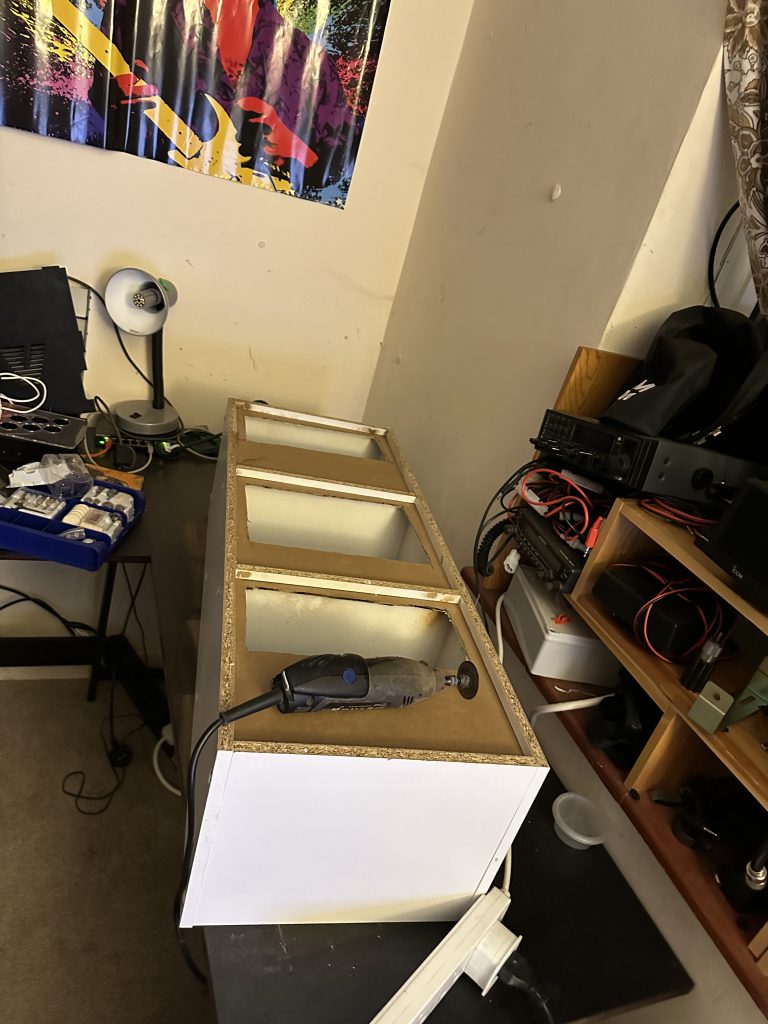
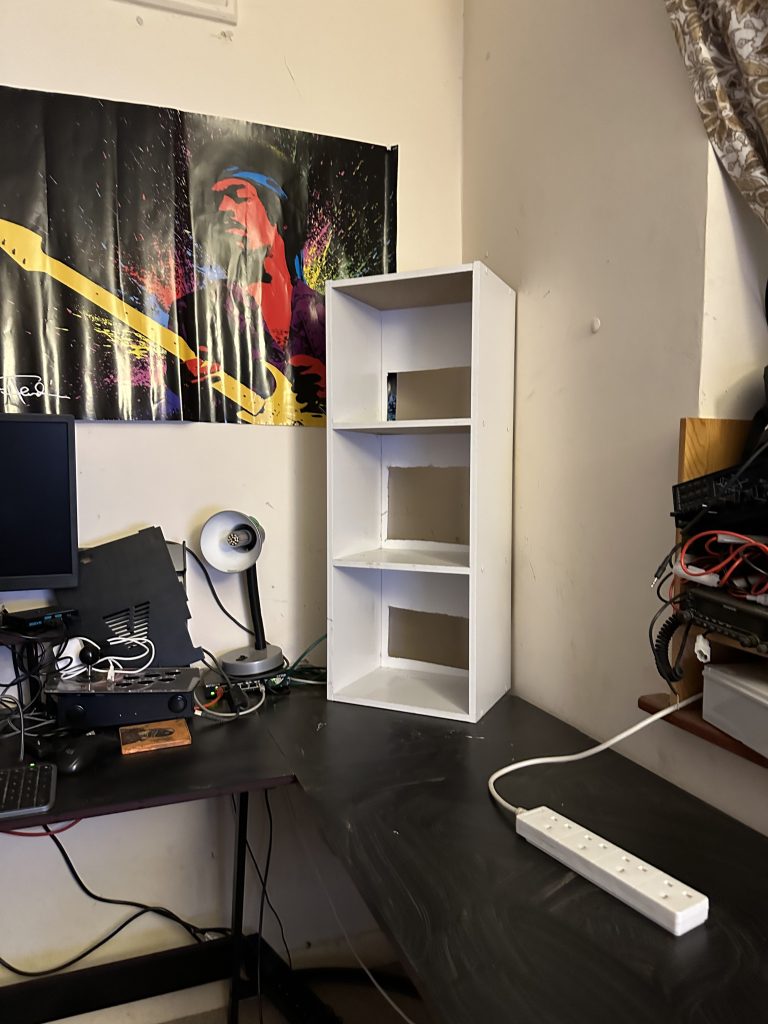
With my shack getting some actual usage of late, as well as the G4PRS 2M call on Monday nights, it felt like a good time to tidy things up. I’d not been particualy happy with the layout of the radios in the window, in particular it was susceptiable to any rain/water ingress. With that I orderd a budget 3 tier book shelf, having measured the dimensions, it was a nice foot print and my radios should all fit…
cleaning out the shelvesinitial configuration testhow to fix them cables…
Having move the radios from the shelving, I then set about putting them in-situ to see how it worked out – i wasnt 100% sure where I was going to put the book-case radio shack, but the corner seemed a good idea, and put the Apple iPad that was there back into the Alex Loop pack ready for my next /P or /M use. The position worked well, but there was a clear issue of routing power and coax to the radios, so Ihad to do some ‘DIY’ on the shelves. Here goes my warranty…
cutting with dremelaccess holes completenow those cables will fit
The cheapness of the bookcase meant the back-walls of the compatments didnt present much work for the dremel, if it was earlier in the day, I would of done this outside tho, it generate a fair amount of dust and smoke, but I kept the windows wide open and also took my time with each section. I didnt need ‘perfectly square’ holes, just enough so that I can route the coax and other cables thru, and as can be seen in the last photo, this worked out pretty well !
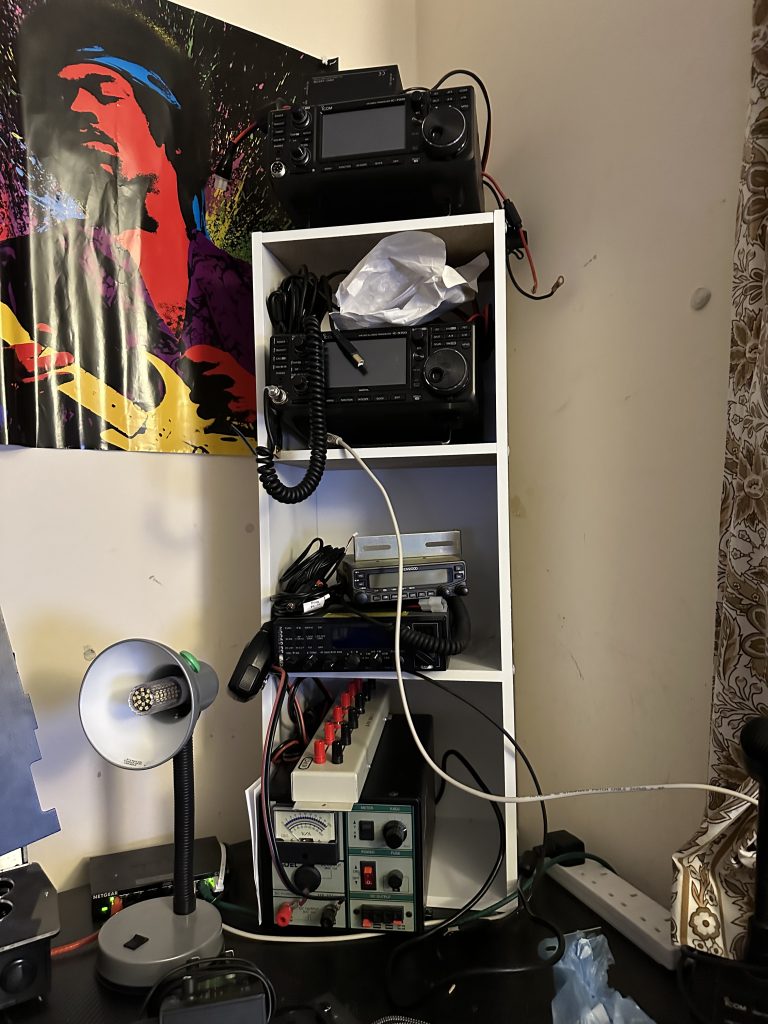
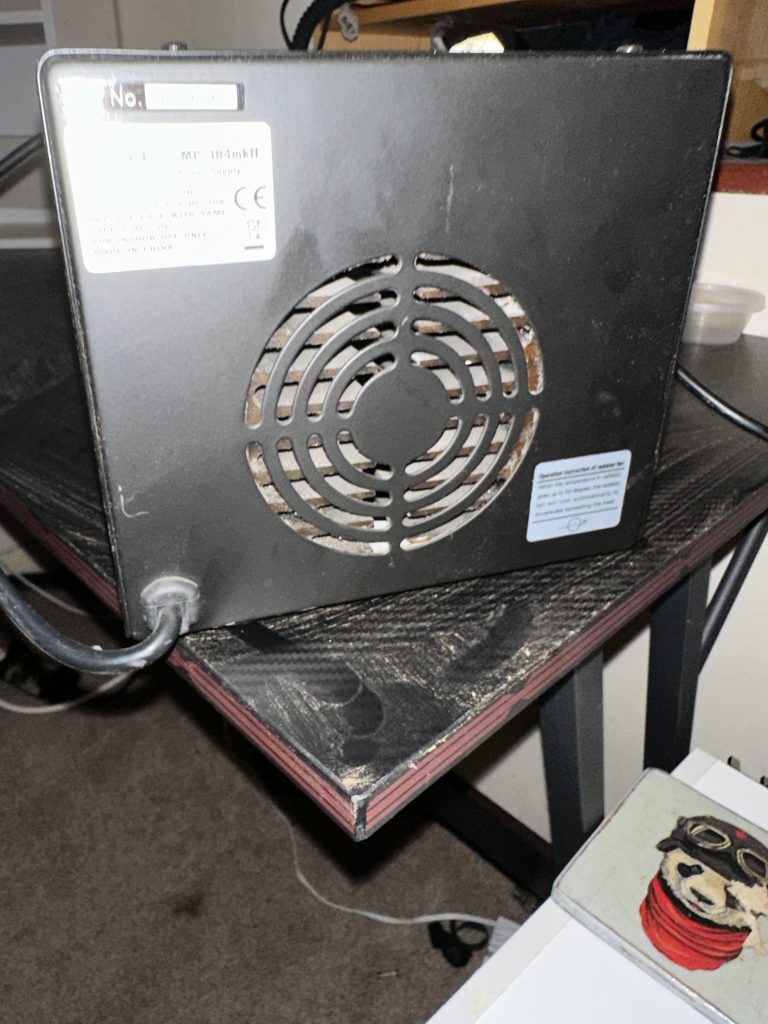
clearance for the PSU fanstart placing the radios
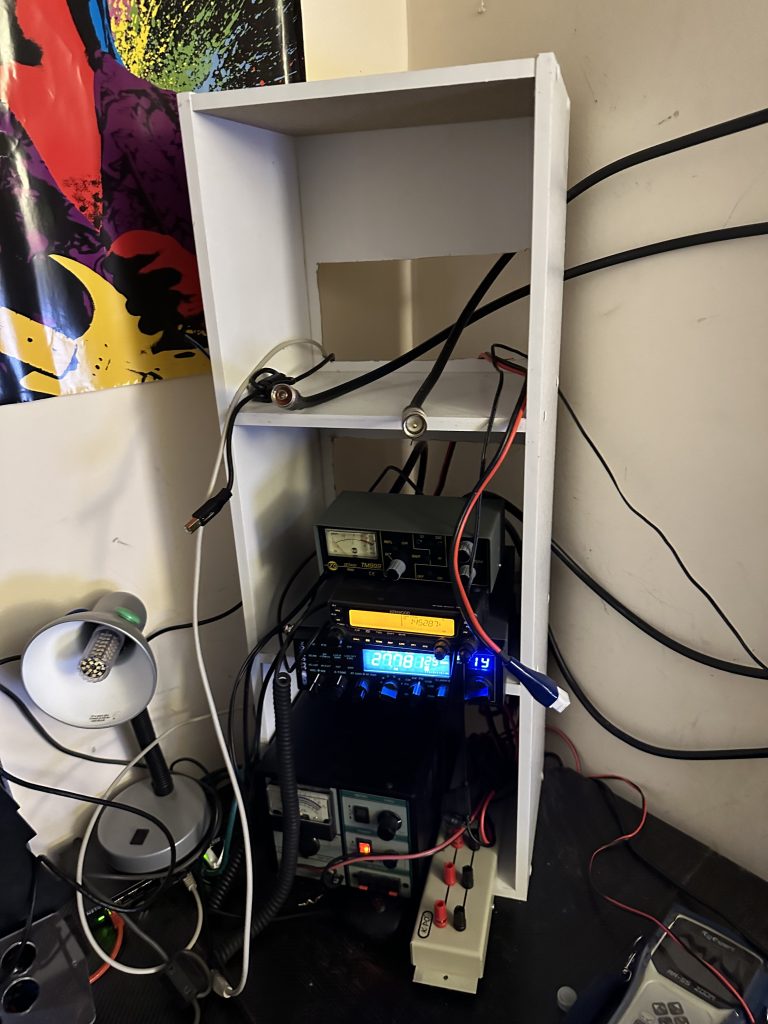
The main transformer now had a nice clearance for its rather noisey fan (my only complain of this transformer, its otherwise done an excellent job) then can start placing the radios in place. I started with my 11m CB+manual antenna matcher, this went in easily enough, and then I placed the Kenwood TH-V71E on top of that. I put all the necessary data/audio cables in place in case I choose to use them, but I’m going to be using this as my main 2m/70cms rig. At the moment its using the Diamond X-9000 which has excellent gain on the 2m and 70cm bands. I am looking forward to trying it out on the G4PRS net on Monday night.
I fed in the very chunky cables for the IC9700. Currently I am running a very simple setup, with no mast head amplifier and direct to the satellite egg-beater antennas. This should become a single feed with a splitter both ends once I put the mast-head amp in place.
9700 and 2M/11M radiosAll the radiosAwaiting the iSS pass
With the radios all connected and the basic setup up and running, I then set about using the IC9700 for what it was really designed, operating satellites. Luck would have it that the ISS would be passing over, not a particularly high elevantion at 22 degrees, but worth a try. I waited for an hour and was pleased to hear QSO’s from all over europe going into and out of the ISS repeater. I manually controlled the doppler, but there was no need to rotate the yagis liked what I used to have to do. First impressions of the non-amplified eggbeaters is very encouraging and I look forward to continue to setup the annteas and systems in the coming weeks.
Sundays weather took a turn for a worse, the best part of the day was used to enjoy some time out the shack and with my XYL. We headed off to the New Forest then to Milford on Sea. In the Bongo I have the Kenwood TM-D710GE which I use for APRS on 2M and scan the other bands, GB3IW used to be on 2M, with amazing coverage, being able to reach as far east as Shoreham/Worthing, it was a good way to make /M and /P contacts (as you’ll see in other posts on the blog). I tried out to reach IW from Milford-on-Sea, but no luck, where ever the repeater is now, its a former shadow of its once great coverage, which probably led to its demise thanks to abuse.
We headed back home and whilst there was spatters of rain, there was a time to get out before the sun went down to make some small progress on the satellite antennas.
I removed the previous horizontal beam and replaced it with the one supplied in the kit. I was careful enough, as the vertical holders are only fibreglass, and it would be unwise to knock them and suffer any undue damage! As I had already had a full day, and the next step would be to start erecting the antenna and horizontal fetelling, decided to call it a day, happy at least that the anteannas are in there temmporary mount.
I’m hoping for some good weather today to at least make sure I can locate the coax and get things in place. My son is due to visit this week, so I will put the antenna vertical with him the first time at least, then I will have a better idea of the effort and how easy it is to get up.
I finished the day with a nice meal of roast lamb, which on a cold, wet and rather miserable evening, was a welcome break.
GB3SU + M0DQO 70cm contact
Further to my lack of 70cm contacts via GB3IW, I had a scan thru the bands at the QTH on the IC9700 today (Monday 13/11/23), I was glad to find GB3SU in Southampton. I monitored for a while and was pleased to hear a call out from M0DQO, who was operating portable on his way to work. It was a good QSO and learned about Chris’s setup, which worked really well being /M via Bluetooth controlled PTT Headset. It was a good start to the day and will put the repeater in the D710 to listen to when I’m out and about in the New Forest or en-route to Guildford.