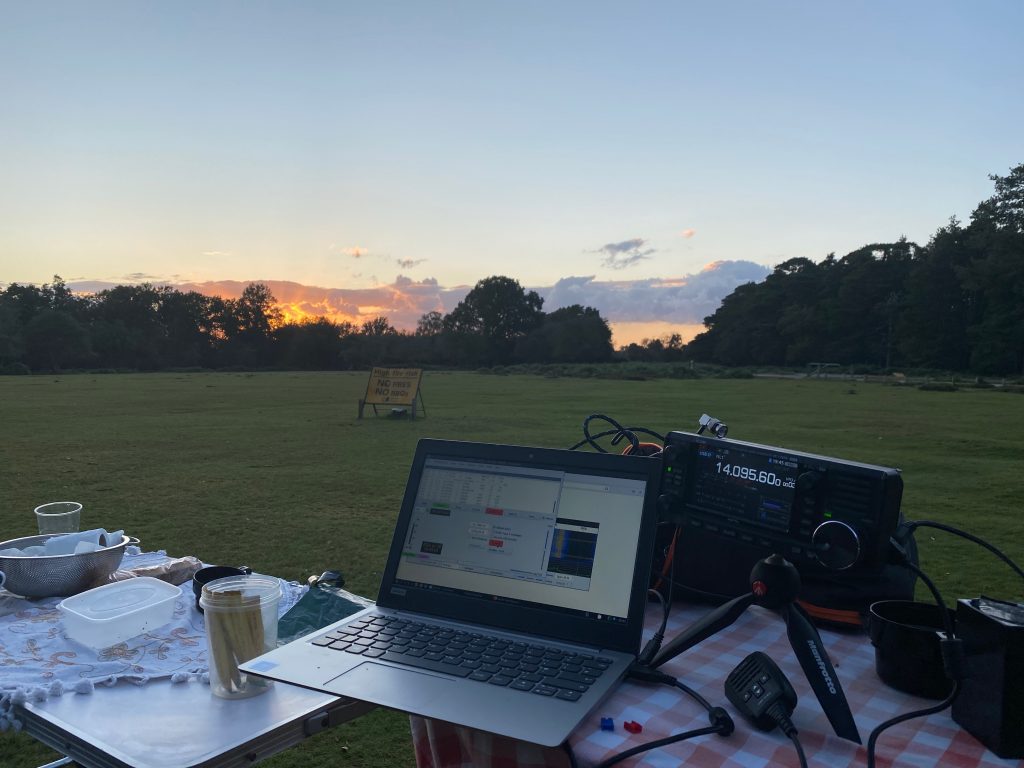
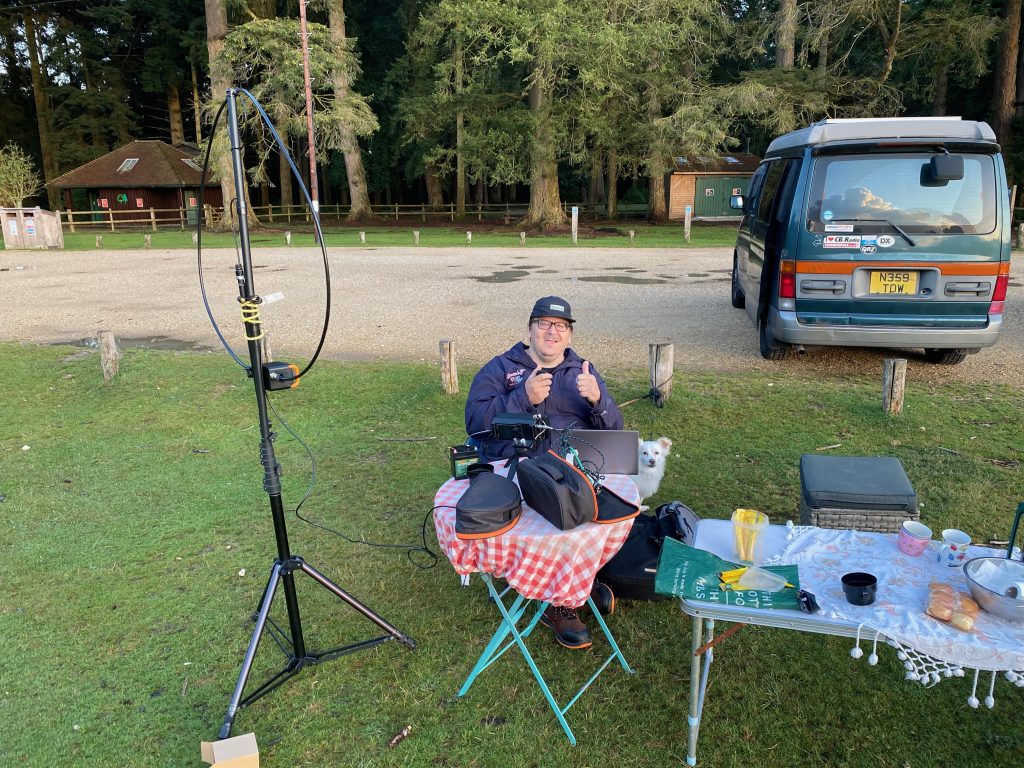
Having owned the IC-705 for quite some months this was my first time to take it portable. With the weather looking slightly dodgy our group of friends headed to Boulderwood in the New Forest.
Our risk taking with the weather was rewarded with a fantastic, albeit slightly cooler than of late, evening in the New Forest.
Portable in the New Forest in Boulderwood
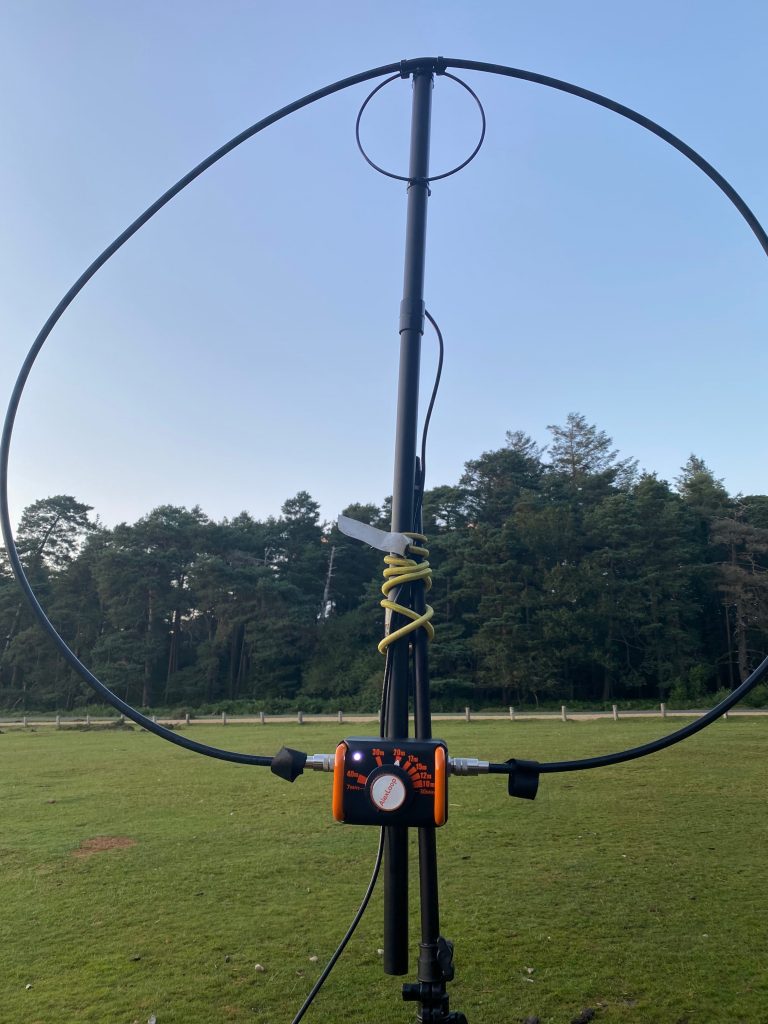
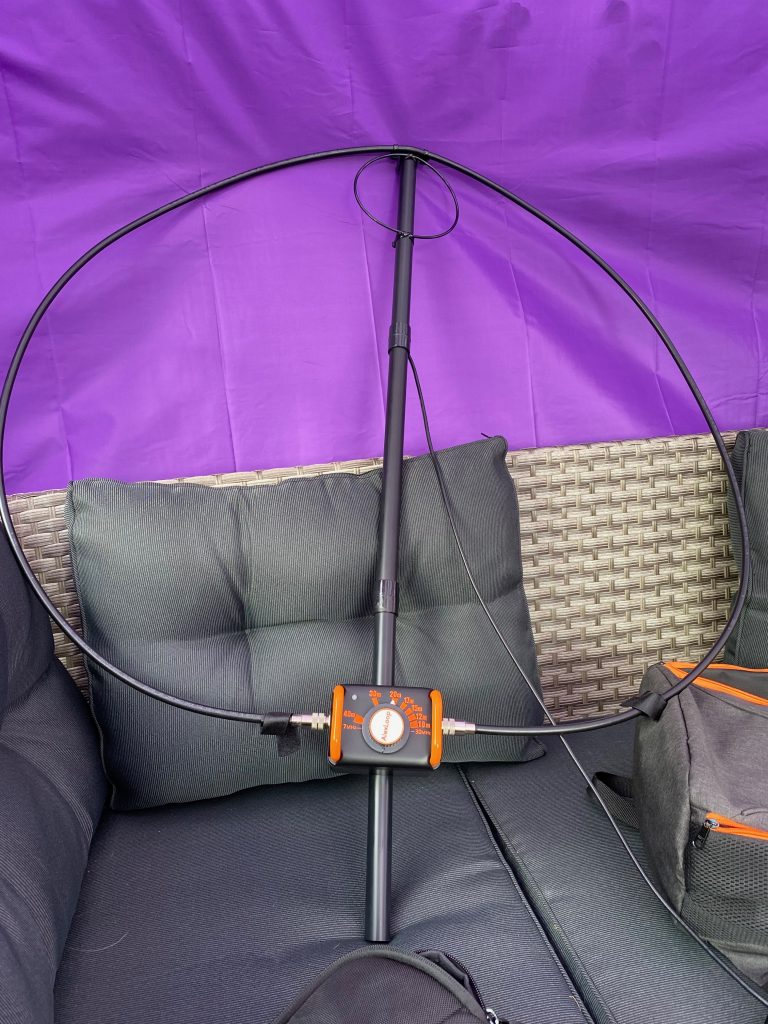
It was great to go with a friend as although the setup was minimal a helping hand was greatly appreciated. I attached my Alexloop Ham Pack antenna to my Buddipole mast with a bungee which done an excellent job of keeping it secure
bungee, buddipole tripod/mast and ALexloop hampack = nice secure setup
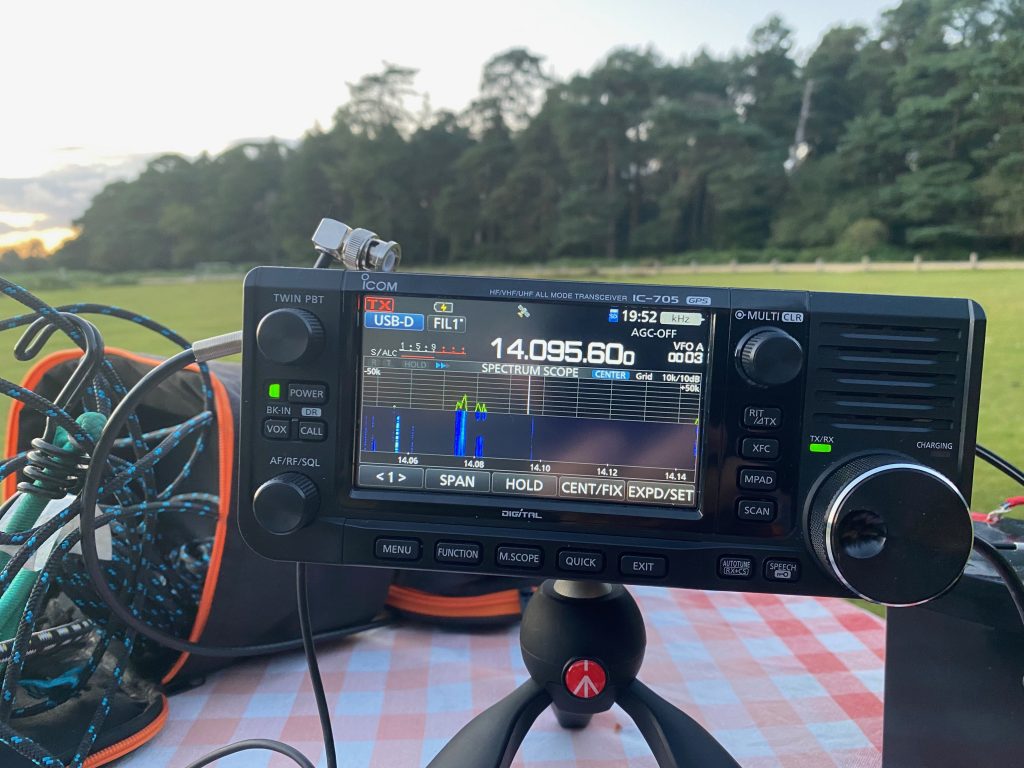
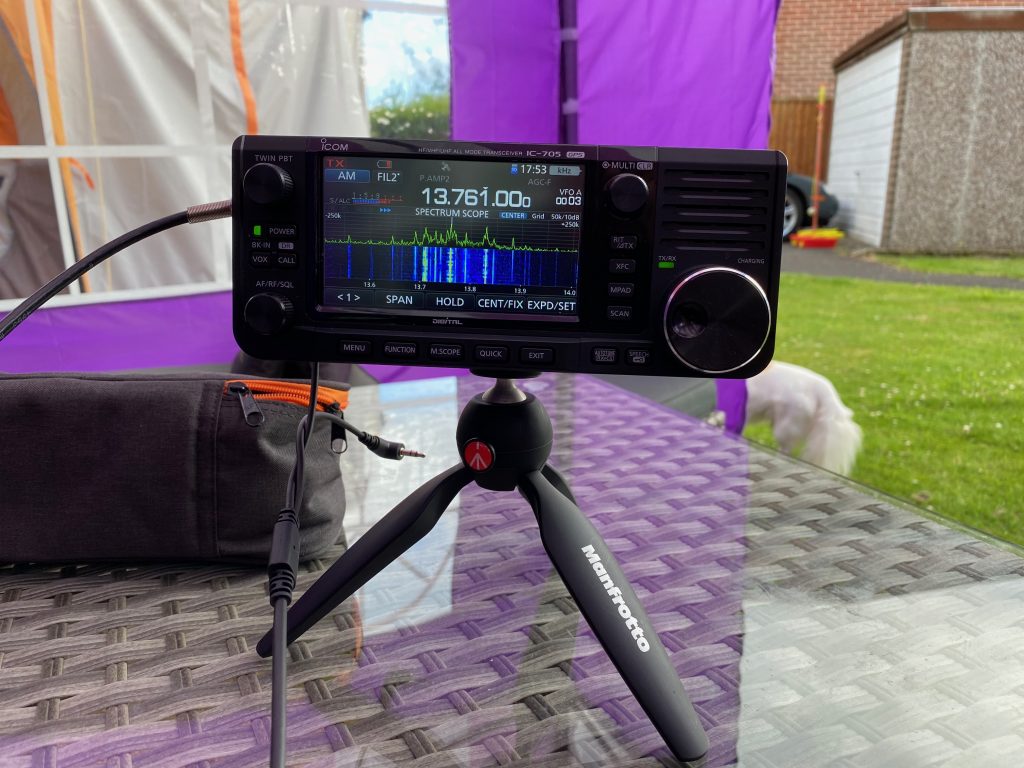
I brought along a couple of fold up tables, one for the ladies ot have their pic-nic on the other for me to setup my radio. I started with just the IC-705 first and tuned to 20m. The quality of the signals away from the QRM of my QTH was simply amazing.
Receive singals where really strong and clear – absence of background noise (QRM)
I did try to reply to the CQ calls, but couldnt get a response this time, but was nethertheless glad to just be trying.
Operating the the Alexloop Ham pack was everything it should be, really easy to tune into the frequency. I was getting SWR of 1.3 to 2 on all the frequencies i tuned. I dare say I could get better as I get more expericned with it, but the gauge on it is fantastic.
Resonence LED in full effect on 20m
As seen in the picture above the LED on the tuning unit shows the power/matching of the antenna to the transceiver. I also used the SWR meter on the IC705. I did bring along my rigexpert (HF) but didnt need it in the end.
Having run 5W on the internal batttery, i then switched to a Lifo battery and got the full 10W portable. My connections to the battery need improvement, but are functional.
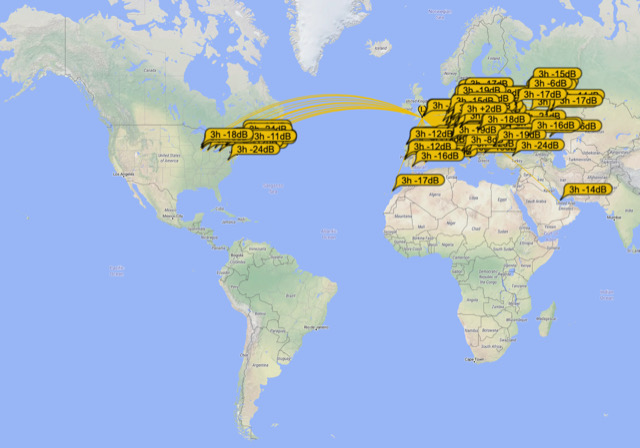
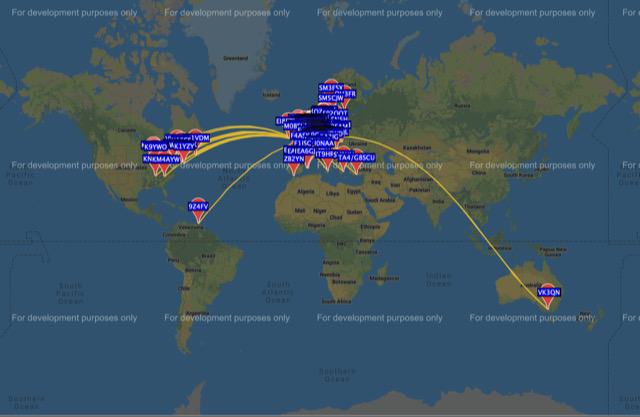
I was able to test FT8, and received plenty of signals from around the world. I explained to my friend how FT8 works and our signals on PSKReporter. It was amazing how far we was getting out on 10W and the Alexloop !
2E0fwe portable from the new forest reaches far !
I was unable to make a contact, but I was still gald to be getting out. I need to learn how to adjust the volume control on my linux laptop, as the signal was overloading, i suspect i missed some DX/RX opputnities.
Next we tried WSPR – with the portable battery it was no problem to keep going. I checked the database and my own site and could see that we was getting out nicely, albeit with 10W which is probably the most power I have ever used on WSPR.
WSPR mobile
I must rememer to update my callsign for Mobile operation next time as I only changed it later in WSJT-X.
After digital modes and with the sun / grey line coming in I made one more try on telephony just calling CQ, but alas no responses. I dont feel disappointed, i had limited time and wanted to make sure we got back home all feeling well and having an enjoyable evening, so packed up. Again having a friend help was great, everything was put away with no damage and easily into my camper van.
This was a great first experience of being portable. I really enjoyed it and am sure to keep on trying and will probably make Boudlerwood my goto place. If you ever see me there, dont be shy and am always happy to talk to people who are interested.
Having a great time in Boudlerwood, New Forest with the IC705 and Alex Hampack
This has really added so much more to this already amazing hobby. I can thorougly recommend portable operation !
Have had a great weekend on SSTV on 20m. Thunderstorms are incoming to QTH in IO90BS so have taken the antenna down for now, but will be back once they pass.
I’ve been able to setup an automated upload. The site is here and can also be found on the tabs of the main site. I’ve also subscribed to World SSTV cams, so other amateur radio users can see their reception at my site easily as well.
I’ll take you thru how I setup the Windows and Linux side.
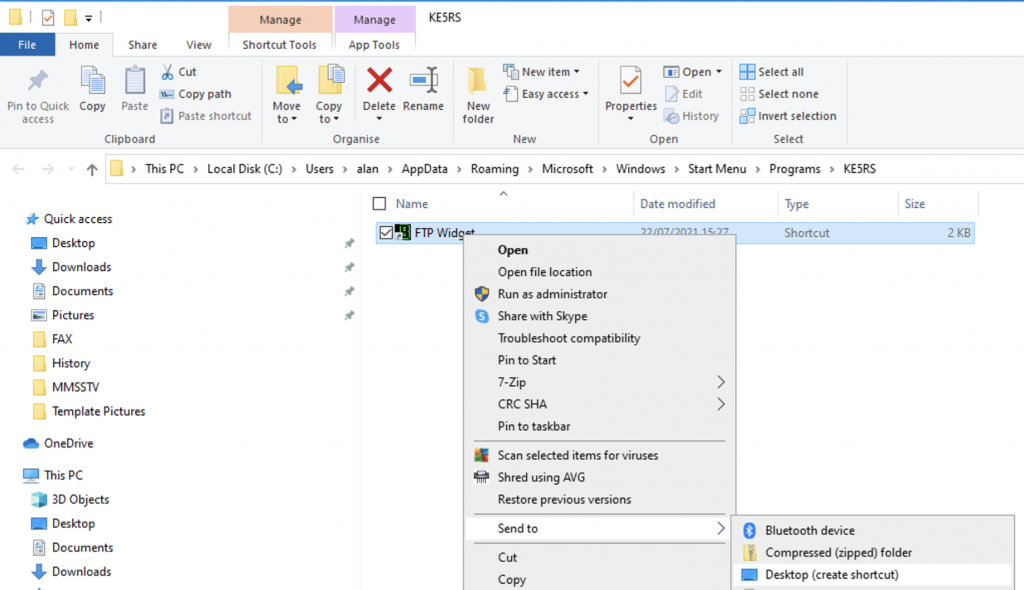
On the Windows host I download and installed KE5RS FTP Widget which is available free with registration info of call/sign location. Run the setup and let it install in the default locations.
The next step on the windows host is to create the local SSTV directory – this is in *addition* to the SSTV images MMSSTV uses.
I opened a command prompt (Start / Run / CMD) and typed the following
cd c:/
mkdir sstvimages
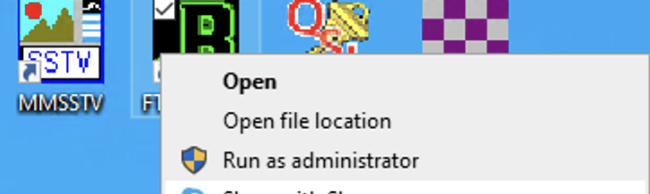
I created a shortcut to the desktop for FTP Widget. This is useful as I found running it as administrator overcome any file permissions issues on the local side. This probably due to the mechanism and file permission settings that MMSTV uses to duplicate the files, running as administrator fixed this.
Create a desktop shortcut, put it next to your MMSTV shortcut if you have one for easy access 🙂
I then run as administrator from the desktop.
run as administrator to avoid permission issuesSelect Properties to open the configuration settingsConfigure the paths
Now if you have not used FTP in the past the cocent of local and remote paths will be new, and each FTP client will have its own interpretation of how to set it. Usually the remote system is a Linux/Unix system and the actual full remote path is typically /home/sstvimagesusename/images but the FTP Widget takes the login from the FTP Server and uses the short path name, in this case images.
You’ll need to set the local drive to the one created in the DOS prompt earlier. In image name properties, only change the name if you really must, this is important as the crude template i will provide below depends on the filenames matching. You’ll also want to keep the Image history to what ever you iike, by default its 3, I upped it to 12 as this gives a better log of the images.
On the Linux side I’m using vsftpd. I dont mind saying that running FTP in 2021 is slightly unusual, most file transfers are done over SSH / SFTP more recently, but FTP still has its purposes.
I would suggest running vsftpd as it has options for TLS/SSL as well as chrooting. ‘chrooting’ is a method of ‘jailing’ a user to their own location, so in the worst case the credentials are discovered, the only space they can easily access is that of their own home directory, not the ntire OS filesystem (old FTPs that allowed system access could easily be used to accessing /var/log/ and from there discovering other usernames and ‘brute forcing’ the credentials).
Here is the full example vfstpd.conf , you dont need all of this, but from the default you can see the deltas.
# Example config file /etc/vsftpd.conf
#
# The default compiled in settings are fairly paranoid. This sample file
# loosens things up a bit, to make the ftp daemon more usable.
# Please see vsftpd.conf.5 for all compiled in defaults.
#
# READ THIS: This example file is NOT an exhaustive list of vsftpd options.
# Please read the vsftpd.conf.5 manual page to get a full idea of vsftpd's
# capabilities.
#
#
# Run standalone?  vsftpd can run either from an inetd or as a standalone
# daemon started from an initscript.
listen=NO
#
# This directive enables listening on IPv6 sockets. By default, listening
# on the IPv6 "any" address (::) will accept connections from both IPv6
# and IPv4 clients. It is not necessary to listen on *both* IPv4 and IPv6
# sockets. If you want that (perhaps because you want to listen on specific
# addresses) then you must run two copies of vsftpd with two configuration
# files.
listen_ipv6=YES
#
# Allow anonymous FTP? (Disabled by default).
anonymous_enable=NO
#
# Uncomment this to allow local users to log in.
local_enable=YES
#
# Uncomment this to enable any form of FTP write command.
write_enable=YES
#
# Default umask for local users is 077. You may wish to change this to 022,
# if your users expect that (022 is used by most other ftpd's)
#local_umask=022
#
# Uncomment this to allow the anonymous FTP user to upload files. This only
# has an effect if the above global write enable is activated. Also, you will
# obviously need to create a directory writable by the FTP user.
#anon_upload_enable=YES
#
# Uncomment this if you want the anonymous FTP user to be able to create
# new directories.
#anon_mkdir_write_enable=YES
#
# Activate directory messages - messages given to remote users when they
# go into a certain directory.
dirmessage_enable=YES
#
# If enabled, vsftpd will display directory listings with the time
# in  your  local  time  zone.  The default is to display GMT. The
# times returned by the MDTM FTP command are also affected by this
# option.
use_localtime=YES
#
# Activate logging of uploads/downloads.
xferlog_enable=YES
#
# Make sure PORT transfer connections originate from port 20 (ftp-data).
connect_from_port_20=YES
#
# If you want, you can arrange for uploaded anonymous files to be owned by
# a different user. Note! Using "root" for uploaded files is not
# recommended!
#chown_uploads=YES
#chown_username=whoever
#
# You may override where the log file goes if you like. The default is shown
# below.
#xferlog_file=/var/log/vsftpd.log
#
# If you want, you can have your log file in standard ftpd xferlog format.
# Note that the default log file location is /var/log/xferlog in this case.
#xferlog_std_format=YES
#
# You may change the default value for timing out an idle session.
#idle_session_timeout=600
#
# You may change the default value for timing out a data connection.
#data_connection_timeout=120
#
# It is recommended that you define on your system a unique user which the
# ftp server can use as a totally isolated and unprivileged user.
#nopriv_user=ftpsecure
#
# Enable this and the server will recognise asynchronous ABOR requests. Not
# recommended for security (the code is non-trivial). Not enabling it,
# however, may confuse older FTP clients.
#async_abor_enable=YES
#
# By default the server will pretend to allow ASCII mode but in fact ignore
# the request. Turn on the below options to have the server actually do ASCII
# mangling on files when in ASCII mode.
# Beware that on some FTP servers, ASCII support allows a denial of service
# attack (DoS) via the command "SIZE /big/file" in ASCII mode. vsftpd
# predicted this attack and has always been safe, reporting the size of the
# raw file.
# ASCII mangling is a horrible feature of the protocol.
#ascii_upload_enable=YES
#ascii_download_enable=YES
#
# You may fully customise the login banner string:
#ftpd_banner=Welcome to blah FTP service.
#
# You may specify a file of disallowed anonymous e-mail addresses. Apparently
# useful for combatting certain DoS attacks.
#deny_email_enable=YES
# (default follows)
#banned_email_file=/etc/vsftpd.banned_emails
#
# You may restrict local users to their home directories.  See the FAQ for
# the possible risks in this before using chroot_local_user or
# chroot_list_enable below.
chroot_local_user=YES
#
# You may specify an explicit list of local users to chroot() to their home
# directory. If chroot_local_user is YES, then this list becomes a list of
# users to NOT chroot().
# (Warning! chroot'ing can be very dangerous. If using chroot, make sure that
# the user does not have write access to the top level directory within the
# chroot)
chroot_local_user=YES
chroot_list_enable=YES
# (default follows)
chroot_list_file=/etc/vsftpd.chroot_list
#
# You may activate the "-R" option to the builtin ls. This is disabled by
# default to avoid remote users being able to cause excessive I/O on large
# sites. However, some broken FTP clients such as "ncftp" and "mirror" assume
# the presence of the "-R" option, so there is a strong case for enabling it.
#ls_recurse_enable=YES
#
# Customization
#
# Some of vsftpd's settings don't fit the filesystem layout by
# default.
#
# This option should be the name of a directory which is empty.  Also, the
# directory should not be writable by the ftp user. This directory is used
# as a secure chroot() jail at times vsftpd does not require filesystem
# access.
secure_chroot_dir=/var/run/vsftpd/empty
#
# This string is the name of the PAM service vsftpd will use.
pam_service_name=vsftpd
#
# This option specifies the location of the RSA certificate to use for SSL
# encrypted connections.
rsa_cert_file=/etc/ssl/private/vsftpd.pem
rsa_private_key_file=/etc/ssl/private/vsftpd.pem
ssl_enable=YES

#
# Uncomment this to indicate that vsftpd use a utf8 filesystem.
#utf8_filesystem=YES
#
force_local_logins_ssl=NO
force_local_data_ssl=NO

#
#
allow_writeable_chroot=YES
Be sure to keep a log of the password, of course you can always reset it, but it makes setting the FTP Widget properties easier.
You will then want to add the HTML template. Now i make no apologies for how awful this HTML is, but it will get you up and running, i’m planning to do redo this in HTML4, CSS and what ever JavaScript is necessary.
You will then need to make your webserver (typically apache) serve home directory content. Rather than re-write the excellent tutorial already provided by Apache, follow this. You may have alternative configurations/different http servers, but Apache is simple and well supported.
With the Unix side complete, its time to finish off the settings for the FTP Widget and SSTV.
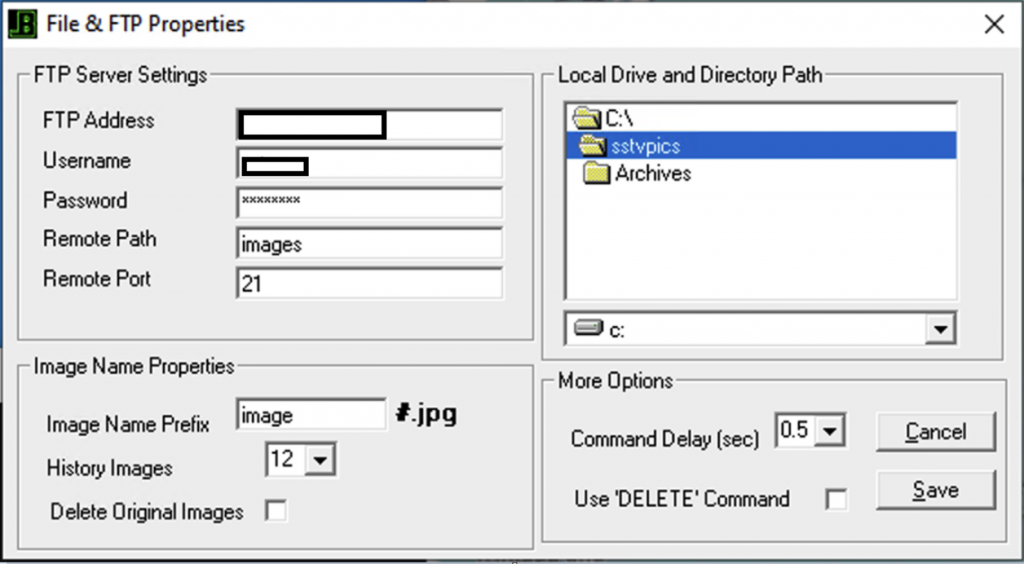
FTP Widget Settings
Follow the settings given above, putting in your FTP address, either the hostname or IP address. i.e. myftpserver.bob52.com, <n>.<n>.<n>.<n>. You don’t ned to put in the URI ( ftp:// ) .
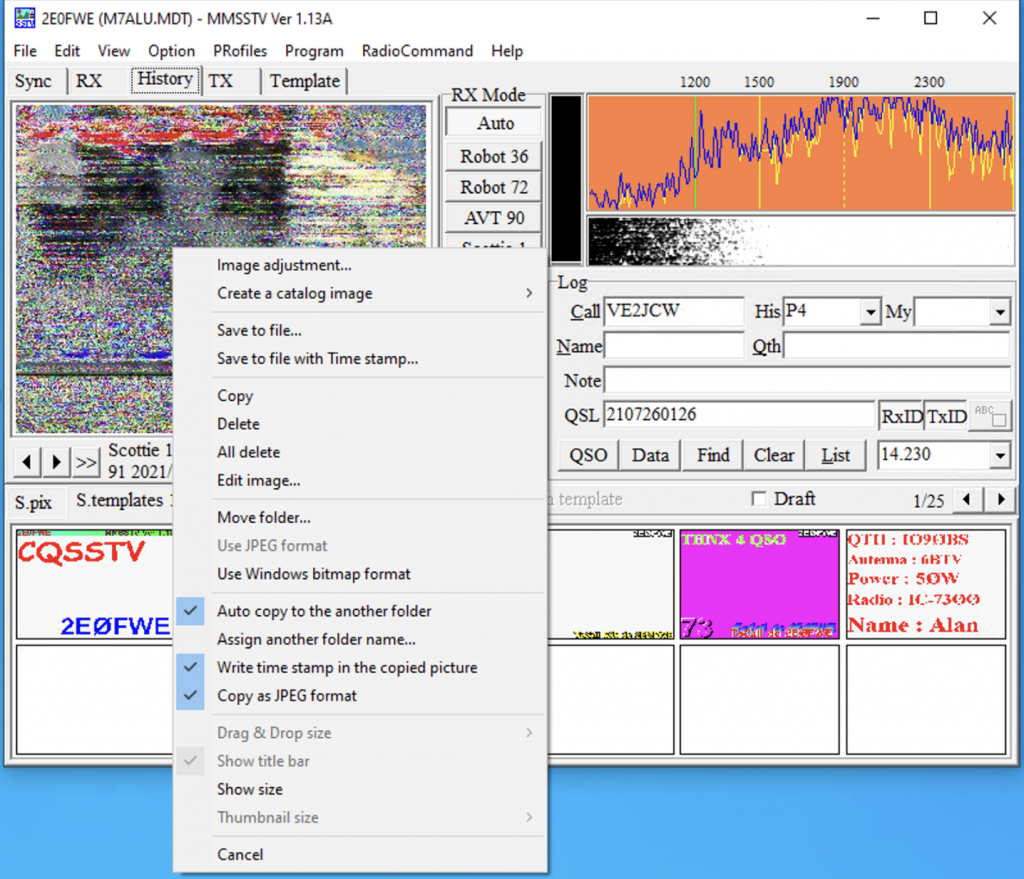
The next step is to configure MMSTV to copy the received files into the FTP SSTVPics directory.
History tab, right click, Auto Copy, Assign another folder name
In SSTV goto the History tab and right click the image, select ‘auto copy to another folder’ and assign the folder name to the SSTV c:\sstvimages directory.
With that your received files will now not only be stored locally, they will be automatically FTP’d to your webserver ! If everything goes well, you’ll end up with a page whereby other SSTV users can see how their images are being received and a nice catalogue of recent images for yourself.
Your own SSTV reception page !
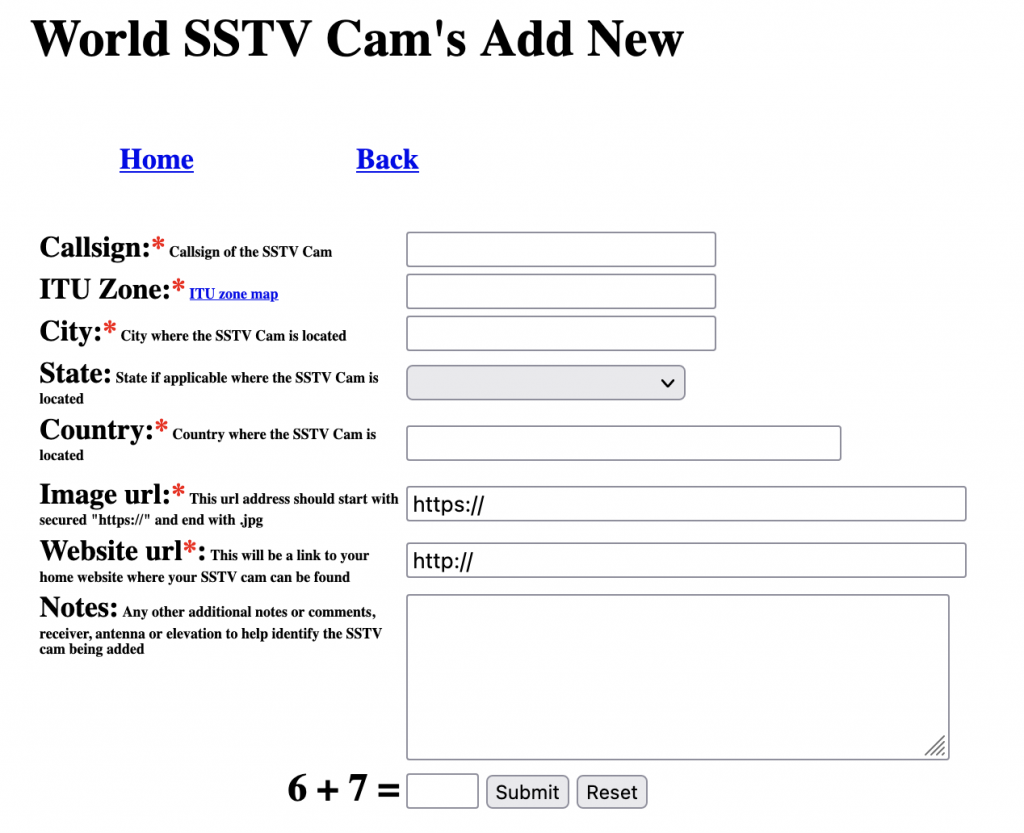
The next optional step is to setup registration with World SSTV Cams.
Complete the fields to add your site
Complete the fields to add your site, and with that your site will be added for the whole world to see with thumb-nail updates of the most recent reception of images !
Welcome to the World SSTV site !
I hope this gets you up and running with the exciting and interesting world of SSTV !
Recently I started to experiment with SSTV (again) on my IC7300 and Windows desktop.
I’ve not been able to get it to work with the band select, but the audio in, out and importantly PTT fine. I saved the main SSTV calling frequency to my IC7300 (14.2300 USB) and just recall that when i want to use SSTV.
I’ve learned to use, but not to rely on, other KiwiSDRs and other sites that scan SSTV images. Most of the time I am seeing one side of the QSO on the remote sites, a good example of this is the slowscan tv site in the Netherlands.
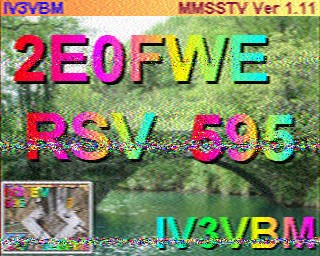
The conditions have been pretty bad lately, but once in a while I get a really good QSO via SSTV, an example from today below with IV3VBM. I’m using 50W into a 6BTV with conditions being reported as ‘poor’
Receive my send respose and my report
Calling on SSTV
73
SSTV QSO Received Images
I am really enjoying SSTV – during the day and overnight I can leave MMSSTV running to receive great pictures, and also look back to see how the propagation has varied. I was amazed to receive these transmissions from the US last night !
receive sstv from US
As you can see the propergation is clear to see as the quality of the pictures vary.
I’m now working out how to automate the upload and ‘most recent’ pictures to the hamradio website, it shouldnt take me long, but as every life is keeping me very busy !
I hope this encourages other users to try out SSTV, its great way of having a digital QSO with personalized content, so why not give it a go.
Where has the year gone, or more accurately where did June go ? Well, having been busy with work, uni and mentoring the month flew by. WIth bad weather alot of the weekends it meant I couldnt get alot of what I wanted to do done, and the time I had was limited. The good news is that alot of my University work for 2020-21 year is complete, I’m just waiting for grades to be finalized. I’ve changed jobs and am glad to say my new role is more suited to me, so Im really enjoying work. I’ve also had a great time mentoring undergrads the past few months, but has made me very busy, but very rewarding – but heres the good news – this weekend I got a number of things on my ‘ham radio’ to-do list done.
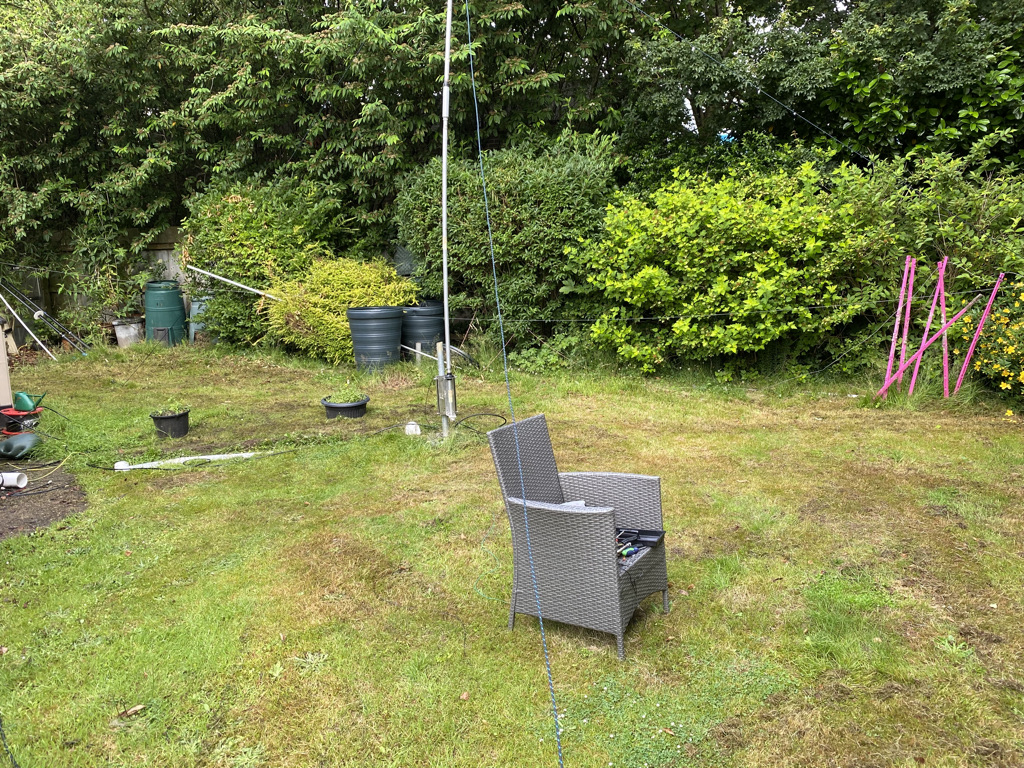
Firstly, I got my IC-705 working in the garden on the Alex-Loop ham-pack. It went really well, although setup wasnt as good as I thought it should be. I’ll do a longer more in-depth write up, but needless to say initial operating was fun and exciting.
Alex Loop hampack antenna
IC705 in the garden
IC-705 in the garden
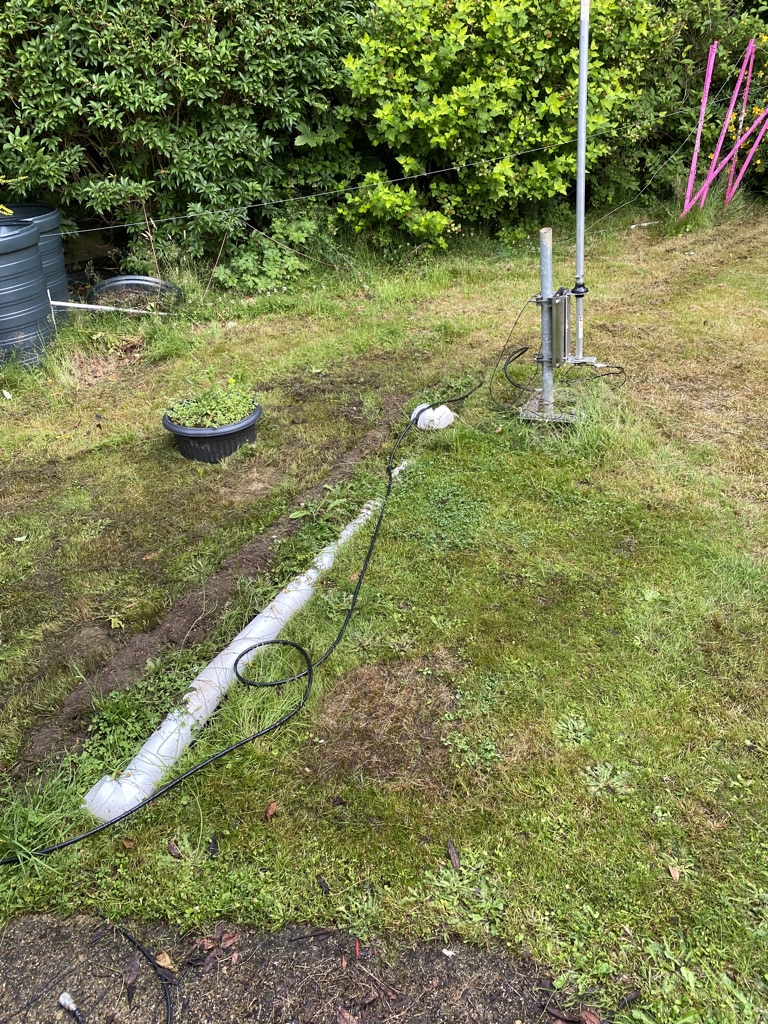
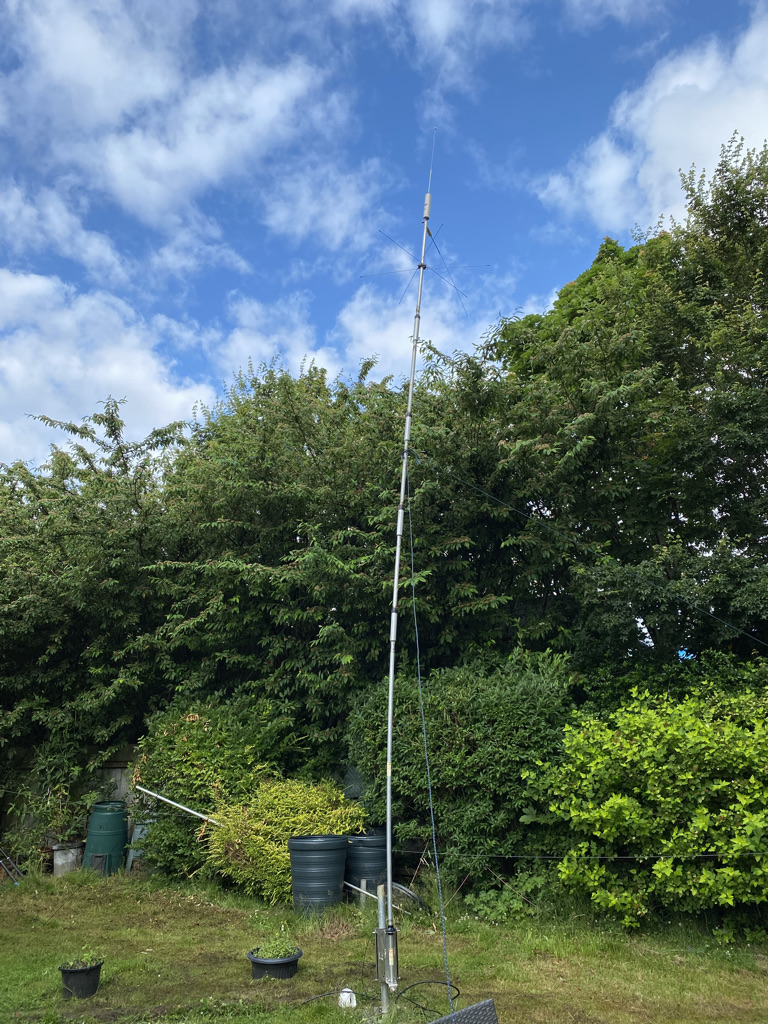
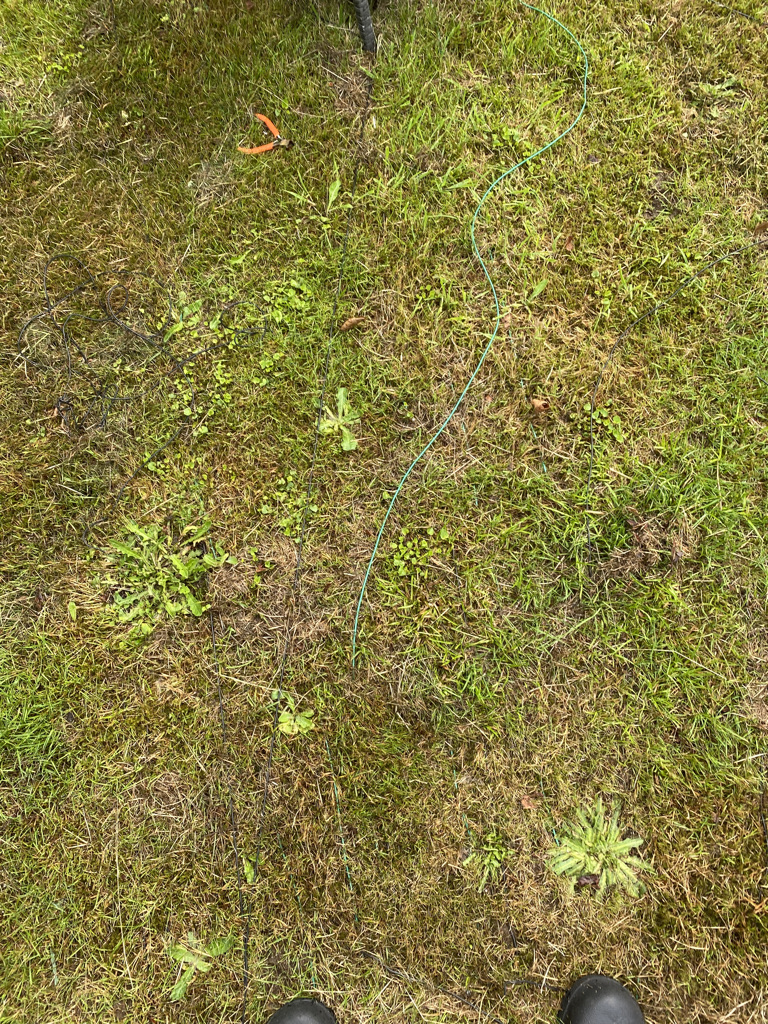
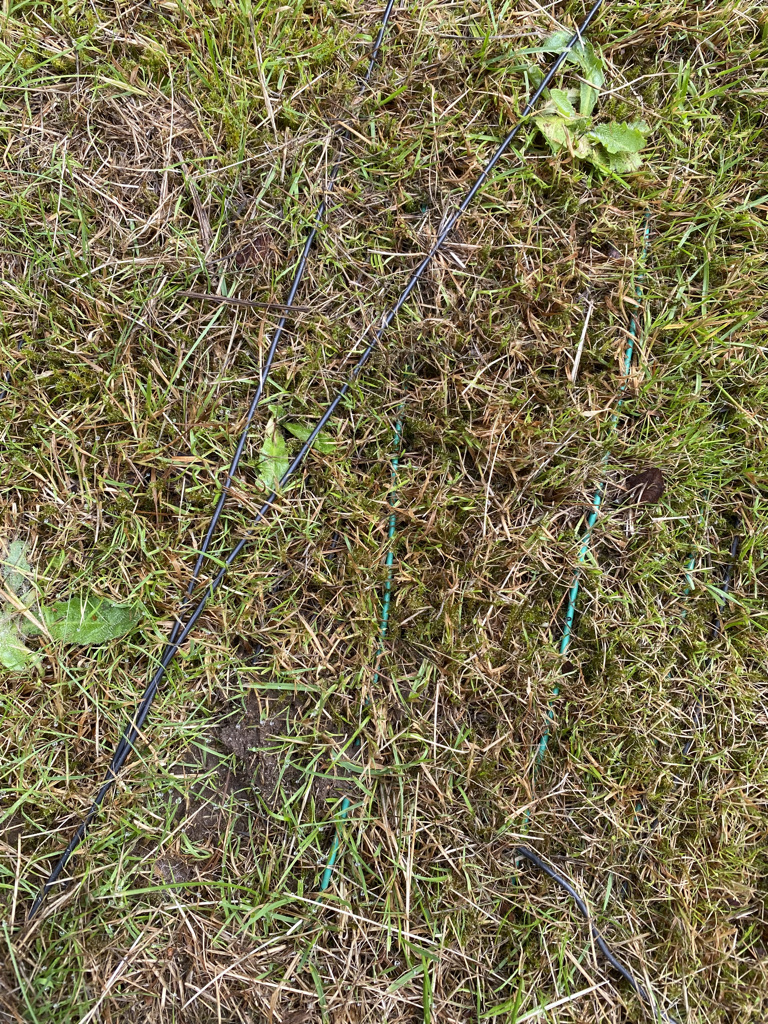
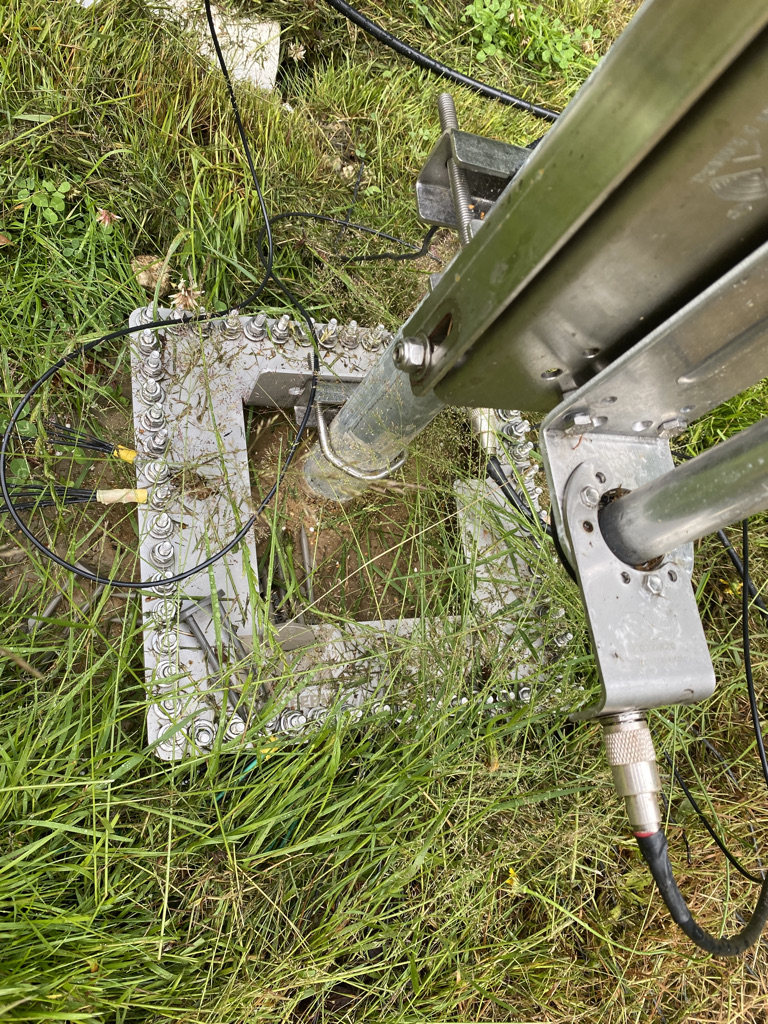
Recently and friend and I mowed the garden, as I had told our gardener to not worry about it for the moment due to the movement of tents and radio equipment out. With all the rain and sunshine the grass grew at a proflific rate ! I first borrowed a friends lawnmower, then got a cheap electric one from amazon that would do the job. I’m glad to say that having mown the antenna area with all the radials down the majority of the radials have stayed down.
radials staying down
I will continue to mow the grass and keep it short, then look at adding more radials with better wire-pins (I have been using plastic ones). I still have some more work to do on the 6BTV to add 17M to it, but hopefully the weather will hold at the weekend, in the mean time I have been enjoying FT8 and SWL, making interesting contacts and getting ever closer to the DX100 award.